

Introduction: Wire Flowers


As Valentine's Day presents for friends, I created wire flowers. The attached message was, "My love for you is like this flower. Undying." I'm not a fan of presenting living flowers as gifts (though I wouldn't protest if I ever get any...) because they eventually die; I guess I'm practical like that, preferring long-term, enduring gifts instead. I also figured out a way to turn the flowers into bookmarks to make them functional; a bit of my utilitarian side coming out.
No skill is necessary for this so they're pretty easy to make. Not only that, but they also look extremely lovely!
Step 1: Materials
- wire (I used 20 gauge wire.)
- pliers
- round, cylindrical object OR round nose pliers
Step 2: First Petal


Curl the tip of your wire around in a circle using a cylindrical object or round nose pliers. Stop when the cut end of the wire reaches around to the rest of the wire, so now you have a petal shape (or teardrop). Then make another bend at where the teardrop ends. The bend's sharpness depends on how many petals you want for the flower; more petals = sharper angle. I wanted 5 petals so the angle is about 72 degrees (360 degrees per circle divided by 5 petals) but just estimate this and adjust later. No need to be perfect now.
Step 3: Second Petal


Curl the wire to form another teardrop shape; this is petal number 2. Make another bend at the bottom of the teardrop to make room for your next petal like before (sorry; no picture of that part).
Step 4: Next Petals


Make another teardrop before bending the wire at the end of that shape to prepare for your next petal. Repeat to create your fourth and fifth petals. You could stop at any number of petals, but I just chose five.
Step 5: Second Layer of Petals


You could stop at one layer of petals (if so, go to step 11), or you can continue on with another layer of petals (petals behind the first layer).
To start your second layer, bend as shown in the picture so that the wire is in between two petals. Then use your round nose pliers or cylindrical object to bend the wire and form another petal. I suggest making these petals a bit larger than before so that a second layer is clearly visible.
Step 6: Next Petals


Bend the wire at the end of that petals like before and position the wire in between the next two petals (from the first layer). Then curve the wire to make another petal.
Repeat those steps until you have five petals in between the first five petals.
Step 7: Wrapping Around to Secure Petals


To secure the petals as they are, bring the wire up and around all the layers. See the pictures above for what I mean.
After doing this, fix the arrangement of the petals and fix the angles between petals now.
Step 8: Curling Petals


To curve the petals upward, just pinch the top of a petal with you pliers and bend upward so that the tip points up. Start with the first layer of petals before doing the second layer too.
Step 9: Leaf: Part 1


You can choose to do the leaf, or not; up to you.
To make a leaf, bend the wire upward like in the first picture. Then curve the wire to resemble a leaf so that the end result looks like the fourth picture above.
Step 10: Leaf: Part 2


Bring that long tail up and around the flower. Then bend that tail downward so that the step looks like one complete line.
Finish by making a tiny loop at the bottom of the flower so it doesn't prick anyone.
Your flower is complete! (or you can go to step 14 for turning this into a bookmark)
Step 11: Alternate Versions


Alternatively, you could have ended at one layer of flowers, done step 7, curled the petals, and gotten a flower like the one in the second or third picture. You could also go with two layers but arrange the larger layer directly behind the first layer as in the second picture.
Step 12: Different Number of Petals


You can do do three petals instead, and have two layers of petals.
Make three petals, with 120 degree angles in between each petal, to finish your first layer. Then bend the wire at the end of the last petal so that the wire is now in between two petals of the first layer. Curve the wire to make a petal for the second layer. Again, I suggest that you make the second layer's petals a bit larger than the first layer's.
Repeat those steps to complete three more petals in the second layer.
Step 13: Securing Petal and Completion


Wrap the wire up and around the stack of petals again like in step 7. Then complete the flower as shown before, curling the petals and creating a leaf if you want.
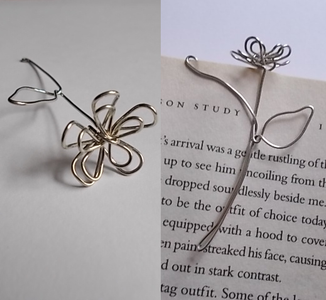
Step 14: Flower Bookmark Version


Here's how to turn these flowers into functional bookmarks.
Start by completing your flower up to step 8 in the previous steps.
Then make a leaf on the right side of the flower as shown in steps 9 and 10 (images 2-4 above).
Determine how long you want the stem to be and bend the wire up at that point (5).
Bend the wire behind and then in front of the stem (7).
Make a loop as shown in image 8 and cut the wire (9). (see picture 8 for which wire needs to be on top)
Bend the excess wire to form another leaf (10-12).
Anyway, I hope you enjoyed my tutorial, and have fun making these!

Participated in the
Full Spectrum Laser Contest

Participated in the
Valentine's Day Contest

Participated in the
Makerlympics Contest


