

Introduction: Wireless All Sky Camera


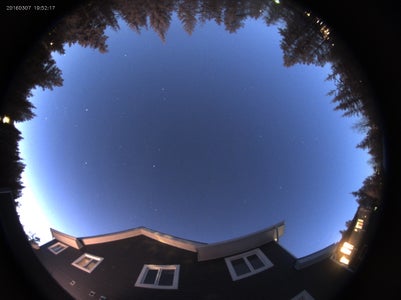
An all sky camera is a device designed to take pictures of the entire sky over a certain amount of time, usually to monitor meteor showers or other astronomical phenomena.
I built mine to monitor the northern lights. I live in the Yukon and we sometimes get beautiful aurora displays during the night. However, I also have a day time job and I need my 8 hours of sleep. I created this camera to record a movie of the entire night. That way, I can replay the movie in the morning and never miss any aurora night.
Step 1: Requirements and Materials

My requirements for this camera are the following:
- needs to photograph most of the sky
- needs high sensitivity to low light
- should be weather proof
- no wires should run to the house
- needs to be autonomous
- needs to create a movie from pictures and upload it to the internet
- needs to start at dusk and stop at dawn
After thinking about it for a while, I decided that the device should include its own computer and send the pictures using wifi. As for the camera, I decided to use an astronomy camera that would be small enough and was powered over USB.
Here's the list of materials:
- ASI224MC camera from ZWO (ASI120MC or MM works too and is cheaper)
- wide angle lens Arecont 1.55 (It gives a wider field of view than the lens that comes with the camera)
- Raspberry Pi 2 (or 3)
- 64 GB micro SD card
- Wifi module (no need if Raspberry Pi 3)
- Short right angle USB cable
- 4" ABS pipe with end caps
- Acrylic dome
I thought about adding a dew heater but after a few month of testing, I never got any frost on the acrylic dome. This is possibly due to the heat produced by the raspberry pi itself.
Step 2: Wiring


In this instructable, I will assume that you already have raspbian installed on the SD card.
The wiring is relatively easy. Plug the USB cable to the camera on one side and the raspberry pi on the other. Plug the wireless dongle into one of the 3 remaining USB ports of the pi. Insert the micro SD card in its slot and plug the raspberry pi to its 5V adapter.
In order to keep things tidy, you can fix your camera and computer onto a plywood board like I did on the picture.
Step 3: Build the Enclosure


The enclosure is made of a 4" ABS pipe, a flat end cap and a threaded end cap with its lid.
The flat cap goes on top and is drilled to the diameter of the camera. The threaded cap goes at the bottom and a hole (for the extension cord) is drilled in the centre of the lid.
The acrylic dome can be fixed onto the top end using weather proof silicone. I used an acrylic ring but it makes things more complex than they need to be.
You can now fix the enclosure onto your deck, your roof or any other location with a good view of the sky.
Step 4: Software

Update: If you need to change the way the capture works, you might have to make changes to the C++ source and compile it on your Raspberry PI. To do this, follow PeterD192's detailed instructions in the comments.
Update 2 (Nov 11th 2016): I have set up a GitHub page with an install script to make things easier for everyone: https://github.com/thomasjacquin/allsky If you use it, you shouldn't have to use any of the following instructions.
Original Instructions:
In order to capture images with the camera, we need to run a program in the terminal. ZWO provides an SDK in order for developers to communicate with the camera. Using this SDK, I modified one of their C++ example and compiled it for the raspberry pi. Here's a list of dependencies that need to be installed in order to get the program running.
- OpenCV to capture the image of the sky (You can get a compiled version here)
- Sunwait to calculate the civil twilight of your location. There is a compiled version in the archive. Make sure you copy it to your path:
sudo cp ~/allsky/sunwait /usr/local/bin - Required dependencies:
sudo apt-get update && sudo apt-get install libusb-dev libav-tools gawk lftp entr imagemagik
To make things easy, I have attached an archive. Extract it at /home/pi/allsky.
From the lib folder, you will need to run this in order to use the camera without being root:
sudo install asi.rules /lib/udev/rules.d
You will also need to add libASICamera2.so to your library:
sudo cp ~/allsky/lib/armv7/libASICamera2* /usr/local/lib
Another thing you will need to do in order to automate everything is to run the main program on startup of the pi. You can open ~/.config/lxsession/LXDE-pi/autostart and add this line:
@xterm -hold -e ~/allsky/allsky.sh
Remember to set your wifi connection in order for the pi to upload videos.
allsky.sh contains all the parameters you might want to play with: GPS coordinate, white balance, exposure and gain.
Attachments

Step 5: Collect Images


Now that the raspberry pi is ready, you can plug your all sky camera. The startup script should call allsky.sh which in turn calls the binary file named "capture". It will determine if it's day time or night time. In case it's night time, the capture will start and take a picture every 5 seconds (or whatever value you set in allsky.sh). At the end of the night, the capture will stop and avconv will stitch them together and upload a video to your website using FTP.
Step 6: Watch Your Time Lapse Videos
The video produced by avconv should weigh between 30 and 50 mb depending on the length of the night (here in the Yukon, we can get from 18 hours to 0 hours of night time) and should be viewable on any web browser.
In the event that you find something interesting in the video, you can access the individual images on the raspberry pi. They will be in a folder named after yesterday's date.
Here's a page showing my own videos with almost all night archived starting January 18th 2016. Some have beautiful northern light, others have clouds, snow or rain.

First Prize in the
Space Contest 2016

Participated in the
Makerspace Contest


