

Introduction: Wooden Cellphone Stand With Hidden Wireless Charging


One of the things I've really wanted to do for a while was get a wireless charger for my phone and then build something interesting to house it in. The idea was to incorporate the charger into the construct in such a way that it would be completely hidden. There are several pieces of furniture on the market that do this sort of thing (one example that comes to mind is the night tables from Ikea), but mine had to also hold the phone up at an angle so I could have a clock app running and turn into into an alarm clock.
Several searches online turned up ideas similar to what I've built, so the design of this piece is roughly based on things I've seen elsewhere. My twist on it is the addition of the charger in the back, and installing it in such a way that just dropping the phone into its cradle (regardless of the angle) will start charging it..
A few notes about wireless charging:
1. First of all, not all phones support it. Before getting into this, check your owner's manual to see if it does.
2. The range of the charger is very limited (the one I used has about 4mm). This means that the phone has to be extremely close to the charger in order for the juice to flow. If you use a phone cover the effective distance is reduced even further, so you need to make some careful measuring in order to avoid removing too much material from the stand and essentially punching a hole right through it.
3. Depending on your model, the charger may have to be located under a different part of the phone in order for it to work. In my case I'm using a Nexus 5, and the charger needs to be centered behind it. Keep this in mind when figuring out where to make your cuts.
Step 1: Tools and Materials


The main materials in this project are wood of your choice (I went with some 2"x6" pine left over from another project) and the wireless charger.
The charger I picked up is a PowerBot (http://www.soundbot.com/products/copy-of-powerbot-...), which you can find on places like Amazon or eBay for about $15. It's a fairly small device (about 0.5" thick by 3" in diameter), comes with a micro USB cable that plugs into any regular USB outlet (e.g. on the wall, in a laptop, etc) and just needs to be plugged in to work.
Tools - you'll definitely need a few of these. You'll need:
* a compass
* a jigsaw to cut the shapes and templates out,
* a router and straight bit to carve out the recesses for the phone and charger,
* spare MDF or plywood to make the templates for the router,
* sanding tools (I used a belt and orbital sander as well as a Dremel with a sanding head, files and sandpaper),
* chisels
* caliper (this one's a must to properly gauge the depth of your recessed cuts),
* depending on the finish you're going for, a propane torch, stain, varnish, etc.
* hot glue gun
Step 2: Design and First Cuts


The first thing you'll want to do is figure out the overall size of the stand. Considering that I wanted the phone to be completely inside it, I ended up going for a piece that was roughly 1'x1' and eyeballing the position of the phone a bit to the right.
I positioned the phone such that when it is vertical its top and bottom edges would be equidistant from the top and bottom of the wood, and when turned 90 degrees I would have the same distance from the right edge. Once that was done, I marked the phone's position and took it off. Next step was to find the center point of those measurements and then use the compass to trace a circle that passed a little beyond the size of the phone (I gave it an extra bit just to ensure the phone would not have a tight fit and be easy to take in and out).
Once the front is done, it's time to move to the back. You'll need to locate the exact same center point on the back side, and to do this I measured the distance from the center to the top and to the right of the wood, and then repeated those measurements on the back. With the back's center found, I traced a circle that was about 0.5" inch wider than the diameter of the charger, again with the intention of making it easy to install or remove it later. The charger will eventually be hot glued to the wood so it's easy to remove, but still - you never know.
With both circles drawn, you now need to create the templates that will let you carve these circles out with the router. To do that, lay your router on the wood and position it such that the bit is touching the inside edge of the circle. This is the farthest you'll want the router to travel (any farther and you'll be cutting outside of the circle). Using a pencil, mark the furthest position of the router's base on the wood and remove the router. Now measure from the center of the circle to this last mark you made, and there's the diameter for the template you have to make. Draw this circle on a sheet of MDF, cut it out, and repeat the whole procedure for the second circle. You now have your templates ready.
Once you have the templates, you can start cutting the recesses out. Center the template around the recess you're going to cut into, extend the router's bit about 0.25", and remove a layer of wood by moving the router around inside the template. When done, extend the bit a little further, remove another layer, etc.
Now, the tricky thing is cutting until there's only a very thin amount of wood left separating the two sides so that the charger can work but remain invisible from the front. In my case the thickness of that remaining piece ended up being about 1/16", and by holding the piece up against a light source I could actually see the light through it. Checking for an even lighting in this area also helped confirm that the depth was uniform.
So, measuring the depths is critical, and this is where the calipers come in. Measure the overall thickness of the wood, subtract 1/16", and there's how much material to remove. In my case I also wanted the phone's surface to be flush with the surface of the wood, which meant that the front recess was only as deep as the phone. The rest of the material to be removed was then taken from the charger's recess.
I cleared the phone's recess first, moved to the back one, and then kept on clearing material (and measuring the depth of the recess after every cut) until I was about 4/16" away from the other side, and then started creeping up on the cut. To do this, I found two pieces of gutter strapping that was 1/16" in thickness (to be used as spacers) and laid them on the surface of the wood, on either side of the charger's recess. I loosened the router's depth lock, lowered it into the recess (while sitting on top of the spacers), and tightened the lock. By removing the spacers I then had the router set to remove another 1/16" or material, and I repeated this process until I could start seeing the light through the thin layer of material in between the recesses. At this point I also started putting the charger and the phone into their recesses to see when the phone starts charging. It's a bit of a repetitive task, but if you take is slowly and going by small increments you eventually get there.
The last thing here is to carve out a channel next to the charger's recess for the cable to follow, and I just put it a basic sloping recess that was cleared out with a pair of chisels.
Once you're able to put the phone and charger into the stand and get the phone to charge, you're ready to draw the final shape of the stand, cut it out and get all the rough finishing done (e.g. belt sanding, filing along the edges, etc).
Step 3: Making the Legs


The legs are pretty straight forward, and are reminiscent of pontoons. They are simple rectangles with an angled slot in which the main piece sits.
To start off, I drew the rough outline of what I wanted on a piece of cardboard, laid the main piece on it at the angle I liked, and then cut it out. After trimming it and getting it right, I used it to trace a second piece, cut that one out as well, and then inserted the main wood piece to see how it all fit. Doing this trial-and-error process with cardboard is very easy and quick, and you can go through several iterations until you find something you like.
Once the cardboard pieces looked right, I traced them on to a fresh piece of lumber, cut them out, and spent the next few minutes adjusting the shape with a chisel, belt sander and sandpaper.
After this it was pretty much on to the home stretch. Next up was sanding and the finishing touches, as well as the final assembly.
Step 4: Sanding, Assembly and Final Touches


Sanding is one of the most tedious and long steps in any woodworking project, but if you take your time and go through several grits of sandpaper it really makes a difference.
The shapes of the main piece and legs were already finalized at this point, so I only used the orbital sander as some hand sanding to get everything perfectly smooth. I started of with a 40 grit, moved on to 80 and finally 120, and the end result could not have been any smoother.
When all the sanding was complete, it was time for the glue-up (just smear some glue into the legs, attach firmly to the main piece and let dry overnight).
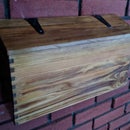
Next it was time for some color. The look I was going for was a bit of an antique one that I had already used on my bookshelf (https://www.instructables.com/id/Copper-and-Torched...), so I won't go into too many details here. Very briefly, the idea is to use a propane torch and do light passes over the wood until it darkens to your taste. When done, apply a wood stain, let it dry, and then follow up with three layers of a protective varnish (letting the individual layers dry for a few hours and sanding them before applying the next one).
The final step - hot gluing the charger. Just put a dab of hot glue on the front of the charger, stick it into the recess, and voila - you've got your wooden phone stand with a built-in wireless charger all ready to go.
Enjoy :)


