

Introduction: Woodworking: Making Wood Projects Without Using Nails, Screws, or Glue.


Make knock-apart shelves, hinges, latches, books, chairs, cabinets, spice containers, doors, desks, and toolboxes using only wood to hold them together. Almost any wood project can be made without using any metal fasteners or glue. This instructable details the techniques and tools I have successfully used over the years to do this.
So, rather than just showing a single project, I will demonstrate a system of fairly simple woodworking joints that you can use to create your own wood projects. Best of all, all the projects featured here can be entirely made with hand tools (although power tools will make it go faster and easier).
Woodworking without metal or glue is of course nothing new. Colonial Americans, Japanese woodworkers and even the ancient Egyptians and Chinese developed all kinds of ways to fasten wood together using only the wood itself. Sometimes, we can discover our future in the past.
Advantages to all-wood woodworking
1-Using these age old techniques, you can save on the cost of fasteners and expensive power tools.
2-Most projects can be easily taken apart for shipping or transport.
3-All-wood joints and fasteners allow for the wood to move with seasonal shrinkage and expansion. Nails and screws hold the wood fast, allowing little movement which eventually cracks the wood around the metal fastener. The movement of the wood, moisture, and the deterioration of glue will eventually
loosen any glued wood joint.
4-When done properly, projects made entirely of wood, can last as long as the wood, which can be more than a thousand years. If you want to build quickly for yourself, use nails, screws, and glue. If you want to build for your children and grandchildren and beyond--you might try using wood-only joinery.
Below are a few example of things I have made without glue or metal. Read the next few steps to see more project examples and details on how they can be made.
pic 1 shows a cantilevered chair made out of Phillipine mahogany.
Pic 2 is a cabinet of pine and cedar.
Pic 3 is a wood book made of cedar with a walnut hinge.
Pic 4 is a spice rack of cedar and aspen.
Pic 5 is a stool made of walnut and alder.
Step 1: Hand Tools and Power Tools


All of the projects pictured in this instructable were designed and made by me using only hand tools. At the time, my solar-electric powered workshop had not yet been built and I wanted to see if I could learn to use traditional techniques and tools. Since then, I have acquired some very impressive battery powered tools that would have made the process go much faster. The newer battery powered tools have improved tremendously in power and affordability and I would highly recommend them. They are often as good or better than the AC power tools. And they are easily solar powered.
Pic 6- Hand tools necessary to do these projects:
A-Ryobi Japanese hand saw-Useful for rips and crosscuts. An American saw will also work fine.
B-Pencil and marking knife-While a pencil is useful for marking most cuts, a knife (such as an x-acto) is more precise for precision cuts and joinery.
C-Layout square-Almost any square can be used for this, but the Japanese square pictured is thin, light, and elegantly precise.
D-Sandpaper-If you cannot plane it or chisel it, then sandpaper is the only option for a smooth wood surface.
E-Brace and bit and drill bits. Works fine and fast for most holes but a power drill is somewhat faster.
F-For striking a chisel a wooden mallet is best, but almost any hammer will also work.
G-Block Plane- used for planing the edges of boards. If really sharp, it can also be used to plane end grain.
H-Tape measure
I-I prefer a Japanese water stone, but the newer diamond stones work just fine.
J-Clamp for holding down wood while you cut it or chisel it.
K-Set of chisels to cut mortises or smooth edges of wood.
Pic 7- Optional tools that I used to create a better finish:
A-Adze-Useful for rough carving of chair seats.
B-Slightly curved gouge used to clean up flat surfaces, large paring chisel used to bevel edges, and gouge used to clean up around knots where a chisel or plane cannot go.
C-Japanese double curved plane-used to smooth out chair seats and other
concave surfaces after the adze has been used.
D-Coping saw- used for tight curved cuts. A power Jigsaw can replace it.
E-Bow saw or frame saw. This is one I made using an inexpensive saw blade (about $10). Used for cutting chair legs and other curved cuts.
F-Dozuki Japanese saw, used for dovetail and other delicate, precise cuts.
Pic 8- Power tools that are very useful:
A-Random Orbit sander-used for final sanding finish.
B-Battery powered jigsaw-Can be used for cutting mortises and curved chair legs. With the 4-3/8" blade shown, I have successfully cut curves on 4" thick beams.
C-Belt sander for rough smoothing.
D-Circular saw for straight cuts. The 18 volt and up saws are quite powerful.
E-Battery powered drill for holes of all sizes.
F-Router-(not pictured)good for sliding dovetails and mortises.
Good Sources for woodworking hand tools:
http://www.frogwoodtools.com
http://www.highlandwoodworking.com
http://www.japanwoodworker.com/
Step 2: Four Simple Woodworking Joints

Here (Pic 9) are the 4 main joints that you can use to make everything from shelves to rocking chairs.
A-Wedged Mortise and Tenon Joints
Pic 9-A A tenon is usually a round or square piece of wood that goes partially or all the way through a hole cut into another piece of wood. Here you see a square tenon.
Pic 9-B-Sliding Dovetail
The sliding dovetail is useful for braces on doors or for attaching chair legs to chair feet and chair legs to chair or stool seats.
Pic 9-C-Dado Groove
Groove joints are often used to catch the ends of shelf boards to make them stronger. They can also be used to hold chair seats on legs and to hold splines between boards. They are used anywhere you want to keep a board from twisting or to make a stronger joint that will hold more weight.
Pic 9-D-Dowel Joint
Dowels of various sizes can be used to connect boards side to side to create counter tops, wider shelves, and chair or stool seats. They can also be used at the end of a board to attach it to an upright for shelves.
See the next few steps to see how to make them and examples of how they are used.
Step 3: Making a Mortise and Tenon


Pic 10A-Begin by laying out the tenon. For 3/4" thick wood a tenon about 1" to 2" wide usually works well. Make the tenon longer than you think you will need as sometimes it is best to have it protrude longer to get good design proportions.
B- Cut the tenon.
C- Use the cut tenon to layout the mortise and then use a square to transfer the layout to the other side. Drill the largest size hole that will fit within the layout. Don't drill all the way through as it will splinter out the back side. Drill over half way and then flip the board and drill from the other side.
D-Outline the mortise by angling a chisel on the pencil lines and give a single whack with hammer or mallet. This will keep the edges from splintering out as you chisel out the mortise.
Pic 11E-Hammer and chisel the hole square. A faster and easier way is to drill the hole and then use an power jig saw. The battery powered ones work quite well for this. If you want precision (what serious woodworker wouldnt want precision?) then cut shy of the line and use a chisel to get you right at the line for a tight and lasting joint.
F-Adjust the mortise until the tenon fits through snugly and then pencil mark the edge of the upright onto the tenon.
G-Drill an angled hole the size of your dowel (1/4"to 3/8").
H-Use a chisel to pare a dowel into a wedge. Leave the dowel extra long until you have a good fit that will wedge the tenon tight to the mortise and then cut the dowel wedge to lenth.
pic 12-Shows the finished tenon
See also Pic 14
Doweled Tenon (Pic 13)
An even easier way is to use a dowel 5/8" to 1" in diameter as the tenon. The tenon is locked to the board it protrudes from with a 1/4" lock dowel that intersects it. You can then drill a hole the same size as the tenon dowel for the mortise. Such a joint will tend to rotate. So it is usually a good idea to also dado the seat board or shelf to prevent this.
Step 4: Making a Dado Groove

Pic 15A-Layout the groove, marking it 1/8" to 1/2" deep depending on how much weight it will hold.
B-Clamp a square cut block onto the board to keep your cut perpendicular.
C-After sawing both sides, hammer and chisel down to the bottom line.
D-Finished dado groove.
An easier way to cut the dado is to use a table saw with a dado blade. A router with a flat bottom bit also works well.
Step 5: Making a Sliding Dovetail


Pic 16A-Layout the dovetail so that it tapers in both directions. An edge angle of 3 to 5 degrees usually works well.
B-Cut the dovetail out and then sand or plane the edges until they are straight and smooth.
C-Use the dovetail sides to guide the saw at the right angle to cut the dovetail groove.
D-Chisel out the groove and adjust the dovetail until it slides in and fits snugly.
Pic 17 shows the finished sliding dovetail.
Pic 18 and 19 show how a dovetail was used to create a leg joint on a work chair that tightens as more weight is put on it.
Step 6: Making a Dowel Joint


Dowels can be used to connect two boards side to side together to create wider shelves or chair seats (Pic 20)or workbench counter tops. 1/2" to 3/4" dowels connect the boards together and are held in place by 1/4" lock dowels. Since dowels are usually pretty dry and wood is somewhat wet they tend to swell up and stay in place without glue. So you can consider this a permanent joint that will not come apart easily. You will usually have to drill out the lock dowels to get it apart.
Pic 21-I usually leave a 1/8" to 1/2" crud gap between the two boards to allow dust and junk to fall through. If you try and make the joint totally tight, it tends to gunk up.
Step 7: Making Simple Wooden Hinges


Door Hinges (Pic 22)
Very nice cabinet and full size door hinges can be easily made with wooden dowels. They can be partially or completely hidden allowing for very clean designs in cabinet doors. A dowel pin is inserted into holes drilled into the top and bottom of a door. The pins then go into holes drilled into the top of the door frame and the bottom of the door sill.
Pic 23 shows the bottom of a cabinet door with a hidden top pin and an access hole that is use to install the lower pin. The lower pin goes through a plastic washer which acts as a bearing and can be cut out of any thin plastic. The pins were rubbed with beeswax to reduce friction, but candle wax works also.
I was at first worried that the birch dowels (the kind you find in most hardware stores) would wear out the bearing holes since they are a hard wood rubbing against often softer wood (pine, fir or Cedar). It turned out not to be a problem. My front door (Pic 26) has 1" dowels top and bottom and my cabinet doors have 1/4" dowels. None of the dowels have shown significant wear after more than twenty years of daily use. For larger doors, like the front door, I set it on a hardwood bearing made out of oak or walnut.
Book hinges (Pic 3 and Pic 24)
Pic shows a photo book I made with hinges entirely of wood. Two dowels pivot on each hinge to allow the book to fully open. I did cheat and use metal D rings held in place by three removable screws to allow me to easily remove or add pages. But the same thing could have been done using leather or rope loops to attach the pages. Pic 25 shows the details of the hinge.
Step 8: Making Wooden Latches


Door Latches (Pic 28)
Simple door latches can be made using just two dowels. A 3/4" to 1" dowel is inserted through the door. A 1/4" dowel is drilled into the handle dowels to make the latch. Pic 29 shows the door closed and latched into a groove cut into a block in the door frame.
Pic 29 and Pic 30 shows a spring catch that uses thin oak as a spring. A wooden door knob on one side and a lever on the other activates the latch. I did cheat and use some screws to hold some of the pieces onto a door that was fastened with screws.
Step 9: Cabinets


Pic 2 shows a cabinet that is made entirely with all wood joints. Dowel hinges are used. The doors are held together with juniper branches that were carved in the shape of a nail. A dowel wedge holds the joints together.
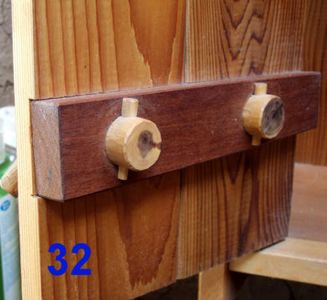
Pic 31 and Pic 32 shows the door pull and wooden nails that hold the sliding dovetail brace that holds the doors together. Pic 33 shows the juniper pegs that were carved and wedged to hold the doors together.
Pic 34 shows a standing cabinet.
Pic 35 shows a kitchen cabinet.
Step 10: Chairs


Building a chair is perhaps the ultimate woodworking challenge. A chair holds a lot of weight, even with a normal person. The joints that hold the seat to the legs are fairly small and have to be precise and strong or they will eventually loosen and fail.
The chair seats are held together with dowels and hand carved with an adze and a curved plane.
Pic 36- Walnut and Alder rocking chair
Pic 37- Oak and Cherry work chair. The back pivots on two dowel tenons allowing one to sit upright to type or slouch at a steeper angle.
Pic 37-Cantilevered dining chair of Phillipine mahogany. Pic 39 and Pic 40 show details of the chair.
Step 11: Stools


Pic 41, 42, and 5 are some stools I made using mostly doweled mortise and tenon joints to hold the legs onto the seat.
The Devils Wedge
The stool in Pic 43 is one of the simplest you can make. It is an old colonial American design. The seat is carved out of a 18" section of a log that was split in half. I used dry juniper branches for the legs. In this stool I attached the legs to a seat made out of green Douglas fir. This insured that the green wood would shrink around the drier branches to hold them tight. After more than 20 years the legs are still locked tight.
Another way to attach the legs if you are using wood that is all fairly dry, is to use a devils wedge. So called because once it is locked in place it is difficult to get back out. See Pic 44.
Step 12: Making Knock-Apart Shelves and Spice Racks


Knock-Apart/Knock-Down Shelves
Pic 53b shows plans for easy to build book shelves that come apart easily for transportation.
They are made out of standard lumber-2"x12" boards and 3/4" and 1/4" dowels.
Step A- Cut lumber to length. Make sure the ends of the shelves are cut square as this provides the diagonal strength of the shelves.
Step B- drill 3/4" holes into the ends of shelves and the two uprights.
Step C- install dowels and lock the long tenon dowels with 1/4" dowels drilled to intersect them.
Step D- Drill for 1/4" wedge dowels and cut dowels into wedge shape (see step 3)
Step E- Assemble shelves.
Step F- CAUTION: You should definitely anchor the top shelf to the wall by attaching sheet rock screws or an eye screw into a stud at the height of the top shelf. You can then wire or use cord to tie the top shelf to the wall anchor. This will prevent children or careless adults from pulling the whole thing over.
Spice Racks
Pic 4 shows a spice rack with shelves held to the sides with wedged mortise and tenon joints. This basic construction can be scaled up to make shelves of any size. If you are making bookshelves that will hold significant weight the ends of the shelves should also be dadoed into the uprights to add strength to the mortise and tenon joints. See also Pic 53.The spice canisters were made with dead and weathered aspen branches that were drilled with a 1" bit and then lined with melted beeswax to seal the insides. Corks then sealed the deal.
Step 13: Toolboxes and Clamps


Pic 45 and 46 show a couple of tool boxes.
Pics 47 and 48 show a classic German style clamp I made out of red oak.
Step 14: Woodworking Tips and Other Projects


Dry Your Wood
Wood is never dry. No matter where you get it from and no matter how it is dried, it is perpetually wet. Over the years, it will swell and shrink with the seasons. Wood will not vary in length (along the grain) much at all. In the rainy season it will swell in width (across the grain) as much as 3/16" per foot. In the dry months it will shrink back down.
Over the decades it will continue to shrink and swell, but overall it will shrink. Some woodworkers who know wood and want to build with the driest wood possible, will buy their wood and let it air dry for 10 years before they even think of using it. Some (Such as those who make the finest Japanese wood planes) will let it dry for twenty years before they use it.
While that much of a lag time before use is not necessary for most projects, it is a good idea, if you can, to let your wood sit for at least a year in the state that it will be built in.
Tung oil and Linseed oil
My favorite oil which is non-toxic and easy to use is Tung oil. It comes from the seeds of the Tung tree. It changes the wood the least of any oil I have tried in terms of color. It also brings out the natural beauty of wood without changing it much. All of the projects here were finished with Tung oil.
I find it takes 3 coats of oil to bring the grain of the wood into focus and give a good protective surface that is easy to clean. I like to coat it with oil, let it soak in, and then wipe off the excess. I let it sit overnight and the next day give a buffing with 0000 steel wool before giving it another coat.
The final surface is not waterproof and if you leave a wet object such as a cup on it for any length of time it will stain the wood. Luckily, scratches and stains can be easily sanded out and re-oiled and in a couple of months the repair will darken as the wood oxidizes and disappear.
Linseed oil is cheaper than Tung oil and works almost as well. It will however, darken the wood more and over time tends to change light woods a more honey color.
Simple Design
Simplicity in design is not simple. Neither is it easy. A simple, classic, elegant design requires the minimum of parts to make it work. A complex design can use any number of parts. A simple design with simple lines and simple joints can require much more skill than a more ornamental design because every defect or error is exposed. A more complex and ornamental design has lots of parts that cover over other parts. If a complex design is gappy or crappy, you can just cover it with trim or fill it with putty. If it is too weak, you can just add more parts.
So for me, the ultimate woodworking challenge is to design the simplest lines with the least number of parts that will get the job done.
Fast and Easy
All this talk about making wood projects without metal or glue is fine. But sometimes we need to build something fast and dirty and don't have time to waste on refinements or building things for the next generation. If you are making something temporary (needs to last for a few years), or just for yourself, by all means throw it together with nails, screws, and glue. Get it done and move on to more important things. Life is short, don't waste a minute of it. As someone has said: "Waste is the only sin"
Pic 49 and 50 show a cradle and stand.
Pic 51 shows a shoji screen that uses paper bag paper instead of the traditional rice paper. The paper was glued on with corn starch boiled down to a paste. When the glue dries it shrinks the edges of the paper so that it comes out tight as a drum.
Pic 52 shows a walnut and cherry sewing desk with a hinged flap.
Participated in the
Craftsman Workshop of the Future Contest


