

Introduction: Wrap Beats - Capsense Arduino Instrument


The circular design of the object as well as the notes is completely a personal choice you could put this together in many different ways and I would love to see different creations people come up with!!
Step 1: Materials

- Arduino
- Resistors
Anything between 1 MΩ - 4.7 MΩ is usable.
You will require a resistor for each note you plan on having I have 7 notes and 3 optional keys that allow you to change the instrument, but you could have anywhere between 1 - 11 notes when using an Arduino Uno, If you have another model you can create as many notes as the digital pins will allow! - Copper Tape / Wires
- Conductive Thread
- Nails
Or anything conductive that is in a similar shape that you will be able to wrap the thread around - Soldering Iron + Solder
(These are materials I used to create how the instrument looks, but not necessary for the outcome of the technical side working)
- Hot glue gun
- Form Core Board
- X-acto Knife
- Compass
- Masking Tape (very useful when soldering and putting together the circuit with copper tape)
- Different coloured threads
Step 2: Creating the Casing / Box


- Using the Form Core measure out the size of the box you wish to create.
For example:
The top of my casing is 25cm x25cm and then I cut the four sides being 25cm x 15cm - Cut out these 5 shapes with the X-acto knife as precise as you can manage
- Now measure the thickness of the Foam Core, ie. mine was 2.5cm. Then measure 2.5cm out from the edge of each edge of the top piece of the box and 3 out of four edges of each of the side pieces of the box (Leaving a "bottom" edge). This is so you know how deep to cut each of the "jigsaw" like groves in order to join the sides of the box.
- Now draw 3 or 4 rectangles as deep as the markings you just drew on each edge of the top side of the box. Then cut these out with the X-acto Knife.
- Then use these groves as a guide to draw out where you will need the negative of the grove to appear on each of the side pieces of board. Then cut these out in the opposite fashion so they connect easily. repeat this for each of the edges that run along the top edge of the side pieces of board. (It will make it a lot easier if you mark out which side board goes with which edge of the top piece as each will be slightly different)
- To connect all the side pieces together I did the same steps with attaching the top to the sides, draw out the thickness and create a rectangle that will be your groove and then make it correspond to another side board that is the opposite of the groove and can fit together nicely.
- To create the disc like affect on the top of the box cut a circle out of another piece of foam core, measure out the same sized circle on the top of the box as well, marking on both where you want each note/nail to sit.
- Then cut a hole where each of the nails is going to come through on the top of the box.
- Then push a nail through each of the points you marked out on the top of your circular disk. You should now be able to place this on top of the box and it should fit nicely.
Step 3: The Methodology of the Circuit


The way this instrument works is through Ardunio's capacitive sensing library.
Which basically turns two pins into capacitive sensors meaning it can detect the electrical capacitance of the human body, so when you touch the sensor the arduino is given an input.
In our case we are making the sensors nails so when you touch one the arduino receives the input and plays a note. Using this library instead of say a button or another type of sensor also allows us to play multiple notes at once by stringing the nails together with the conductive thread.
The library can be found here CapSense
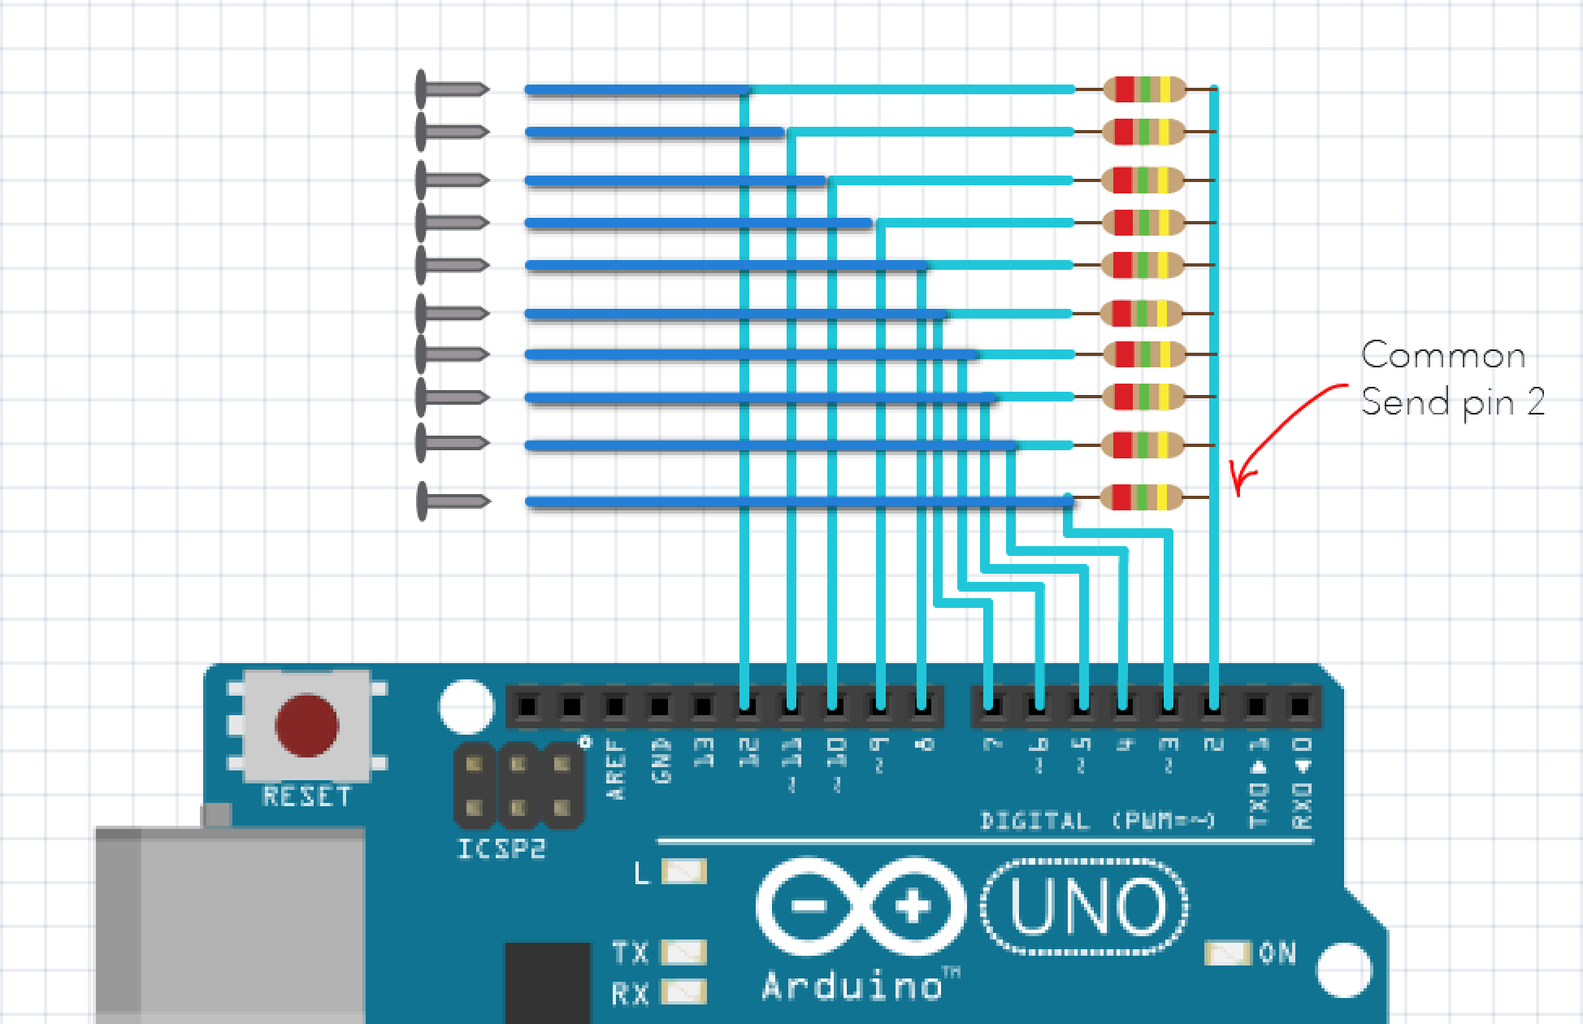
In the first Diagram we can see how to set up a basic capacitive sensing circuit. pin 2 is our common send pin and pin three is our first note, we connect these two pins with a resistor in between and then attach the nail to the connection between the resistor and the input to pin 3.
In the second Diagram you will see how I connected multiple sensors to the arduino, all use pin 2 as the common send pin and then attach to another digital pin through a resistor.
In the third diagram you will see how I connected each of the nails to each capacitive sensor input. The dark blue line is the connection between the digital pin and the resistor. It is important to note that when actually constructing the circuit to not have these wires touching it will short circuit and it won't work.
Step 4: Constructing the Circuit


- First I chose one of the side panels of the box to create the circuit on
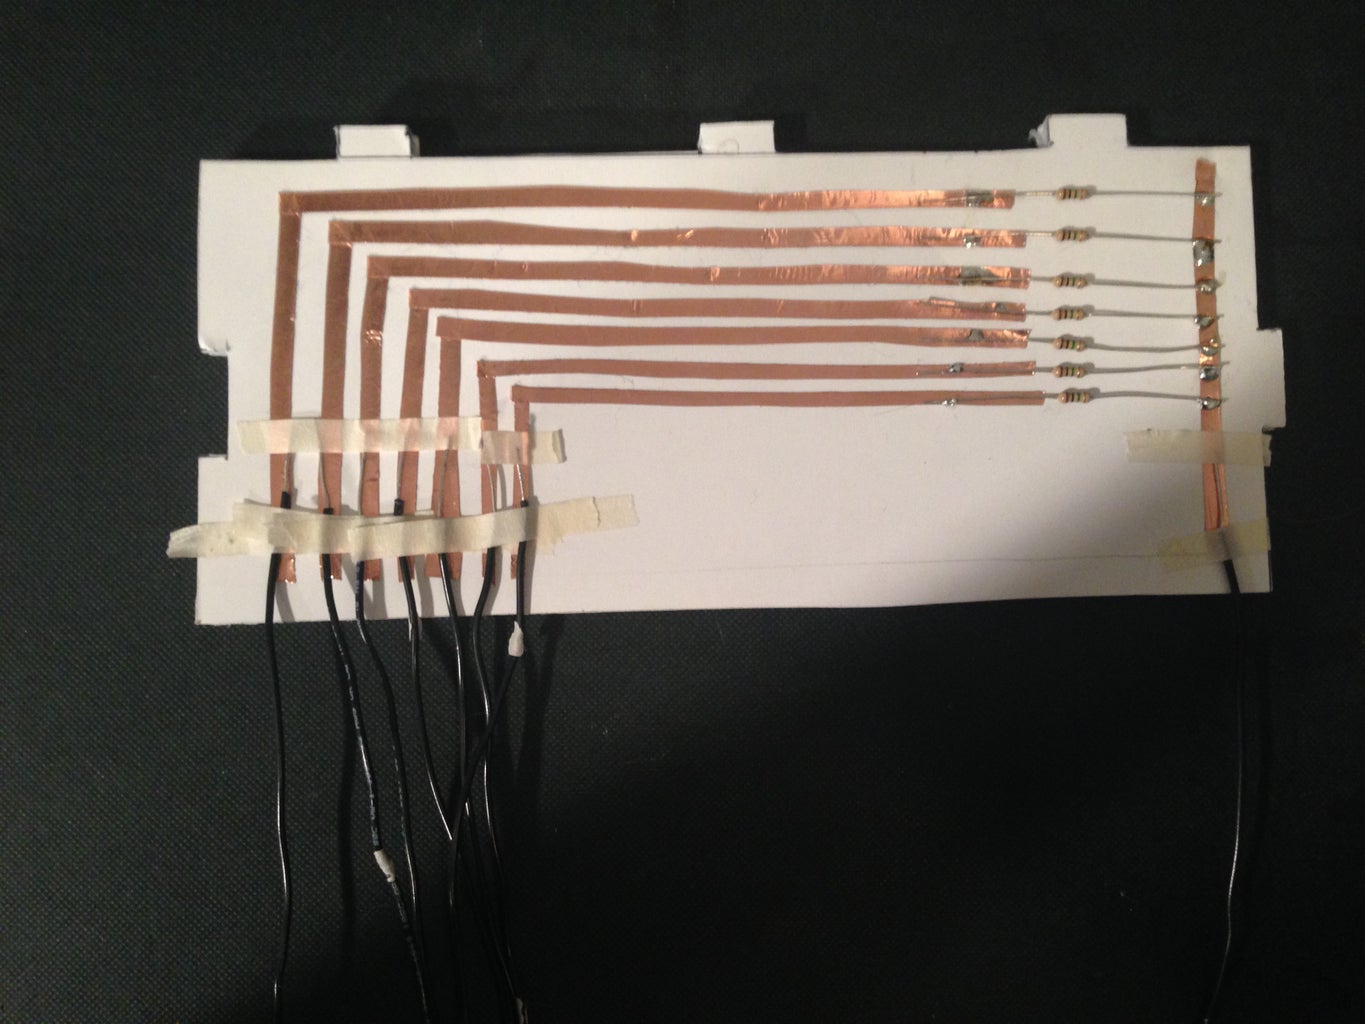
- Then I put one long horizontal piece of copper tape on the far side (This is to be our common send "wire" that will connect to pin 2)
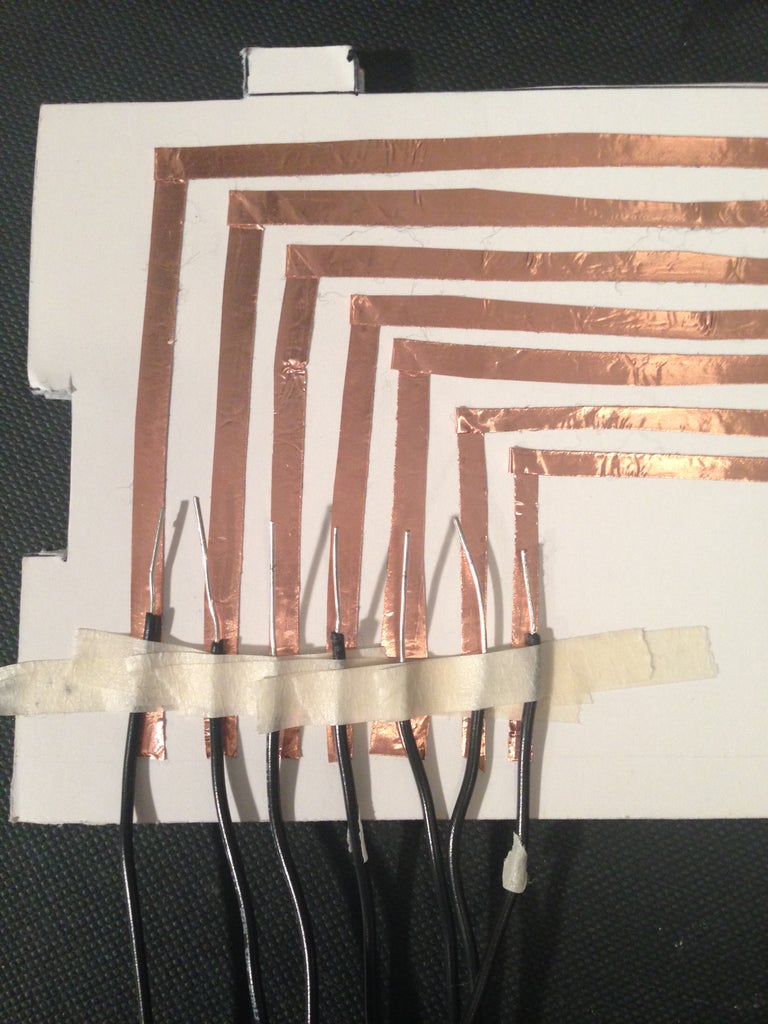
- The I taped down each of the other connections that will go to each of the other digital pins leaving space for the resistor to connect this part of the tape to the common send wire (Picture 1)
- From here I put each of the resistors in place using masking tape and soldered them to the copper tape on each side.
- Then you will want to solder wire onto each of the copper tape strands that are going to input into the arduino.
Step 5: Connecting the Circuit to the Nail Sensors


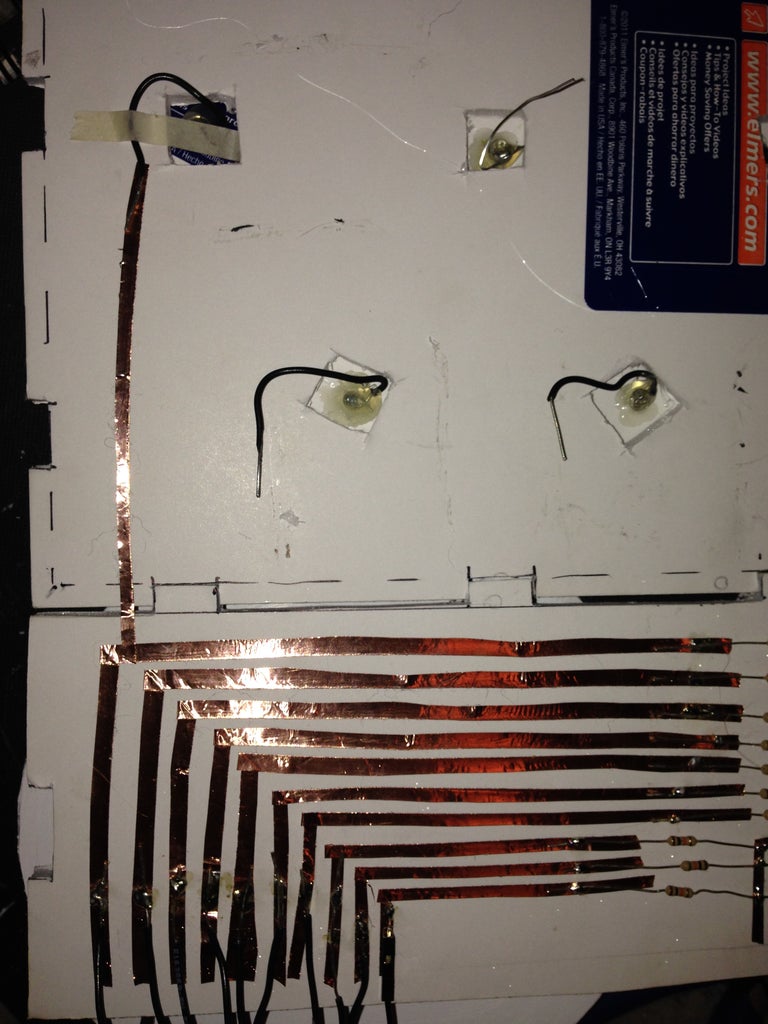


1. Make a loop around the tip of the nail that you have pushed through the board (Picture 1), then solder the wire to the nail. I also hot glued the nail to the board to prevent movement. do this to all the nails, It should look something like Picture 2. (This is easier if you attach these with out the disc attached to the box).
2. Next place the disc on top of the lid of the box making sure all the wires can come through the holes you previously cute
3. Next you want to connect the nails to the circuit. To do this I used more copper tape, as seen in picture 3 I have created a path for the circuit from the copper tape I previous put in place on the side board to the wire I just attached to the nail. You will also need to solder both the wire to the copper tape and possibly solder the copper tape where you've made the connection to the circuit to ensure a proper connection. Repeat this for all the nails and pay attention to the order in which you connect them, it will make it easier if you have nail connect to the pins in succession. It will look something like picture 4!
i.e. pin input 3 --> top nail
It is also important to note that you can NOT put the tape overlapping one another this will not work, Instead put a small bit of tape covering the tape underneath before you put the top layer of tape over it. as seen in picture 5!
Step 6: Attach the Arduino / Run the Code
The Next step is to hook up the wires to the Arduino, do it exactly how I drew out in step 3. The common send pin should go to pin 2 and then all the other wires should connect to pin 3,4,5,6... etc.
Make sure you have the capacitive sensing library installed on your computer along with Arduino and Processing!
First you will need to upload the Arduino code to the board.
I have commented all the code so you should be able to see where you can change and customise things to your liking.
Then you will need to open up Processing and run this, I have multiple different sounds located in the data folder and there is the ability to change them, have a play around! With this code as well you may have to fine tune the if statements that allow the piano to sound the notes as the value the capacitive sensing will get will be different to what I was getting, so there will be a small amount of debugging involved.

Step 7: Play Your Instrument!
I added in extra nails along the top of the box to spool my thread around so it was easily accessible.
You can also weave the conductive thread into the coloured thread to make the conductive thread more attractive.


