

Introduction: Your First Program in C (For Windows Users)
Programming can be very challenging. Learning a programming language is not something that’s going to happen overnight. It will take many frustrating hours to get familiar with the nuances of a programming language and learn how to properly “talk” a computer into doing what you want. Although I’ve been programming for more than a couple years now there are still times when I feel like pulling my hair out in frustration. But it’s also a great source of pride. The most important thing to remember is not to get discouraged. If this is something that you want to learn about there is no end to available resources online, and it’s something you can get really good at from the comfort of your desk chair.
I wrote this instructable because I know how difficult and frustrating getting started can be. So I decided to focus on what the bare minimum required to get up and running so that you can have a working program of your own to tinker around with. This instructable was written for windows computers, so unfortunately if you us something else this won't apply.
What exactly is programming? Programming at it's most basic is the process of creating and implementing a set of instructions for the computer. This is accomplished by utilizing a set of standardized conventions known as a programming language which functions in much the same way as a language for people does. Originally programming computers was very difficult, as what we would consider a programming language didn't exist, and instead programmers would have to give the instructions to the computer the only way it could process them, which was as a string of 1s and 0s which the computer could then interpret. Over time, programmers built up the set of tools they could utilize so that programs would be much more easy on people to write.
However, a programming language itself is too abstract for computers to understand and requires the usage of a compiler which basically translates the code written in the programming language to something the computer can understand. The compiler then makes the code into an executable, or something that you can run and perform some kind of action. The very first real step will be installing your very own C compiler. Let's get started!
Step 1: What's Required?
THINGS YOU’LL NEED AHEAD OF TIME:
- You
- A computer (with windows)
And that’s it! Gather yourself, a working computer (presumably the one that you're on) and for the next step we'll install the software you need to interpret your code.
Step 2: Installing GCC
DISCLAMER: This step may be the most confusing/difficult.
http://gcc.gnu.org/install/
The installation instructions there are pretty in depth. To just download it, here is one link:
http://www.netgull.com/gcc/releases/gcc-4.8.1/
Download the 106mB file that ends with "tar.gz". Tar.gz is just a different kind of compression than say ".zip". Decompress the file with something like winzip or 7zip and follow the installation instructions at the gcc website.
Once the compiler is installed (and you've verified it with step 3), if you'd like to see a quick video run down of all the steps involved simply skip ahead to step 10. Otherwise follow along!
Step 3: Open Your Command Prompt


METHOD 1 FOR VISTA OR 7
Click on your start menu. Where you see the search bar type "cmd" with no quotes and press enter. An all black window should appear with white text that looks very dated and ominous. A picture of what it should look like is included with this step (see first picture). If your start menu doesn't look like the one in the second picture then there's a second method included below.
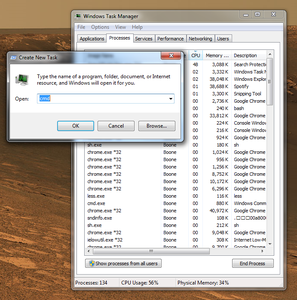
METHOD 2 WITH THE TASK MANAGER
Open the task manager by pressing either CTRL + SHIFT + ESC or CTRL + ALT + DELETE (May require you to click a button that says "Task Manager"). Look at the top of the window that appeared and look for "Run" and press it. If it's not visible click
File>Run. A new, smaller window should appear with just a text field. Type in "cmd" with no quotes.
Once the command prompt is open move onto the next step!
Step 4: Verifying You Have GCC
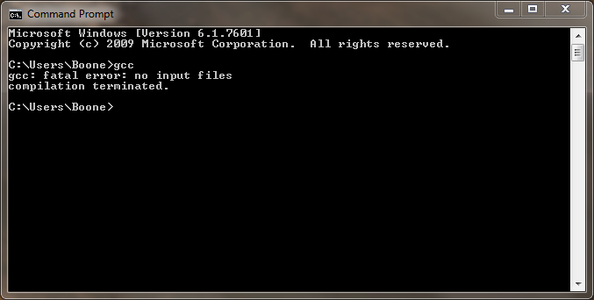
Switch to the command prompt window. To verify that GCC is in fact installed simply type "GCC" without quotes and hit enter. If the message:
'gcc' is not recognized as an internal or external command, operable program or batch file
appears, that means that the GNU C Compiler didn't install properly and step 3 will have to be repeated or troubleshooted. If the following message (as pictured):
gcc: fatal error: no input files
compilation terminated.
appears that's good! It means that all the extra software needed was installed.
Step 5: Opening a New Text File

Open a new text document for putting code into. The easiest way to accomplish this is by right clicking the desktop and going to New>Text Document as pictured for this step. Although after the second step this will leave an empty, unused text document on your desktop. Another way is to just simply open notepad. You can accomplish this by going to:
Start>All Programs>Accessories>Notepad
Once you have a new text document open, proceed to the next step!
Step 6: CODING

In your newly opened text file, copy and paste (or type out) the following bold text into the text file.
#include <stdio.h>
void main(){
printf("Hello World!");
}
You can see an example in the picture for this step. Once that's done, click File>Save As. This part is important. You can name it whatever you like (with no spaces), but set the file type to "all files" and to end your program with the extension ".c" otherwise the compiler won't be sure what to make of it. When this program is compiled and ready to run, it will print out the sentence "Hello World!" into the command prompt window. When the source code file is saved proceed to the next step.
Step 7: Finding Your File
Switch back to the ominous looking command prompt window. There are a couple of commands that you will need to know in order to successfully locate your newly created text file.
dir
cd [directory]
cd..
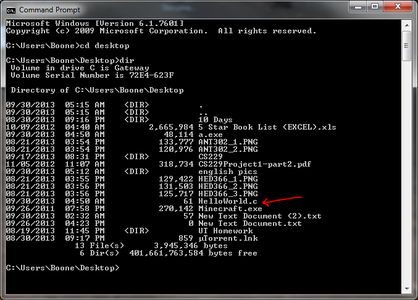
dir stands for "directory". In the command prompt window you'll have something that looks like "C:\Users\Boone" which is the "working directory". Typing in dir and pressing enter will list all of the files that are located in your working directory. Which brings us to the next command cd, which stands for "change directory". Typing cd desktop and pressing enter will bring you to where your "HelloWorld.c" file is stored (if you stored it on the Desktop like me). You can verify if it's there by typing dir.
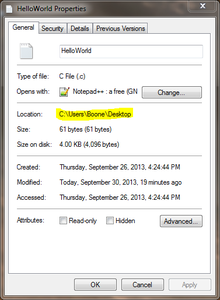
cd.. is the command used for moving back a folder. So if my working directer were "C:\Users\Boone\Desktop", by typing cd.. I would move back into "C:\Users\Boone". If you need help figuring out where exactly your "HelloWorld.c" file is stored, simply right click on the file's icon on the desktop and click on "Properties" (see first picture). The location of the file will be written next to "Location:" Once you've navigated your working directory to where your "HelloWorld.c" program is (HelloWorld.c shows up when you type dir. See second picture) you can move on to the next step.
Step 8: Compiling

IF YOU DON'T CARE WHAT YOUR PROGRAM IS NAMED
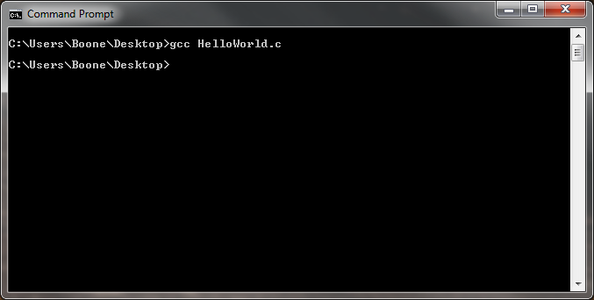
If you don't really mind what your program is going to be name, simply type:
gcc HelloWorld.c
into the command prompt window. If any errors appear, open the file back up in notepad to see if everything was typed/copied correctly, or that it was saved the right way (type set to all files with the ".c" file extension). When you compile your code this way it gets named "a.exe" by default.
IF YOU WANT TO NAME YOUR PROGRAM
Although there's a bit more going on between the steps involved in this process, being able to name your program involves a little bit more than the previous step. Instead type:
gcc -c HelloWorld.c
The compiler will produce what is known as an object file with a ".o" extension on it. This step is necessary for making programs with multiple files that go into them, but for now we'll just worry about naming your program. Next type:
gcc -o HelloWorld HelloWorld.o
The "HelloWorld" portion is simply what the program is going to be named, and everything after it are the constituent files. You can name it whatever you like, however spaces aren't allowed. The pictures included for this step goes through both options. Once this step is complete you've successfully compiled your code and can move onto the next step!
Step 9: Hello World!


Now it's time to run your program for the very first time!
If you missed it on step 6 (probably because you were so excited to get your program up and running) what your program will actually do is print out the sentence "Hello World" into the command prompt window. If you compiled your program in the last step using gcc HelloWorld.c all you'll have to type to run your program is the letter "a". If you cared about what you were naming your program, simply type out the name of your program (I compiled my program in the example as "HelloWorld"). See the attached pictures for what to expect.


