Introduction: Beer Shooter
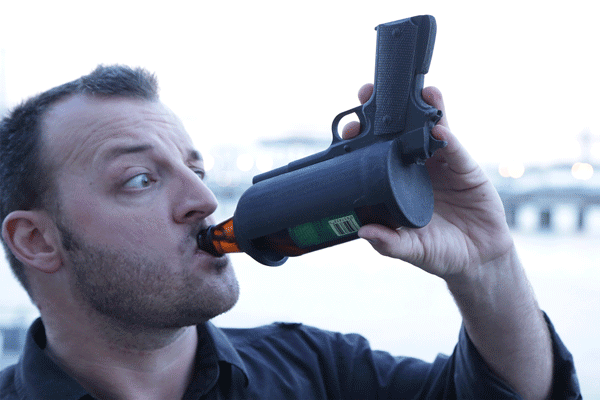
What ever happened to the hubbub around 3D printed weapons? Get ready to bust a cap and shotgun a beer with the 3D printed beer shooter. Before you jump the gun and shoot from the hip, this concept can't shoot anything and is nothing more than a holder for your beer.
Perpetuating the concept of 3D printing weapons beyond the iStab, the beer shooter is a novel way to take the pain away and self medicate with a few shots (of beer) straight to the mouth. This 3D printed beer holder uses a model of a Colt 1911 to hold the beer bottle while you sip, and is sure to cause a stir wherever you drink.
Obviously this is a novelty creation. Using the beer shooter anywhere is really a bad idea.
The 3D file to make your own beershooter is below.
Attachments
Step 1: Get Meshmixer
*(Cowbert model shown can be found here)
If you're not familiar with Meshmixer, it's amazing!
Meshmixer is a free entry level design software used to mash two (or more) models together. You don't need to know anything about 3D modelling to make things, and the results are usually pretty amazing (like the "cowbert" model shown above).
There's endlesslibraries of free models you can download for free that other people have made, and there's primatives in the software, so the possibilities are endless.
Meshmixer is the same software used to create the iStab, how to Turn Yourself into Action Figure, and the Knuckleduster Phone Case.
Step 2: Get Files to Mash Together
There's heaps of free CAD files online. I got both my models from GrabCAD, which requires a free sign-up to download models. Thingaverse is another good model library and requires no signup.
Here's the 2 free GrabCAD files I downloaded:
Next I'll share how I made this model in Meshmixer, if you want to skip ahead of the Meshmixer tutorial go to Step 12.
Step 3: Meshmixer - Getting Started
Open Meshmixer and open the pistol 3D file, then file>import the bottle file.
When importing the second 3D file into a scene that already has a file loaded, you can append the scene which will add the second file to the first. Both files should now be loaded into the same scene.
You should see both files in the object browser. If you don't see the object browser menu you can toggle it under view>object browser.
With both objects loaded into the scene we can toggle which one we can view by clicking the eyeball icon next to the image. Click to turn off the pistol for now to focus on the bottle model only.
Step 4: Meshmixer - Scaling the Bottle Holder
Start by duplicating the bottle by clicking on the edit button in the ribbon on the left-hand side, then click duplicate.
After, select the duplicate and edit>transform to drag it next to the original my clicking on the red arrow (which represents the x-axis) and dragging it over.
Select both models, then from the ribbon on the left click analyse>units/dimensions to scale the bottles to the correct size of an actual bottle (which I measured to be about 8.5").
With both bottles now the right size we'll select the duplicate model and make it slightly larger by clicking the white box in the center of the model and dragging outwards. You want the duplicate about 15% larger than the original.
Step 5: Carve Opening in Duplicate
We'll be focusing only on the larger duplicate for now, so click the eyeball in the object manager to make the original bottle invisible.
From the ribbon, click the bottle and make it solid by clicking on edit>make solid.
Next, in the ribbon, make a cylinder primitive by clicking Meshmixer>cylinder and drag a cylinder into the scene.
Click the cylinder and move it into the beer bottle, then stretch it by clicking on the arrows. We're going to make an opening in the side of the bottle that will allow the regular sized bottle to slide into. I made mine almost the entire length of the bottle from the bottom to the shoulder.
When you think your cylinder is the right size make it a solid in edit>make solid.
We're going to carve out the space that the cylinder occupies by using a Boolean Difference. When both models selected (the cylinder and the larger duplicate beer bottle) you can apply edit>Boolean Difference. It's important to select the base model you want to keep first, so select the beer bottle first, then the cylinder, then apply the Boolean Difference.
You should now have an opening in your duplicate beer bottle.
Step 6: Slice Top
There will need to be an opening in the top of the enlarged beer bottle to allow the neck of the regular sized bottle to pass through.
With the modified beer bottle selected, choose edit>make cut from the ribbon. A new grid overlay will appear, this grid represents where the cut line will be made. You can adjust the angle and placement of the grid using the colored arrows like before when moving the bottle around.
When you're happy with the cut line you can click accept and the portion above the cut line will be removed.
We now have the basic shape of the beer holder.
Step 7: Lower Lip
To make loading a beer into the holder easier I carved a small lip from the bottom of the holder.
Using the exact same process to make the opening in the side of the holder I made a new cylinder primitive and used it to do a Boolean Difference and make an indent.
Step 8: Positioning the Two Models + Cut
Turn the eyeball for the pistol model back on.
Select the beer holder and drag it into position roughly above the barrel of the pistol and at the same angle. Then, position the beer holder over the barrel, mashing the two models together. Take the time to make sure the placement looks correct before moving on.
Duplicate the beer holder by selecting the model and edit>duplicate, then turn off the beer holder duplicate. We'll save this duplicate for later as we're going to sacrifice the existing holder to make the cut we need in the pistol.
With the pistol selected first, select the beer holder next and do a Boolean Intersection, from the ribbon edit>Boolean Intersection. This will remove the areas that the two models touch, sacrificing the latter model to make the intersecting cut (this is why we made a duplicate of the beer holder earlier).
Step 9: Remove the Top of the Barrel
After the Boolean Intersection the pistol model will have the barrel cut where the bottle holder used to be.
From the ribbon choose the select tool and draw a line around the top portion of the severed pistol barrel, the selected area will turn orange. After you can click clear selection which will delete the selected area.
Don't worry if you don't get it all, you can clean up any left over geometry after you clear the initial mass has been cleared.
Remember that duplicate beer holder we made last step? Make that duplicate beer holder visible now.
Step 10: Repair Your Model
Chances are that when you did the Boolean Intersection you broke the model. Oops!
Meshmixer has a very clever tool that fixes that for you automatically. With the pistol model selected find in the ribbon analysis>inspector which will find all the error in your model. Click repair all and your model will be repaired and water-tight.
You model is now done. Having it in two pieces makes printed much easier. If you want you can lower the beer holder back onto the pistol frame and edit>combine.
Step 11: Export Your Model
Before we can print this model we need to export it into a file that the printer will understand.
From the top menu bar click file>export to export your model to the 3D file of your choice (probably STL or OBJ).
Step 12: 3D Print Parts
With your STL file exported you can load it into your 3D printing software and start printing.
I have access to a stereolithographic printer, so that's what I used. At home I use the Creality 3D printer, it's inexpensive and works great!
Here's my object being printed in 2 parts to save on support material.


Step 13: Remove and Clean Parts
After about 9 hours my models were printed and could be removed.
I scraped most of the larger support material from the models to expose as much of the base model as I could. Then, I soaked the models in a bath of warm water. Since the support material is water soluble after a few hours the support material jellifies and falls from the model.
Step 14: Detailed Cleaning
After soaking I could clean the remaining support material with a few fine tip tools and a jet of compressed water. After I dried the models and sanded any rough edges down.
Step 15: Assemble Parts
Ensure both models are dry and completely free of dust or any support material.
Mix up some strong epoxy and glue the beer holder to the pistol body. I used some painters tape to hold the models in place securely while the epoxy cured.
Step 16: Coat With Mineral Oil
Once the epoxy has completely set we can apply a finish coat over the model. Applying a coat of mineral oil over the model gives the piece a darker and more uniform appearance and removes any ghostly abrasion marks from cleaning and sanding.
Remove excess mineral oil with a clean rag.
Step 17: Load Round
To load a beer slide the neck through the opening and push the bottom of the bottle into place.
Bottle insertion may be a little tight, depending on how small your bottle holder is compared to the bottle you choose to load into your pistol. The bottom lip and upper edges of the bottle holder can be refined with some sandpaper to allow for easier bottle loading if required.
Step 18: Dispense Sudsy Justice
With a bottle of your favourite brew locked and loaded you're ready to bite the bullet and down a cold one.
The beer shooter might not protect you from bad guys, but no one will mess with your beer again.

Take a shot at a new project by remixing this beer shooter with your own ideas. I'd love to see them.


