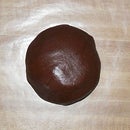
Introduction: Edible Peanut Butter Play Dough
I happen to have a huge stockpile of different play dough recipes and I was shocked that there weren't any edible ones here on instructables yet! I make a different dough for my son almost every week, so I figured I may as well make instructables for them. That way everyone can have as much fun as we are with them! I figured that a basic peanut butter one would be a good place to start. There are quite a few recipes for them out there, but I like this one the best because it is a little healthier and has a nice taste. I might put up other peanut butter dough recipes later in the future. Snag generic peanut butter when it's on sale and this is a very affordable afternoon of fun and a treat that isn't loaded with sugar as well!
If you are making this for children that aren't your own, be sure they aren't allergic to peanuts and peanut products or dairy. Also, I think the new standard is to wait to feed your children peanut butter until they are 2 and to wait on honey until a child is at least one , so you might want to keep that in mind before you make this.
Now, onto my very first instructable!
Step 1: Gather Your Ingredients
All you will need to make this dough is a little honey, powdered milk, and peanut butter. The recipe I always use for my son makes about one cup of play dough. This is perfect for one child or even a couple of small children, but you may want to double or triple the recipe depending on the age and amount of kids (or adults) playing. It's very easy to do because it's just...
1/3 cup honey
1/2 cup peanut butter
1/2 cup powdered milk (plus more if needed)
that's it.
Step 2: Dump and Mix
Measure and dump everything into a medium sized mixing bowl. Then start to mix it with a fork. Once it is fairly incorporated, you can knead it with your hands. If you want, add more powdered milk until you are happy with the consistency.
Step 3: Add to the Fun! (optional)
Now that your dough is all made, gather up any supplies you may want to add to the fun of this yummy dough! It can be used in any way regular play doughs are used, but don't forget you CAN eat it so other foods are a welcome addition for decorating. You can use nuts, dried fruits, marshmallows, candies, pretzels... all sorts of things.
Step 4: Play and Eat!
Now we have come to the best part. We get to play with the peanuty delicious dough we have made! Spread out a decent sized piece of waxed paper for each child to play on and make sure everyone has nice, clean hands. Go ahead and give it a taste test while you play. You can eat any creations you want now!
Step 5: Storage
IF you happen to have some dough left over, it's a good idea to put that in a sealed container or baggie and keep it in the fridge. The dough gets firm when chilled, and sometimes we roll it into balls to eat with apple slices as a snack. I don't recommend keeping it over a week or 2, but I don't really expect it to last that long either. ;) I hope you have fun if you decide to make it!


