

Introduction: Hydration Pack Camera Mount for GoPro


This mount will provide nice "third person" view of your activity. I use this often on a bike, you can switch the camera to face backward and you will get a nice rear view. This is even better when a friend is chasing you down. Another advantage of mounting to a pack, is that most small vibrations are dampened by your body creating a smooth shot.
The concept is similar to the over the shoulder mount by griffinity. This just allows you to carry your water and tools that you may normally carry along your trip.
A few sample videos below, enjoy.
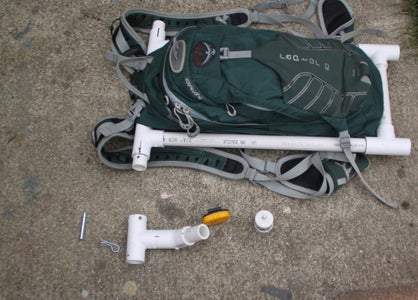
Step 1: Gather Tools and Materials

Materials
Approximately, 5 feet - 3/4" Diameter PVC pipe
5 pieces - 3/4" PVC tee connectors
1 piece - 3/4" PVC 45 degree connector
1 piece - 3/4" PVC end cap
1 piece - vuju quikee mount for gopro with attached gopro mount, sourced from seller:sabazaar, ebay
3/4 inch 1/4-20 screw
1/4" washer
1 piece - universal clevis pin with clip
PVC Glue
Tools
- PVC Cutter
- Drill
- 1/4" Drill Bit
Step 2: Prepare Materials
Cut pvc pipe to appropriate lengths
Cut left and right vertical pipes, this should be about half an inch shorter than your hydration pack.
Cut Top and Bottom horizontal pipes, this is about the same width as the width of your hydration pack. Top and bottom pipe pieces will form a secure mount on your hydration pack.
Cut 3 pieces PVC pipe, 1.75 inches in length. 2 of this will go horizontally to each side of the top horizontal pipe on the outside end of the tee connectors. The stem will connect to these protruding pieces.
The remaining piece this will be for the first part of the stem pipe towards the camera adapter. This can be set longer if you would like the camera to be farther away from your pack.
Cut a 2.5" length pvc pipe, this will be for the second part of the stem towards the camera adapter, try different lengths and see which length you prefer.
Step 3: Building the Main Mount

*Do not glue the pieces yet.
Connect the horizontal and vertical pipes, using tee connectors as shown on the picture.
Insert the short 1.75" pipe into the outside ends of the upper horizontal pipe, the short pipe protrusions will be used as stem connectors.
Step 4: Prepare PVC Endcap and Assembling the Stem


*Do not glue the pieces yet.
Flatten the top portion of the PVC endcap, you can use a file or sandpaper. I simply rubbed the endcap on rough concrete to get the same effect. This allows for a better surface connection with the vuju quikeemount adapter.
Drill a 1/4 inch hole into the top of the PVC end cap.
Insert the quarter inch screw into the end cap hole, and attach the vuju quikee-mount adapter. Use a washer or several washers if screw is too long.
Connect a PVC tee into the 1.75" inch pipe into the 45 degree connector. From the 45 degree connector insert the 2.5" pipe, on this attach the end cap. You now have assembled the stem, see picture for reference.
Step 5: Connecting the Stem to the Main Mount


To attach the stem to the main mount simply insert the stems tee connector to the pipe protruding on the side of the main mount.
Test your preferred stem angles and mark these on the pipe and connector intersection, you may have different prefered angles depending on the length of the stem and the activities you will be doing.
Once you have finalized the angles drill into tee connector where the clevis pin will fit. For several angles, you can simply rotate the stem and drill through the inner pipe passing through the stem's existing hole.
Step 6: Gluing Pieces Together

Glue all connections except for the lower right horizontal pipe and the tee connector. Also do not glue the stem to main mount connections.
Step 7: Attaching to Your Hydration Pack

Attaching the mount would depend on your hydration pack, i have an Osprey pack that has several straps where i can insert the mount pipes. Also as noted earlier where i did not glue one corner of the rectangular mount which allows me to slightly open the mount and insert it through the straps. Once strapped in the mount should hold it's posistion.
If your pack does not have enough straps, i will suggest to use several velcro straps and use this to tie each corner of the mount (or as close to the corner) to your pack. If the mount wobbles as you ride or hike, have a longer wider velcro strap and tie the middle part of the pack/mount.
Step 8: Notes


Different angles and views, see images.
* why use tee connectors?
Cheaper to get it in a 10-pack. Also the bottom tees allow that bag/mount to be placed upright on the floor without the pack touching the floor. You can also switch the mount stem from the left side to the ride side with tee connectors.
*About Stem Length
Test your stem length first, test several length of pipes for the stem to figure out the length you want.. The longer stem length will provide a wider view, farther away from your pack and your head. On the other hand a longer stem may show more vibration.
*why use vuju quikee mount
- Because i designed the vuju quikee mount :).
- It allows a straight forward connection to the end cap
- vuju quikee mount connect the gopro to my mount through a quick release buckle, which allows me to keep quickly snap in my camera when i need to, and quickly put it away when I'm done. Also easy to switch between from and rear view.
*Enhancements
I do not glue the end cap on the stem where the camera attaches to, my thought it that if i have a bad fall i would like the camera to just get disconnected and not have a rigid connection amplifying the impact both for me and the camera.
I have a small thin cord that attached my camera to my pack, just in case i get in to a big enough impact to pop out the end cap.
For some hydration packs that does not have enough straps to securely attach the mount, you use additional velcro straps to secure the mount into your pack.


