

Introduction: Interface Keypad With Arduino


In embedded devices one of the essential part is Keypad is used to interact with embedded devices ,Keypad is input devices which is used to give commend the devices,from calculator to computer input is given through keypad,in this tutorial you will know how to interface keypad with arduino ,arduino is a mini computer which is user-friendly,we can hack anything using arduino,let see how to interface 3x4 matrix keypad with arduino.
This keypad has 12 button,which is arranged in telephonic order in 3x4 matrix you need only 7 pins to interface with micro-controller that 3 columns and 4 rows.Which has more applications like electronic door lock-calculator etc.
Step 1: INTERFACING CIRCUIT:


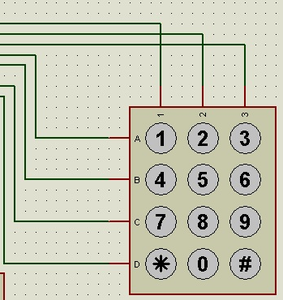

Keypad consist of 7 pin- in which 3 from keypad columns and 4 from keypad rows.
COLUMNS:-
colum 0 - to arduino pin 12
colum 1 - to arduino pin 11
colum 2 - to arduino pin 10
ROW:-
row 0 - to arduino pin 9
row 1 - to arduino pin 8
row 2 - to arduino pin 7
row 3 - to arduino pin 8
When you press keypad button respective key value will display in virtual terminal
Step 2: ARDUINO CODE: DOWNLOAD KEYPAD LIBRARY

#include
const byte ROWS = 4; // Four rows
const byte COLS = 3; // Three columns
// Define the Keymap
char keys[ROWS][COLS] = { {'1','2','3'}, {'4','5','6'}, {'7','8','9'}, {'#','0','*'} };
// Connect keypad ROW0, ROW1, ROW2 and ROW3 to these Arduino pins.
byte rowPins[ROWS] = { 9, 8, 7, 6 };
// Connect keypad COL0, COL1 and COL2 to these Arduino pins.
byte colPins[COLS] = { 12, 11, 10 };
// Create the Keypad Keypad kpd = Keypad( makeKeymap(keys), rowPins, colPins, ROWS, COLS );
#define ledpin 13
void setup()
{
pinMode(ledpin,OUTPUT);
digitalWrite(ledpin, HIGH);
Serial.begin(9600);
}
void loop()
{
char key = kpd.getKey();
if(key) // Check for a valid key.
{
switch (key)
{
case '1':
Serial.println(key);
break;
case '2':
Serial.println(key);
break;
case '3':
Serial.println(key);
break;
case '4':
Serial.println(key);
break;
case '5':
Serial.println(key);
break;
case '6':
Serial.println(key);
break;
case '7':
Serial.println(key);
break;
case '8':
Serial.println(key);
break;
case '9':
Serial.println(key);
break;
case '0':
Serial.println(key);
break;
case '*':
Serial.println(key);
break;
case '#':
Serial.println(key);
break;
}
}
}


