

Introduction: K'nex Pistol: Winona V3.0


So, Winona v1.0 seemed to go over fairly well, but there were some issues, and some problems, and it wasn't all it could be. We had a trigger that was way too big, ammo wouldn't stay loaded, the handle was uncomfortable as heck as well as a little rickety. So here we have Winona v3.0 (v2.0 was a total piece and had to be dismantled. It started out as a decent build, but it just grew and grew and was very unstable and prone to falling apart, and when I got close to done it looked more like a rifle than a pistol, so it went the way of all dead ideas.)
So the improvements are as follows:
The trigger has been improved, it is shorter and far more comfortable.
Ammo now stays locked in, without the use of any "exotic" or "modified" parts. (Thanks to Perfect Duck's suggestion.)
The handle is immensely better, stronger, more comfortable, more usable should you need to pistol-whip someone, etc...
As per all k'nex guns, these are dangerous, so consider yourself warned. If you put an eye out, don't come crying to me, I disclaim any and all liability for any misuse of this item.
Due to the design of the barrel I believe it would not be difficult at all to modify the design to include a magazine for ammunition, or to extend the barrel or add a stock to make this into a rifle. I will be working on that at some point, but anyone is more than welcome to try their hand at it and show their work.
I apologize for the quality of some of the pictures, I am not a photographer, and my camera isn't the greatest. I may try to take some better pictures, but that is doubtful, I really don't want to take this thing apart or try to build another one again. Some of the things on it are there simply to make it look cooler, some are there to give it a little extra support, and I have no clue how many parts I used, so don't ask.
Also, don't ask me how far it will shoot, I lack the drive, equipment, or time to evaluate that, and it all depends on the rubberbands you use anyways. It works well, it seems to be fairly accurate, and it works, anything other than that you will need to figure out for yourself.
Apparently there was someone else copying my work, unsure of who that was, but this is the real deal, I am the person that made the original, so please, don't start slandering me because you think I am someone else. (You can go check the original if you like, you will see it was done by me.)
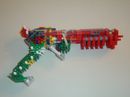
That being said, here she is. Enjoy!
Step 1: Construction - Barrel


First off, look at all the pictures before you build, some of them are out of order to give you a better idea of how it should look or how the pieces go together. I have tried to show the easiest way to put this together, but no guarantees.
Anyways, the barrel is the first part, simply follow the pictures and cram it all together.
Step 2: Construction - Handle


Here we have the new and improved handle. I had figured out I wanted to use this as the handle many months ago, but had no sturdy way to connect it to the barrel I had designed. That particular problem was solved in the next step.
Step 3: Construction - Backend


Okay, this is the part that attaches everything together, and was the elusive missing piece I needed to make this gun work. It's fairly sturdy, and it allows the firing pin to go in without catching on other parts. Sorry for the picture quality, but hopefully there are enough that you can figure it out.
Step 4: Construction - Connecting the Barrel, Handle, and Backend


Here we put the barrel, handle, and backend together. It isn't hard so long as you look closely at the picture, there are four points where the barrel connects to the backend, and four points where the handle connects to the backend.
Step 5: Construction - Trigger


Here is the new and improved trigger, shorter than the previous one, and much more comfortable.
Step 6: Construction - Firing Pin


Here's the firing pin. Make sure the little brown clips are put together the way it shows, otherwise it has a tendency to fly apart. When you are done with it, the blue rod should be on top (when you insert it into the barrel) and the little clip closest to the barrel should be on the top of the firing pin rod.
Step 7: Construction - Finalization


This is pretty much it. You need to put in the piece that holds your rubberbands to the gun, and that is about it. Look at ALL the pictures first. When you are done, pulling the firing pin out should set the trigger, you load your ammo in the front, then point and pull the trigger. The last few pictures are just things I have done to make it look cooler or add a little stability, but whatever floats your boat. Anyways, enjoy!


