

Introduction: Freezing


I know what you're thinking. What can you tell me about freezing that I don't already know? Well, in truth this will be a short chapter, but I think, a very valuable one. There are a few do's and don'ts to keep in mind, that will take your freezing game to the next level.
We are lucky enough to live in a world of electricity that fuels freezers. Freezing food at its freshest, allows us to keep food in it's uncooked, fresh form longer than any other kind of preserving. But there is more to it than opening the freezer door and just throwing in a thing.
A misconception about freezing is the assumption that once something has been frozen, it won't change. But there are in fact still changes that occur. For example, things that are not properly prepared and packed before freezing can get freezer burn, which is caused by moisture loss and results in desiccation (the toughening of texture). Another thing that can happen to meats (fish in particular) is oxidation of tissue lipids (fat rancidity) which will change the flavor of the meat and not for the better.
Both these things can be avoided with a bit of preparation. In this lesson I'm going to show you the best ways to freeze both veggies and fish. Similar techniques will apply to fruits and other meats.
Step 1: Why Freezing Prevents Spoilage
As we learned in Lesson 1, the 4 spoilers (enzymes, molds, yeasts, and bacteria) require a temperature of 50°F / 10° C - 145° F / 63° C to grow and flourish. Keeping foods at 32°F / Zero° C and below prevents any of the spoilers from being able to do their work.
An important thing to keep in mind: Freezing only holds the spoiler microorganisms inactive, it doesn't kill them. From the moment something is thawed, the spoilers will reactivate and restart their life cycle. So remember not to leave thawed food out at room temperature for any longer than absolutely necessary.
Step 2: Tools & Equipment
Freezing Vegetables & Fruit

- Freezer safe moisture-vapor proof containers: glass, plastic, or metal containers with secure lids or heavy duty freezer bags
- cutting board
- chef's knife
- large bowl (for broccoli and cauliflower only)
- measuring spoon
- large pot for blanching
- slotted spoon
- colander
Freezing Fish, Meat & Poultry

Additional Supplies For Fish Only
- medium bowl
- parchment or wax paper
- ascorbic acid
- tongs
Step 3: What (and What Not) to Freeze
Most fresh foodstuffs will respond well to freezing, but there is a short list that does not benefit from this form of preservation. To save you from disappointment, avoid freezing the following fresh foods:
- whole tomatoes
- cabbage
- lettuce
- radishes
- endive
- parsley
- cucumbers
Once thawed, all of the above get limp and watery. Unless that's your thing, I recommend using one of the other preserving techniques like pickling and/or lacto-fermentation to extend the life of these delicious veggies!
NOTE: If you need to freeze tomatoes but don't have the time to transform them into freezable sauce, do what instructables member canida does and roast them before freezing them!
Step 4: Freezing Vegetables

The key to optimal veggie freezing is blanching. Blanching vegetables before freezing them:
- slows the actions of the enzymes that cause loss of flavor, texture, and color.
- removes dirt and any organisms living on the surface of the foodstuffs
- brightens the colors
- helps the veggies retain their vitamin content
- softens the pieces making them easier to pack in freezer proof storage containers
Blanching is:

"...a cooking process wherein the food substance, usually a vegetable or fruit, is scalded in boiling water, removed after a brief, timed interval, and finally plunged into iced water or placed under cold running water (shocking or refreshing) to halt the cooking process." - wikipedia
Every vegetable has its own specific blanching time and it's important to honor it. Underblanching kickstarts the enzymatic cycle and is worse than not blanching at all. Overblanching causes a loss of vitamins, minerals, color and flavor. So make sure to check on each vegetable's correct time before getting started.
Because of this, I don't recommend mixing veggies before blanching. If you want to put together pre-mixed packages of stir fry vegetables or the like, blanch each veggie individually and then mix them together before packing them.
My favorite online resource for veggie blanching times is this one.
A FEW NOTES ON FREEZING FRUIT:
- I prefer to dry pack all my fruit. Which means not packing them in a sugar syrup (the syrup method is becoming less and less a common practice). Simply clean the fruit, remove the skins if desired, and cut into bite sized pieces. Place them in a freezer-proof container leaving 1/2" headspace to allow for the expansion of the fruit as it freezes.
- To prevent fruits like apples, apricots, peaches, nectarines and pears from darkening (and to slow enzymatic action), dissolve a tsp of ascorbic acid in 1/2 cup water and sprinkle it over your cut and prepped pieces of fruit. Make sure every piece gets well coated. To avoid having the wet pieces stick together, freeze them in a single layer on a parchment lined baking sheet and transfer to a freezer-proof container when fully frozen.
*Another tip for the best quality frozen foods possible, is to turn down your freezer about 10° the day before you plan to prep your fruit, veggies or proteins. The faster fresh foods freeze, the better the quality of the foods when thawed. Once your new additions to the freezer are completely frozen you can return the freezer to its regular temperature.
Step 5: How to Blanch and Pack Vegetables for Freezing

To ensure the best freezing results, it's very important to pick or buy vegetables at their peak freshness. Whatever state a veggie (or anything) is in before it goes into the freezer, quality wise, is how it will come out. So make sure you take the time to pick out the good stuff. (You can tell broccoli is in great shape if there are still tightly packed flowers that are blue/purplish in color.)

Cut the vegetable up into either bite sized pieces, or whatever shape/size is required for a particular recipe you have in mind.


TIP: For broccoli and cauliflower, to make sure there aren't any pests hiding out in the spaces under the florets, soak the cut pieces in one gallon of cold water with a 4 tsp of added salt for 30 minutes before blanching to 'encourage' any pests to vacate the premises.

Set up your blanching station: a large pot filled half way with water, a slotted spoon, a colander, kosher salt, and a teaspoon.

Bring water to a boil.
Once the water is boiling, blanch your veggie for its determined amount of time. (See here for times.) Broccoli should blanch for 3 minutes. No more, no less.


Once the timer goes off, use the slotted spoon to remove the veggie pieces quickly from the water and place them in the colander. Once you've removed them all, immediately take the colander to the sink and run the veggies under cold water for another 3 minutes to halt the cooking process. (Alternatively, you can plunge the veggie filled colander into a big bowl of ice water and let it sit for 3 minutes.)


Now it's time to pack the veggies in freezer-safe (aka, moisture-vapor resistant) containers.
A note on container sizes: I find it easier to use containers that are portion/recipe sized because the veggies will stick together once frozen. If you prefer to make just one huge batch and have the veggie pieces NOT stick together, spread the pieces out on a cookie sheet in a single layer and freeze them before putting them in a larger container, and then back in the freezer.
Ok, now back to the how-to's of packing. For some veggies like broccoli and cauliflower you do not need to leave any headspace (space between the top of the veggies and the rim of the container). For these, and a few others, you just pack them in as tightly as possible and press down and secure the lid. For others like green beans, you want to leave a 1/2" of headspace so there's room for them to expand as their water content freezes and takes up a bit more space. Check here for the different headspace requirements.


NOTE: I find canning jars to be great freezer containers. There's so many different sizes to choose from and they're cheaper than official re-usable containers. Of course you can also use plastic freezer bags, but they are less environmentally friendly. BAG USE TIPS: Double bag foods for maximum protection and always wait until blanched foods are completely cool before packing them in plastic of any kind.

Once you have your veggies all packed up, place them in a single layer on a freezer shelf with room around each container so they freeze as quickly as possible. Once frozen, you can stack them on each other and close together.
Step 6: Storage Tips

Properly prepped and packaged vegetables will last for 8 -12 months in the freezer when stored at 0° or below. Beyond that amount of time, even when properly packed, foods will start to show signs of succumbing to the enzymatic process (loss of taste, nutrient quality, and texture) and loss of moisture that causes freezer burn and dedication.
NOTE: Be sure to write the packing date on a label or piece of masking tape to mark each container, so you know how long everything has been in your freezer and when their storage times are up.
Step 7: Freezing Fish

The steps necessary to properly prepare fish for the freezer can seem a little onerous, but given what a precious resource they are and how expensive they can be (for those of us that don't fish), it's worth taking the time to keep the quality as high as possible.
Just like vegetables, fish you plan to freeze should be super fresh! If you're a fisherman, that's as fresh as it gets. If not, try and find out when the fish you're buying in the store was put in the case and inspect it to make sure it's not dull and 'wilty' looking and that it doesn't smell overly fishy (which means it's probably older).
Another 'just like vegetables' tip for the best quality frozen fish possible, is to turn down your freezer about 10° the day before you plan to prep and freeze your fish. The faster fresh foods freeze, the better the quality of the foods once thawed. Once your new additions to the freezer are completely frozen you can return the freezer to it's regular temperature.
A NOTE ON FREEZING MEAT & POULTRY: Beef, veal, lamb, pork and poultry do not require glazing like fish does. Simply double wrap it in moisture-vapor resistant butcher or freezer paper and freeze. Cured and processed meats will only last for 1-3 months in the freezer because the salt used in those processes speeds up rancidity. All other meats will last up to 4 months frozen. Poultry up to 6 months. BE SURE to label and date everything you put into your freezer so you can keep track of what needs to be for dinner. :)
Step 8: How to Prepare Fish for Freezing
The best way to protect fish from freezer burn, desiccation and oxidation, is to glaze it before freezing it. Glazing creates a 'forcefield' of frozen water around the fish that keeps moisture in and oxygen out. There are a few different ways to do this (a lemon gelatin glaze being one), but my favorite is a simple ice glaze. This is how it's done:


Fish are labeled as either fatty or lean. Which fish gets which label is decided by the amount of fat in its flesh. Trout, mackerel, tuna and salmon are considered 'fatty fish'. Flounder, cod, snapper, grouper and most freshwater fish are considered 'lean'.
To pretreat the fish for maximum quality, dip fatty fish in a solution of 2 tbsp ascorbic acid and 4 cups of water for 20 seconds (this controls rancidity and flavor change), and dip lean fish in a brine of 1/4 cup salt and 4 cups of water, also for 20 seconds (this prevents loss of tissue juices during thawing).


As I'm freezing salmon, I used the ascorbic acid solution to pre-treat.


Place your pre-treated fish fillets on a piece of parchment or waxed paper, supported by a plate, cutting board or baking sheet, and stick it in the freezer. Allow it to completely freeze, uncovered.


Once your fillets are frozen, prepare a bowl of ice water. Remove the fillets from the freezer and dip them in the water bath. This starts the process of 'glazing' the fish.

Place the fillets back on the parchment paper, remove any stuck ice cubes, and return to the freezer for a few minutes to allow the first layer of the glaze to freeze. Repeat this process until a visible build up of ice has formed. BE CAREFUL not to crack the glaze while handling the fillets during this process! This would allow air to reach the fish flesh and negate the whole glazing process.

While the final layer of glaze is freezing, cut large squares of butcher or freezer paper (enough for all your fillets) and then cut a square of plastic wrap for each paper square.

Remove the glazed fillets from the freezer and place one on the plastic wrap on a diagonal.

Tightly wrap the fish in the plastic wrap.

Place the wrapped fillet diagonally in the corner of the paper square and fold up the corner.

Roll the fillet over once.

Fold the right side of the paper over.
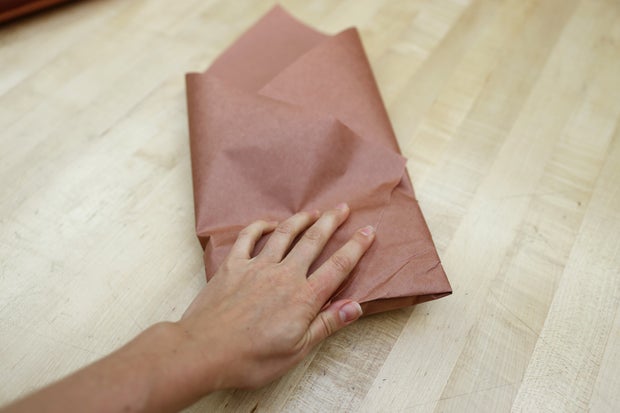
Then the left.

Roll the fillet over twice more.

Grab hold of the remaining corner...

and fold it down.

Secure the package with a piece of masking tape.

Be sure to write the packaging date and the contents on the outside of the package!
Step 9: Storage Tips

Properly prepped and packaged fish will last for 3-6 months in the freezer when stored at 32°F/0°C or below. Be sure to write the packing date on a label or piece of masking tape to mark each container, so you know how long everything has been in your freezer for and when their storage times are up.
And as a reminder:
Cured and processed meats will only last for 1-3 months in the freezer because the salt used in both processes speeds up rancidity. All other meats will last up to 4 months frozen. Poultry up to 6 months.
Step 10: Quiz Time!
{
    "id": "quiz-1",
    "question": "Is it necessary to blanch vegetables before freezing them?",
    "answers": [
        {
            "title": "yes",
            "correct": true
        },
{
            "title": "no",
            "correct": false
        }

    ],
    "correctNotice": "That's correct! Blanching slows the action of the enzymes and prevents moisture and vitamin loss that can occur during freezing. ",
    "incorrectNotice": "That's incorrect! Try again."
}
{
    "id": "quiz-2",
    "question": "Which group of fish are considered 'fatty'?": [
        {
            "title": "Trout, mackerel, tuna and salmon",
            "correct": false
        },
{
            "title": "Flounder, cod, snapper, grouper and most freshwater fish",
            "correct": false
        }
    ],
    "correctNotice": "That's correct! You got it! Fatty fish require a quick bath in ascorbic acid and water before the glazing process begins.",
    "incorrectNotice": "That's incorrect! Try again."
}


