

Introduction: Leather Hardware: Buckles and Clasps


Choosing a buckle or clasp probably has an even bigger aesthetic impact on a leather project than any other hardware choice. Different buckles and clasp styles can make the same project look anywhere from steampunk to modernist, luxurious to rustic. Buckles and clasps also attach to leather in a variety of ways, so some work better for different designs.
In this lesson I'll show you some of the most common options for leather buckles and clasps, and how to attach various kinds. Then we'll add a buckle closure to our bag design.
In this lesson I'll be using:

Step 1: Types of Buckles

Heel Bar Buckles

Heel bar buckles are buckles in the classic belt buckle style. The bar with the buckle tongue that attaches to the strap loop is located on one end, so when you use this kind of buckle, you need to create a "keeper" loop that will hold down the loose end of the strap. (Some buckles like this also come with metal keeper loops). Heel bar buckles are most often used on belts, but they come in many different sizes and can be used on bags and other projects as well. They are slightly more complex to attach because of the need to create the keeper loop.
Center Bar Buckles


Center bar buckles are great buckles to use for straps on leather projects because they are structured to automatically contain the loose end of the strap under one of the metal bars of the buckle. I usually use this kind of buckle because it saves the hassle of creating a leather keeper loop.
Double Bar Buckles

Double bar buckles have an additional bar in the center of the buckle separate from the bar that holds the buckle tongue. These buckles are mostly used when you want to be able to adjust the length of the strap on the buckle side as well as the strap side. In order for them to function this way, you need to attach them with an additional piece of hardware called a slider.
Rolling Bar Buckles

Rolling bar buckles are any buckle that has a rolling tube on one side which makes it easier to slide the strap in and out of the buckle.
Step 2: Making Leather Keeper Loops

If you are using a heel bar buckle that doesn't come with a keeper loop, you need to make one before you attach the buckle. To do this you need to cut a strip of leather and sew it into a loop. To get the length of the strip, use this formula (or just wrap a strip of leather around two straps stacked on top of each other and mark how long it should be):
Keeper loop length = (strap width x 2) + (thickness of strap leather x 8)
In this case = (7/8" x 2) + (1/8" x 8) = 2.75"


You can choose the width of your keeper, but it should be between 1/4" and 3/4" proportional to the width of your strap. After you have cut your keeper strip, use an awl or stitch punch to punch at least 2 sewing holes on both ends of the strip.


Then use a needle and thread to sew the loop closed using what is called a butt stitch. Make several loops around each pair of holes and knot the ends of the thread together in the back.


You can also sometimes buy pre-made keeper loops from places like Tandy. These are usually veg tanned leather and are often constructed with small leather staples instead of sewing.

Step 3: Attaching Heel Bar Buckles

To attach the heel bar buckle itself, you are going to make a loop in your strap that goes around the bar with the buckle tongue. To let the buckle tongue poke through this loop, you need to create a slot in the center of your strap. Determine the approximate size of this slot by measuring the diameter of the little metal loop where the buckle tongue attaches to the bar, double this measurement, then add about 1/8"- 1/4" depending on the size of the buckle. This is the length of the slot you need to create.

Punch two holes on your strap this distance apart with a hole punch that is a little bigger than the diameter of the buckle tongue. Make sure you are leaving enough room past the slot for your strap to loop around and attach to itself. About 1 1/2" - 2" is usually enough.
Now use your x-acto knife to cut between the two holes to create the slot.


Before you attach the buckle, slide the keeper loop onto the strap. Hold the buckle so it is right side up, with the tongue facing in the wrong direction. Stick the tongue through the slot on your strap and loop the strap around the bar so the short end of the strap is on the underside. Make sure the grain side of the leather is facing out.


The tongue should fit comfortably in the slot and move freely. If the movement of the tongue feels sticky, take the strap off and make the slot a little longer or wider.
To finish attaching the buckle you need to fasten the strap onto itself to secure the buckle and hold the keeper in place. You can do this with rivets or sewing. If you are working with very thick leather, you may want to skive the end of the strap so it lays flat against itself.
The keeper should be sandwiched between the two layers of strap with either one rivet on each side of the keeper, or the keeper between the buckle and a single rivet. Leave enough room for the buckle to move freely in the loop, then punch holes through both layers of the strap, and set rivets with a mallet.


If you want to sew instead of rivet, punch sewing holes through both layers and sew lines of stitches to enclose the keeper in the same way. Sew the strap together with a saddle stitch (you'll see more of this in a minute).
To create the opposing strap that will thread through this buckle, you just need a strap the same width with holes punched in it for the tongue to poke through. You always want to leave some extra room on this strap, how much extra room depends on how the strap is going to be used. Decide where your average attachment point is going to be, and then add some extra length to the strap, at least 3 inches. Place a hole at the average attachment point, and a few holes in both directions so the strap can be buckled looser or tighter (about 5-8 holes is usually enough). Standard hole spacing is 1/2" apart.


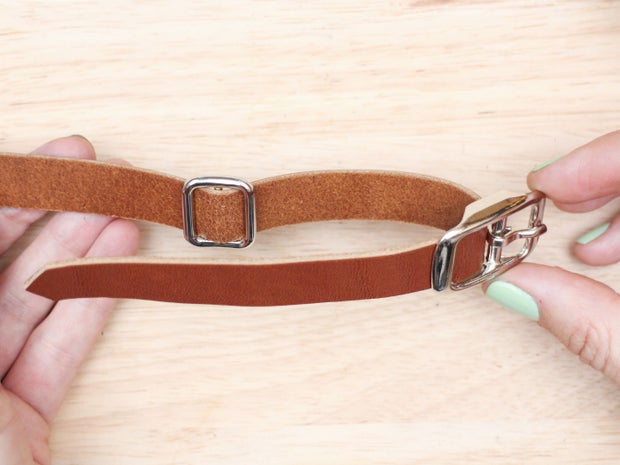
Step 4: Attaching Center Bar Buckles

Attaching a center bar buckle is similar, except that you don't need to create a keeper loop.
Create the slot for the buckle tongue in the same way, by punching holes in your strap and cutting between them.

To attach the buckle, loop the strap around the center bar poking the tongue through the slot and looping the strap around on itself. The buckle tongue should end up facing away from the strap loop, and the short end of the strap should be on the underside. If the movement of the tongue feels sticky, take the strap off and make the slot a little longer or wider.


Now fasten the strap onto itself with rivets or sewing. If you are using rivets, it's usually good to use more than one for re-enforcement. You can place them perpendicular or parallel to the strap. Leave enough room for the buckle to move freely in the loop, punch holes through both layers of the strap, and set the rivets.


If you want to sew instead of rivet, you should create the same kind of re-enforcement by sewing more than one row of stitches across the strap. Sewing a square, an X, or both is a good way to do this. Punch sewing holes through both layers (to do this more easily, you can remove the buckle while you punch the holes) and then sew with a needle and thread.


Create the opposing strap in the same way you would for a heel bar buckle.
Step 5: Attaching Double Bar Buckles

Attaching double bar buckles is actually the easiest because is doesn't require any hole punching or hardware. It does require, however, that the end of your strap extend about 3-4 inches past where you want to attach the buckle or more than that if you want a lot of room for adjustment.
To attach a double bar buckle, first, thread your strap through a double slider loop.


Next, loop the end of your strap around the second bar of the buckle. This time, you want the loose end of the strap to end up on top, so insert the strap into the buckle from the bottom. Now, thread the loose end of the strap through the double slider loop following the path of the other strap.


This attachment method gives you the freedom to adjust the position of the buckle if you need to by pulling more or less strap through the slider. You can decide here if you want the grain side or the flesh side of the leather facing up. It may be most visually appealing to attach the strap to your project with the flesh side facing out, so the grain side is what shows when the strap loops around the buckle.

Step 6: Other Types of Clasps

There are an almost infinite variety of more complex decorative clasps that you can use on bags and cases. They attach in different ways and are good for different purposes. You will find all kinds online and in leather stores, but here are a few examples.
Magnet Clasps
Magnet clasps are perhaps the most inconspicuous type of clasp which makes them great if you want a look with minimal hardware. They come in different strengths and with different kinds of attachment. They will keep a bag closed, but won't hold up to a lot of pressure, so they shouldn't be used for closures that need to be really secure. You also usually need two layers of leather to attach them, which can be annoying in some contexts.
The simplest kind is just two magnets that you attach by sandwiching each one between two layers of leather and sewing around it. The leather will decrease the strength of the magnet somewhat, so choose a strong magnet if you are using thick leather. Attaching these clasps will leave a ring of stitches on the outside of your project, so if you don't like this look, you should use the second kind.


Another common type of magnet clasp is a magnetic snap clasp. These clasps have nesting male and female sides like a snap but are held together by magnets, not mechanics. They attach with two tabs that go through slots in the leather and fold down over a metal plate on the other side. You need a second layer of leather over the back to hide this tab attachment, at least on the upper flap.


Swing Clasps
Swing Clasps are any clasp that closes with a swinging mechanism attaching one side to the other. Swing clasps attach to leather with screw posts, or, in the case of this clasp, rivets. They often have an antique look which will give your project a very specific aesthetic.


Turn Lock Clasps
Turn lock clasps are clasps that create a hole in the flap of a bag which is latched by inserting and turning the lock from the lower half of the clasp.

To attach the upper part, you need to cut a hole the size of the clasp aperture in the bag flap, insert the front layer of the clasp and fold down the tabs over the back layer


The turn lock part of the clasp attaches to the body of the bag by folding tabs through slits cut in the leather.


Step 7: Buckles and Clasps Quiz
{
    "id": "quiz-1",
    "question": "When you use a heel bar buckle, you also need a:",
    "answers": [
        {
            "title": "buckle tongue",
            "correct": false
        },
        {
            "title": "keeper loop",
            "correct": true
        },
	{
            "title": "roller bar",
            "correct": false
        }
    ],
    "correctNotice": "Yup. You need a keeper loop to contain the loose end of the strap.",
    "incorrectNotice": "That's not right, try again."
}
{
    "id": "quiz-2",
    "question": "A double bar buckle lets you:",
    "answers": [
        {
            "title": "adjust both sides of the strap",
            "correct": true
        },
        {
            "title": "attach straps of different sizes to one buckle",
            "correct": false
        },
	{
            "title": "create your own keeper loop",
            "correct": false
        }
    ],
    "correctNotice": "Well done!",
    "incorrectNotice": "Not quite, try again."
}
{
    "id": "quiz-3",
    "question": "True or False: You usually need two layers of leather to attach a magnet clasp.",
    "answers": [
        {
            "title": "true",
            "correct": true
        },
        {
            "title": "false",
            "correct": false
        }
    ],
    "correctNotice": "Yes!",
    "incorrectNotice": "Sorry, that's not it."
}
Step 8: Attach the Strap and Buckle to the Small Bag

Now attach the strap and buckle that will form the closure of your small bag.
First rivet the long strap onto the two rivet holes in the back of the bag. Use the rivet setting base inside your bag as a base to set the rivets, like you did when you added the snap to the pocket.


Now, take the small strap and loop it around the buckle. Make sure the right side of the buckle is facing out and the buckle tongue is pointing up away from the strap.


Use your hole punch to punch the two rivet holes through to the bottom layer of the strap.

To rivet the buckle to the bag, put the rivet setting base inside the bag again and pound two rivets through all three layers.


Now you can thread the long strap through the slits on the flap and buckle your bag closed!

Step 9: You Made a Custom Bag!

The main part of the bag is done! All you need to do now is decide how how you want to use your bag, and then add a strap or a belt. We'll go over making straps in the next lesson, but in the meantime, you are welcome to share a photo of whatever you've created!


