

Introduction: Making Leather Patterns


Now that you've seen how to use a pattern to create a wallet, I'm going to show you the basics of making your own patterns for simple leather designs.
Patternmaking can get very technical when you're making patterns for complex shapes, but it can also be very simple, and knowing a little about it will really help your creative process. Also, once you have a pattern for design, it makes it that much easier to re-create that project or make another version!
I use a combination of techniques to create patterns depending on the design. Sometimes I play around with cutting and folding paper first to create a general shape, sometimes I go straight to drawing a flat pattern either with pencil and paper, or with a vector design program. Most often I use some combination of these techniques.
At this point I digitize most of my smaller leather patterns because it makes it easier to organize them and alter them without wasting a lot of paper. I also do a lot of leather lasercutting, so having a pattern stored in the form of a vector file is very useful. I use Adobe Illustrator to create my vector patterns, but you could use any computer drawing program. (Autodesk Graphic is a good cheap option. With a one time price of only $30, it's a lot cheaper than an Adobe Creative Cloud subscription.)
I'll talk a little about basic patternmaking concepts, then I'll show you how I made the pattern for the small bag we'll be making for the rest of the class. There is a lot of information in this lesson, so if you find it overwhelming, don't worry, you don't need to absorb everything I'm covering here in order to move forward in this class. You can absolutely just work with one of the two pattern variations I created (which are available for download in the next lesson). Whenever you're ready to make your own patterns, this information will be here for you.
In this lesson I'll be using:

Step 1: Anatomy of a Pattern
A pattern is a two dimensional template that has all the information you need to cut specific shapes out of a flat material that can be assembled to form a design. A leather pattern usually includes the following information:
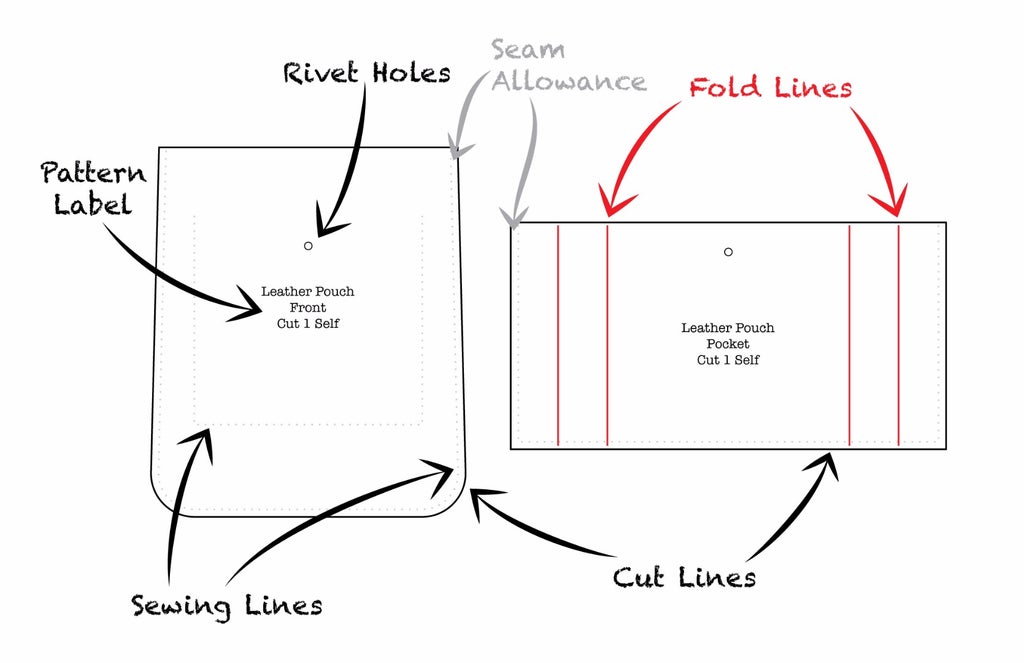
Cut Lines: the lines on a pattern that indicate where you need to cut your leather, these are usually the outside borders of the pattern, but may include internal cut-outs as well. In my patterns, cutting lines will always be indicated by solid black lines.
Sewing Lines: internal lines on a pattern that indicate where two or more pieces are going to be joined by a line of stitching. On my digitized patterns, these lines are always indicated by dotted lines or lines of tiny circles.
Fold Lines: internal lines on a pattern that indicate where your leather will be folded and creased as you assemble your design. On my digitized patterns, fold lines are shown in red.
Seam Allowance: in order to sew, glue or rivet leather pieces together we need to leave room between the sewing line or other attachment point and the edge of the leather. This space is called a seam allowance. The width of seam allowances can vary based on design and materials.
Holes: black circles on my patterns show thethe placement of holes that need to be punched for rivets, snaps, buckles etc.
Pattern Label: Each pattern piece should be labeled with some information to identify it. This information should tell you: which piece of the pattern this is, what material it should be cut in (the main material of a design is called the "self," and a secondary material is call the "contrast"), and how many copies of that piece should be cut. (If you need to cut more than one copy of the exact same pattern piece for a design, you can usually just create one pattern piece in paper, and then cut it out multiple times in leather.)
Step 2: Ease and Leather Thickness
When you are creating a pattern to fit around an object, you almost never use the exact dimensions of that object, instead you need to add a little extra wiggle room or ease to your pattern dimensions.
The amount of ease you need to add often depends on the leather you are using. For thin leather you only need to add a small amount of ease, for thick leather you need more. For flexible leather that has a little stretch to it, you can add less ease, for stiffer leather you will need more ease.
For example, say you want to design a flat two piece pocket that will hold a single credit card, how big does your pocket pattern need to be? The credit card is 3 3/8" x 2 1/8". If you were to make the inside of the pocket exactly the dimensions of the card, it probably wouldn't fit, or if you did manage to squeeze it in, you would have trouble getting it back out.

To add the right amount of ease, measure the thickness of your leather and add that amount of ease to each side of your pattern pieces, except on the side with the opening. If your leather is less than 1/16" thick just use 1/16" as your ease measurement. Let's say we're working with 1/8" thick leather, so the final pieces should measure 3 1/2" x 2 3/8" along the sewing lines.

Ease on Folds: Now imagine you want to create the same pocket, but you want to do it with one folded piece of leather not two separate pieces. If you take a piece of 1/8" thick leather that is 6 3/4" long (double the length of your credit card) and fold it in half, will it make a pocket deep enough to hold the card? No it won't.

Why? The inner depth of this folded pocket will be 1/8" less than the length of the card because the thickness of the leather will take up that 1/8" at the fold. Therefore, if you want the folded pocket to be as long as the card, you need to add 1/8" to the pocket on each end for a total of 1/4" of ease on that pattern piece.

Step 3: Patterning in 2 Dimensions
The basic goal in making most patterns is to figure out how to transform a flat material into something that will fit around a three dimensional object. The more complex and three dimensional the object, the more complicated your pattern will usually be. Here are some important things to keep in mind as you travel from two to three dimensions.
Patterning for Thickness Using Ease: going back to our card pocket example, now say you wanted to make a two piece pocket that would hold not just one card, but a stack of cards 1/2" thick. How long and wide does a flat pocket need to be to accommodate this thickness?

If you are working with 1/8" thick leather, first of all, you know you need to add 1/8" ease on the sides and bottom of the card pocket.
To make room for the 1/2" thickness of the stack, you also need to add half that thickness (1/4") to the sides and bottom of the pattern. Since you are going to be using two pieces to create this pocket, the 1/4" you add to each side will add up to the whole 1/2" thickness you need when the pocket is put together. You don't need to add that 1/4" to the top of the pocket because it doesn't need to bend around the sides of the stack of cards.

So when you're creating a flat pocket for an object with some thickness, the general formula is this:
Width of pattern without seam allowance =
width of object + thickness of object + (thickness of leather x2)
Length of pattern without seam allowance =
height of object + 1/2 thickness of object + thickness of leather

As I mentioned before, the type of leather you are using can affect these measurements quite a bit. If your leather is really stiff you will have to add even more ease, if it's a little stretchy, you can sometimes get away with less. Unless you are trying to make something that is intentionally tight fitting, it's usually good to err on the side of more ease, rather than less. Some of this can really only be figured out by trial and error, but as you do more leather patterning, you will start to get a feel for it.
Step 4: Patterning in 3 Dimensions
Adding extra room to a flat pocket like we just talked about is the most basic way to make room for objects with some thickness, but it really only works for relatively thin objects. To create designs with built-in three dimensional shape you need to start creating patterns that are more than just two flat pieces of leather sewn together.
Gussets: One of the best ways to do this is to add a gusset to your design. Let's go back to our imaginary 1/2" thick stack of cards and create a different kind of case for it.
We'll start by taking the basic width and height of the cards and adding the 1/8" ease for leather thickness to the sides and bottom, this is the size of the front and back pattern for your pocket before you add the seam allowance.

Instead of making the pocket bigger so it will fit around the 1/2" thick stack of cards, we are going to add a side piece that accommodates thickness of the stack. This side piece is called a gusset. The length of the gusset pattern will be the length of the sides and base of the pocket combined (6 1/4") + 1/4" ease, and the width of the gusset pattern will be the stack depth of 1/2" + 1/8" ease.

To construct this case, these three pieces would be sewn together like this:

This is a basic gusset design, of which there are many variations. There are a lot of other ways to create three dimensionality in cases, but most of them are based on the same basic concept: If you are creating a pattern for a three dimensional object you usually need a seam where the angle of the object changes, the more seams you have, the more you can shape your design. There are also ways to create shape and volume with folding and pleating techniques. But for now we are going to focus on seams.
Step 5: Designing a Simple Leather Bag

Now we are going to take all these concepts and use them to make a pattern for a simple leather bag. As you may have noticed, the patternmaking techniques I've been discussing center around the idea of making a case to hold an object. Not every leather project involves encasing something, but many do, and learning how to make leather bags is a good way to practice basic leatherworking techniques.
The first step in my design process is almost always sketching. Well, actually, first I look for design inspiration by falling into a lot of Pinterest holes, but when I have a pretty good idea what I want to make, I sketch. I usually start by making rough sketches of a few ideas, then I choose one design and do a more detailed technical sketch, with some dimensions.

When you are designing an accessory, like the bag we're patterning, you need to think about its features and dimensions from an aesthetic standpoint and a practical standpoint. A good thing to do, is to define your constraints and work around them. For the little bag, my constraints were: I wanted it to be big enough to hold my phone and a few other essential objects, but also small enough to be comfortable as either a belt pocket or an underarm pocket. I also wanted it to be constructed using sewing, and I wanted to keep the aesthetic of it fairly unisex.
With all that in mind, I ended up designing a small rectangular bag with a one piece gusset, a flap, a strap and buckle closure, a small accordion pocket with a snap, and two strap loops to connect the whole thing to a single strap, belt or a shoulder harness.

When you are designing a bag like this, you aren't literally designing it to fit precisely around a specific object as we were in the examples in the last two steps, but the same concept still applies. So, to get an approximate size, I took a few measurements of objects like my phone, and the distance between my waist and my underarm, and came up with a set of dimensions based on these measurements. To start out with, all you really need is a height, width and depth dimension for the bag when the flap is closed.
Step 6: The Pattern Draft

The first step in turning your design into a pattern, is to create what I call a pattern draft. A pattern draft is a full sized front, back and (sometimes side view) technical drawing of your assembled final piece with all the correct measurements, it doesn't necessarily show all the pattern pieces you need to create, but you will use it to determine the proportions and design elements, then trace pattern pieces from it.
To create a draft, first draw a horizontal line near the bottom of your paper, then draw a perpendicular line coming up from the center of this line. This will be the centerline of your draft.

Now take your width and height measurements, and draw the basic outline of the bag from a front view around this center line. I made my bag 5" wide by 6" tall. If you are working with paper and pencil, use a ruler to draw your lines, if you are working in Illustrator, use the rectangle or pencil tool.

Take a look at the proportions of this outline and decide if you like the size and shape, if you don't, change it. Remember that the bag will end up slightly smaller than it appears here because of the ease that is taken up by the leather thickness. I decided to make the top of my bag slightly narrower than the bottom (I took 1/8" off each side) because I thought this created a nice shape. I also rounded the bottom corners because I liked the look and because curved edges will make it easier to sew in a one piece gusset.

Now add the details to the front of the bag. Draw in the flap as if it was closed add a pocket, buckle and strap and side loops. Make sure there is enough room for your buckle closure below your flap. Refer to your sketch, but alter your dimensions if you need to, so they look good on your draft. Think about what you will want to put in the front pocket and create its dimensions accordingly. I made mine 4" wide by 3 3/4" tall. If you want, you can draw these details on one side only, then fold your paper along the centerline and trace the details to the other side with an overstitch wheel. Below you can see what my front draft looked like when drawn by hand.


And this is what my draft looked like in Illustrator. Working this way is nice because you can easily test color combinations on your design.

Now draw a back view with the same details. I made my strap come down the back of the bag about 2 3/4" inches and rivet in two places so it could be used as a belt loop.


Look at your final pattern drafts and decide of you like how everything is coming together, then make any small alterations. Remember that changes you make on the front might also need to be made on the back.
Step 7: Making the Front Pattern Piece

Now you are going to take the draft you've created and use it to create separate pattern pieces for each element of the bag.
If you are working in pencil and paper, you can trace off pattern pieces by placing paper over the draft (this is why it helps to have semi-translucent pattern paper). If you are working in a vector design program, just copy and paste different elements from the draft to turn into individual pattern pieces.
To create the front pattern piece, trace the front outline of the bag onto another piece of paper, also marking the shape of the pocket. Trace the sides and bottom with a colored pencil. Use your ruler to help you trace straight accurate lines whenever you can.

Now you need to add a seam allowance. To do this use your clear ruler to draw a second outline offset 1/8" out from the edge of the pattern on the sides and bottom. We don't need to add seam allowance on the top because there isn't a seam there. Seam allowances can differ in width depending on the project, but 1/8"-1/4" is a pretty good width for most leather projects because we don't have to worry about leather fraying like fabric.


Now we need to mark the sewing line where the pocket is going to be sewn on. To do this, mark a sewing line offset 1/8" in from the edge of the pocket. Mark sewing lines in a different color, or with a dotted line to differentiate them from cutting lines.

Step 8: Making the Gusset Pattern Piece

Now we are going to create a gusset to form the side of the bag. To create this piece, first take your cloth measuring tape and measure all the way around the outside seam of the bag on your draft, then add 1/4" ease to this measurement to account for the thickness of the leather. This will be the length of your gusset.
You should have come up with an approximate depth dimension when you were doing your detailed sketch, I decided I wanted my bag to be 1 5/8" deep, this measurement will be the width of your gusset. Draw a rectangle using the length and width measurements, then give it a seam allowance offset 1/8" out on both long sides, but not the ends.
Step 9: Making the Back Pattern Piece

To make the back pattern piece, we are going to combine a few elements from the draft.
First, trace off the outline of the back of the bag, including the holes for the rivets on the strap. Take your clear ruler and add 1/8" seam allowance to the sides and bottom of the pattern piece.
The front flap piece is an extension of the back of the bag, so we need to add that to this piece, but we also need to give the flap a little more length to account for the depth of the bag. To do this, take the gusset width measurement, divide it in half and draw a line this far above the top of the bag.

Why aren't we adding the entire width of the gusset here? If the leather we were using was stiff and the bag was going to hold its shape we would need to add the entire width of the gusset to the flap to make it long enough, but because the leather is soft, the bag will have a tendency to fold flat at the top unless it is stuffed full. We don't want the flap to be too long to buckle, or too short, so we will compromise by adding half the gusset width to the flap. This is another good example of how you need to adjust your patterns based on the kind of leather you are working with.
Now add the front flap to your back pattern piece by tracing it off your front draft. Take your ruler and extend the side cutting lines from the back up to meet the sides of the flap, blending the lines so they are straight. This may change the angle of the sides of the flap slightly, that's ok.


Step 10: Making the Pocket Pattern

To make the pattern for the pocket, first trace off the outline of the pocket from the draft (or just draw a new square the same size).

We are going to add accordion pleats to the side of the pocket so it will be able to fit more inside it. I decided to make the pleats 3/4" wide. There will be two creases on each side so I added 1 1/2" to each side, drawing lines on the pattern to show where the folds will be. Then I marked seam allowances 1/8" in from the edges along the sides and bottom.

Step 11: Patterning the Straps

The last thing we need to do is make patterns for the straps. You can trace them off the draft, or just draw new shapes since they are simple ones.
To make the strap long enough, you also need to add the same half of the gusset width that you added to the flap between the back and front sections of the main strap. I made my straps 3/4" wide, and 12" long. Be sure to include the rivet hole positions on the back of the strap, and make 8 buckle holes 1/2" apart on the front of the strap. These holes and the buckle closure will allow the position of the flap to adjust a little depending on how full the bag is.


The strap that will hold the buckle at the base of the bag will be a loop that is riveted to the body of the bag. Make this piece long enough to form a loop that reaches from the bottom front seam of the bag to the point of the flap with a little extra and a pointed end on one side (mine is 3 1/2" long). At the point where the loop folds over there will be an oval shaped hole punched into the strap to attach the buckle.

The two looped straps at the top corners of the bag will be sewn in on one end and then looped around and riveted to hold D rings. Double their length to create the loops, add a rivet hole, and sewing lines 1/8" in from the edge.

Step 12: Making Fringed Pattern Pieces

If you want to add fringe to a bag like I did with the larger version of mine, you have two basic options of how to attach it, you can create a separate piece of fringe that you attach like trim, or you can incorporate the fringe into one of your pattern pieces. On the fringed version of my bag, I did both.

I think adding more than one layer of fringe tends to look nice because it gives the fringe more dynamic texture and depth. I decided add fringe along the bottom back seam of my bag, and to the bottom of the front pocket. To create the design of this bag I took the pattern I had created for the small bag in Illustrator scaled it up, and created a pattern draft with fringe details to see how long I wanted to make the two layers of fringe. Then I extracted new pattern pieces for the fringed pocket and the fringed trim to add to the back seam.
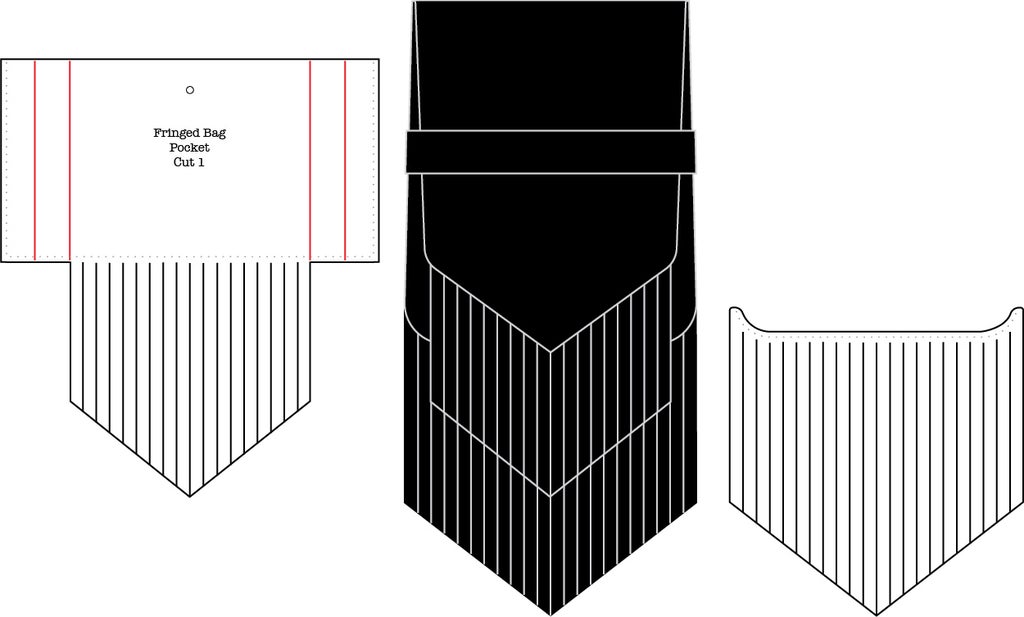
On the front pocket of bag, I simply extended the main section of the pocket down into a pointed shape that will be cut into fringe (left).
It is usually easier to incorporate the fringe into a pattern piece like this if you can, but sometimes it doesn't work. For example, on the back seam of my bag, if I had just extended the back of the bag down to make fringe, the flesh side of the fringe would have ended up facing forward, and that wasn't the look I wanted. Which is why,in this case I had to create a separate piece of fringe that would be sewn into the back seam (right).
Step 13: Make a Mock-Up

After I make a pattern, I usually cut it out and tape it together to see how it's going to look. This is especially useful if you've designed your pattern entirely on the computer because it can be a lot harder to get an accurate idea of scale in the digital world.

If you are taping together 3 Dimensional seams like the gusset on this pouch, you will have to snip the seam allowance so it will curve around the corners.

Keep in mind that your leather will fit together slightly differently because of its thickness, so not everything will work right in a paper mock up, but if you see any aesthetic or glaring technical issues, go back and correct them on the pattern itself before you move forward.
Step 14: Patternmaking Quiz
{
    "id": "quiz-1",
    "question": "The space between the sewing line and the edge of the leather is called:",
    "answers": [
        {
            "title": "border",
            "correct": false
        },
        {
            "title": "seam allwance",
            "correct": true
        },
	{
            "title": "selvage",
            "correct": false
        }
    ],
    "correctNotice": "You're right!",
    "incorrectNotice": "Sorry, try again."
}
{
    "id": "quiz-2",
    "question": "Which type of leather would require the most ease when patterning?",
    "answers": [
        {
            "title": "a stretchy 3 oz cowhide",
            "correct": false
        },
        {
            "title": "a stiff 8 oz latigo",
            "correct": true
        }
    ],
    "correctNotice": "Right! The thicker and less flexible the leather, the more ease you need to add to a pattern.",
    "incorrectNotice": "Nope. Guess again."
}
{
    "id": "quiz-3",
    "question": "What do you call the side pattern piece that adds three dimensionality to a bag pattern?",
    "answers": [
        {
            "title": "a gusset",
            "correct": true
        },
        {
            "title": "a divot",
            "correct": false
        },
	{
            "title": "a panel",
            "correct": false
        }
    ],
    "correctNotice": "You got it!",
    "incorrectNotice": "No, that's not it. Try again."
}
Step 15: What We Learned
If you've followed this lesson all the way through, you should now have a pretty good idea how to go about making leather patterns for your own designs. Making a well designed pattern can be a bit tedious, but it is one of those essential planning steps in a project that you will never regret doing, because it will actually save you time and aggravation in the end.
In the next lesson, we'll start constructing our custom bag, so make sure you have your pattern ready. If you are making the fringed bag and you want a few more details about how to create pattern pieces for fringe, check out the end of Lesson 12: Creating Leather Fringe.
If you decided to take on a challenge and create a pattern for your own custom design, we'd love to see what you've come up with! If you like, post a photo of your design sketch or pattern in the discussion section of this lesson :)


