

Introduction: 3D Ornaments (2 Varieties)


These beauties aren't incredibly hard, but they look like they were!
Follow the steps outlined in this Instructable and you can easily create two different ornaments.
Step 1: Gather Your Materials & Tools


Materials (only 3 items needed!):
- Copy Paper (or paper of choice)
- Thread (or ribbon if you prefer)
- Glue (I like Tombow Multi Purpose)
Tools:
- Paper Trimmer
- Scissors
Step 2: Cut Your Paper

Start by cutting your paper into squares.
For this Instructable, I cut 4-1/4" squares.
Please note: If you only want to create a single ornament, you need 1 square. For the full ornament, you'll need 6 of the same sized square.
Step 3: Folding


Fold each square as follows:
- In half, diagonally
- Fold in half again, bringing the two points together to create a triangle.
Step 4: Cutting


Cut each triangle as follows:
- Start with the longest folded edge to the left
- Cut a line approximately a 1/2" from the left and stop approximately a 1/2" from the top edge
- Cut a second line approximately a 1/2" from the first and stop approximately a 1/2" from the top edge. It's important that you don't take this line up as far as the first.
- Repeat on all your triangles
Step 5: Gluing, Step 1


- Carefully unfold all your triangles
- Take the center points, curl inward and glue the ends together
Step 6: Gluing, Step 2


- Flip over
- Take the next cuts, curl into the center and glue points/ends together
- Your ornament should look like the 3rd picture - the two you've glued together are on opposite sides
Step 7: Gluing, Step 3


- Flip your ornament over again (back to where you started)
- Curl the points into the center and glue together
- Your ornament should look like the 2nd picture (the 1st and 3rd curled in the same direction and the middle one in the opposite direction).
Step 8: Ornament 1 Complete


Happy with this ornament? Stop here!
- To hang it up, take a needle or small hole punch and thread your thread or ribbon through the pointed tip
- Tie a knot
- Hang where desired
Want to continue with the full ornament? Move forward through the next steps.
Step 9: Full Ornament

To create a full ornament, you need 6 single ornaments (as completed in the steps previous to this one).
Step 10: Gluing


- Take your first single ornament and add some glue to the bottom point
- Pinch and hold your second ornament to adhere two together. It's important that all your ornaments are glued in the same direction.
- Glue the first 3 together and then the next 3.
Step 11: Finishing Your Ornament


- Add some glue to the bottom point of one set of 3 ornaments
- Glue the second half to the first and hold in place. Don't be afraid to get your fingers in there to glue them as closely to the middle as possible
It's important to note that copy paper is quite light, so using only glue worked great. If you're using a heavier stock of paper, you may require a glue gun or stapler to make sure your ornament stays together.
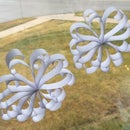
Step 12: Completing Your Ornament

Your full ornament is now complete!
To hang it, thread as you did in Step 8
Hang your beauties and wait for the compliments!

Participated in the
Three Ingredient Challenge

Participated in the
Homemade Gifts Contest 2015


