

Introduction: Arduino Radar


In this tutorial, we will learn how to make a cool looking Arduino Radar using ultrasonic sensor. Arduino radar allows you to detect objects within a short range. This project is easy and fun to make, obviously. You can use this project for showcasing in school science fair. I have added the video to help making this radar easily. Lets start making it…..
Overview
To make this radar we need three basic components. First one is the Arduino which processes the data sent by the sonar sensor. Sonar sensor has a transmitter which produces and transmits ultrasonic sound wave which later is received by the receiver after reflecting from any object. However, servo motor is the third component which revolves with in a particular degree and helps the radar to detect objects.
Components
The listed components are needed to make a arduino radar using ultrasonic sensor.
- Arduino Board (i have used arduino Uno)
- Servo motor (mg-996)
- HC-SR04 Ultrasonic sensor
- Bread board
- Jumper wires
Step 1:

First of all, we have to cut a card board (15cm * 8cm). Then, glue arduino and servo motor on it.
Step 2:

Now, we have to make a “L” shape stand for Ultrasonic sensor (HC-SR04) which keeps it still on the servo motor.
Step 3:

Now, we have to connect sonar sensor to arduino. Be careful while connecting VCC and GND of the sensor to 5v and GND of arduino respectively. Later, connect the trig pin to 8 and echo pin to 9 of arduino.
Step 4:


After connecting sensor to arduino it’s time to attach servo motor with it. Again, be cautious about connecting VCC and GND of servomotor. Connect servo signal to pin 10 of arduino.
Step 5: Required Software for Arduino Radar:
You will need arduino IDE and Processing IDE to run this radar
project. Processing IDE will get the values sent from arduino and illustrate the object area (red marked). Follow the links to download them.
Processing IDE: https://processing.org/download/support.html
Arduino IDE: https://www.arduino.cc/en/main/software
Step 6: Arduino Code:
#includeconst int TriggerPin = 8;
const int EchoPin = 9;
const int motorSignalPin = 10;
const int startingAngle = 90;
const int minimumAngle = 6;
const int maximumAngle = 175;
const int rotationSpeed = 1;
Servo motor;
void setup(void)
{ pinMode(TriggerPin, OUTPUT);
pinMode(EchoPin, INPUT);
motor.attach(motorSignalPin);
Serial.begin(9600);
}
void loop(void)
{ static int motorAngle = startingAngle;
static int motorRotateAmount = rotationSpeed;
motor.write(motorAngle);
delay(10);
SerialOutput(motorAngle, CalculateDistance());
motorAngle += motorRotateAmount;
if(motorAngle <= minimumAngle || motorAngle >= maximumAngle) { motorRotateAmount = -motorRotateAmount;
}}
int CalculateDistance(void)
{ digitalWrite(TriggerPin, HIGH);
delayMicroseconds(10);
digitalWrite(TriggerPin, LOW);
long duration = pulseIn(EchoPin, HIGH);
float distance = duration * 0.017F;
return int(distance);
}
void SerialOutput(const int angle, const int distance)
{
String angleString = String(angle);
String distanceString = String(distance);
Serial.println(angleString + "," + distanceString);
}
Step 7: Processing IDE:


We can easily locate any object within the range (40 cm) by using processing IDE. If you don’t have the IDE on your pc just download it.
Before using this IDE, we have to configure the font.
For this, we have to install “OCRAEXT.TTF” file which is located in Radar.zip .
Then, go to tools/create Font. Select “OCRAExtended” from the list, choose font size 25 and click OK.
Step 8:


Now, we have to find the COM Port number. Go to Arduino IDE and find the Com port(COM3 in photo). Put the COM port number in line 13 of processing code (COM3 in photo).
Step 9: Final

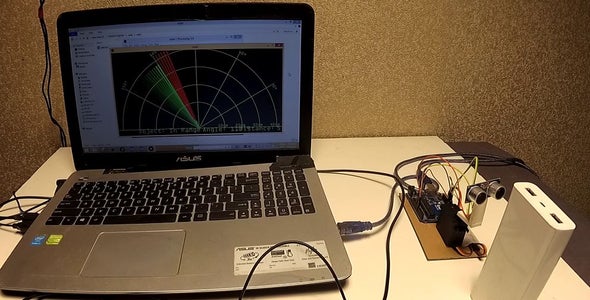
Finally, pressing the Run button will show a processing window. It will show both servo angle of the radar and the object distance.
Follow our Blog to learn more interesting projects.... https://aboutsciences.com
You can download the Radar.zip file from here,


