

Introduction: Build a Chamber Vacuum Sealer.


Most of you are familiar with the food saver vacuum sealers, technically a channel vac sealer as shown in the second photo.
There are expensive versions like the VacMaster PRO350, but by and large they are restricted to the embossed pattern type plastic bags.
Some folk have found work arounds using smooth plastic bags on a channel vac, like straws or strips of shower sponges (bunched up nylon net), but the finished product looks like a dogs breakfast and leaves much to be desired.
Enter the chamber type vacuum sealer, it has none of the drawbacks of the channel vacs and can use any smooth plastic bag that the heat element is capable of sealing. I have even vac'd and resealed a foil type coffee beans bag, mylar plastic I believe.
Bonus feature of using a chamber vac is that the plastic bags are much cheaper than the embossed ones.
Final cost was 2500 ZAR (South African rands). To put it into perspective one needs to compare it to the price of a commercial unit, the Vala DZ300 costs 15000, I dont know if a DZ 200 version is made, but Im guessing it might retail in the 9999 area, so my home made unit is roughly 4 x cheaper.
While shopping at the Cape Town agents for the Vala machines, I had a look in their repair section and saw a DZ620 with a fractured 20mm thick domed lid, probably an expensive replace, which brings me to another point.
My unit is easily repaired by me, spares for the pump and sealer are available and having built the unit, I have the skills to repair it too.
Step 1: Let Me Show You Its Features. Lol


No fancy electronics here, everything is manual, start the pump till the desired vac level and press the seal button.
I initially used a 0.7mm thick roasting pan for the chamber, don't know what I was thinking, some calcs show a force of 460kg on the bottom of the pan, that's approx 1030lbs which caused the pan to warp like wet spaghetti.
I pop riveted a section of angle iron underneath to reduce warping and the sharp edge of the angle almost tore through at the upper vac levels the small KNF pump achieves.
I'm busy with plan B which is 8mm thick steel bottom plate, 3mm x 50mm side walls with a top cap strip of 3mm x 20mm for the silicone seal to seat against. It took the better part of a 10 ton press to straighten out the curve caused by welding, so it should be more than adequate for the task.
I used some brake tubing epoxied into the pan so that I could access the vac pump without having to open the box every time.
Step 2: Vacuum Pump


The vac pump is a laboratory diaphragm pump, KNF Neuberger N022AN18 which had a broken reed valve and plenty of corrosion. I pulled it apart and glass beaded the head with a sand blaster.
A quick fix was to cut a new valve out of a feeler gauge with the dremel, while I waited for the agents to send a new set of valves.
It worked well enough but didn't get down to the 100 mbar abs spec, there was some flutter on the gauge needle showing the the valves were fairly worn out. When the new set arrived, vacuum was restored back to spec levels.
This is the perfect pump for this application, requiring no maintenance or oil top ups at all.
Step 3: Lid and Seal


I used 15mm thick perspex for the lid with a custom seal that was poured in a 6mm x 5mm groove routed in a piece of mdf. I used epoxy release agent, needed about 3 coats but the silicone released with no problems.
I first used the red auto gasket high temp silicone but it was too soft and deformed too much under vacuum. I tried a 2 pass method because I didn't know how much it would take and was worried I would need another tube halfway.
Next, some simple maths yielded a volume of 32ml and I used black auto silicone sealer which was firmer, it released fine and I was pleased with the end result.
Initially the silicone seal bar for the element pressed too hard and sealed the bag as soon as it was put in the chamber, under vac it would inflate like a balloon, the solution was to clamp the element after vacuum was completed, how the commercial version does that is unknown to me.
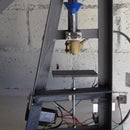
My idea was to have the presser mounted on a sliding bar, 3mm chromed rod from a cd rom, press it down manually at whatever level of vac I wanted and then engage the seal button. It works fine with a small O ring to stop vac leaks.
Step 4: Sealing Element.


Here I used aluminum channel on standoffs I milled out of solid bar and then covered the channel with 2 layers of kapton tape to prevent the element shorting out. One end of the element is screwed to the pan via the standoffs and the other end is isolated with a bulkhead fitting that came with the KS200 impulse sealer.
The element expands in length and a tension spring is needed to prevent the element kinking up, it then gets hot enough to burn the teflon fiber top wrapping that touches the plastic bag.
My solution was to use a section of a tape measure's coil return spring.
Step 5: Internals.


Basically, a Vala KS200 impulse sealer was gutted and all its internals mounted inside the box, along with a vac pump.
I tee'd the sealer supply into the switch panel of the pump so that both devices have power when the unit is plugged into a socket, exactly how they originally functioned.
The vac gauge was bought new, it fits a Vala DZ300, but seems similar to the gauges from all the DZ range of machines.
Step 6: Multi Use Tool.


I'm well pleased with the chamber vac's functionality, its very useful, at the very least it can be used on my Harvey oil filter, but with the vac port it can do much more.
Removing bubbles from stirring epoxies, urethanes and silicones is a handy feature, but it can also be used in experimental work.
I was expecting the slice of bread to get flatter, still it will be interesting to see if it develops mold before or after its companion crust left in the bread packet.
In parting, Tigger caught nothing, not for want of trying though, but his space suit inflated like a balloon in the vacuum on the moon's surface and he rolled around like Michelin Man.
Step 7: Improved Pan


My first attempt with the SS roasting pan was a fail at higher vacuums, so I welded up a steel version using 5mm steel flat bar for the bottom and 3mm strap iron for the rim.
Plenty of wire brushing and leak testing later and Plan B was working well.


