Burn a New Bootloader - Arduino Pro Mini

60K3650

Intro: Burn a New Bootloader - Arduino Pro Mini

I wanted to re-purpose an Arduino Pro Mini that I hadn't used for a while, so - as I do with all the Arduinos I re-use - I tried to upload the Blink sketch to return it to a sort of 'default' state and to prove to myself that it is still working.. This failed miserably, and led to a fair bit of wasted time checking connections, the voltage of the Pro Mini and using a couple of different programmers, and so on.

So I thought it may be useful to someone if I briefly explained what I did to fix the issue I had, and return the Pro Mini to a working state. It may also be of use if your Pro Mini has arrived without a bootloader.

STEP 1: Stuff

Obviously, an Arduino Pro Mini that you can't upload sketches to

Arduino Uno (can be done with other variants)

6 male-to-male breadboard patch cables

Solderless breadboard

FTDI programmer and cable (to check the fix has worked)

Arduino IDE

STEP 2: Symptoms and Investigation

I normally upload sketches to to a Pro Mini using a USB-Serial FTDI programmer, and plug the Pro Mini opposite it on a breadboard. This way, the pins match up and it does away with any messy cabling. This arrangement has worked without issue numerous times in the past.

This time, however, when I tried to upload the Blink sketch, the Arduino IDE started bleating on about the "programmer not responding" and giving an avrdude error:-

avrdude:stk500_recv():programmer is not responding (sorry, I didn't screenshot it at the time)

I also noticed that the LEDs on the FTDI programmer only flickered a couple of times, when they normally go berserk during a successful upload.

So, I

  • Checked the connections on the breadboard - looked fine.
  • Tried another programmer (same model) - no change.
  • Changed USB port on the pc - waste of time
  • Updated and repaired the drives for the FTDI device - no difference
  • Tried another Pro Mini in the same arrangement - worked like a dream.

Aha. Must be the Pro Mini. I tried to think back to the last time I used this one but it was more than a day ago, so I had little chance. I was about to resort to the Internet when I did remember (it works sometimes) that I had an ESP8266 arrive with a corrupted bootloader and had similar issues. The more I though about it, the more it made sense and tied in with what i was seeing.

STEP 3: Fix

There are a number of ways to burn a bootloader to an Arduino device, but the one I used (for convenience and speed) was to use an Arduino Uno as an ISP (In-System Programmer). This is well documented and I've used it a few times for different things.

First step is to set up the Uno to be an ISP:-

  • Connect the Uno to the PC (using USB)
  • Open the Arduino IDE (I'm using v1.6.11)
  • Check the board: Tools Menu -> Board ->Arduino Uno
  • Check the port: Tools Menu -> Serial Port -> [select the port for the Uno]
  • Load the ISP sketch: File menu -> Examples -> ArduinoISP ->ArduinoISP
  • Upload - once complete, the Uno is configured as ISP
  • Remove connection from Uno (power off)

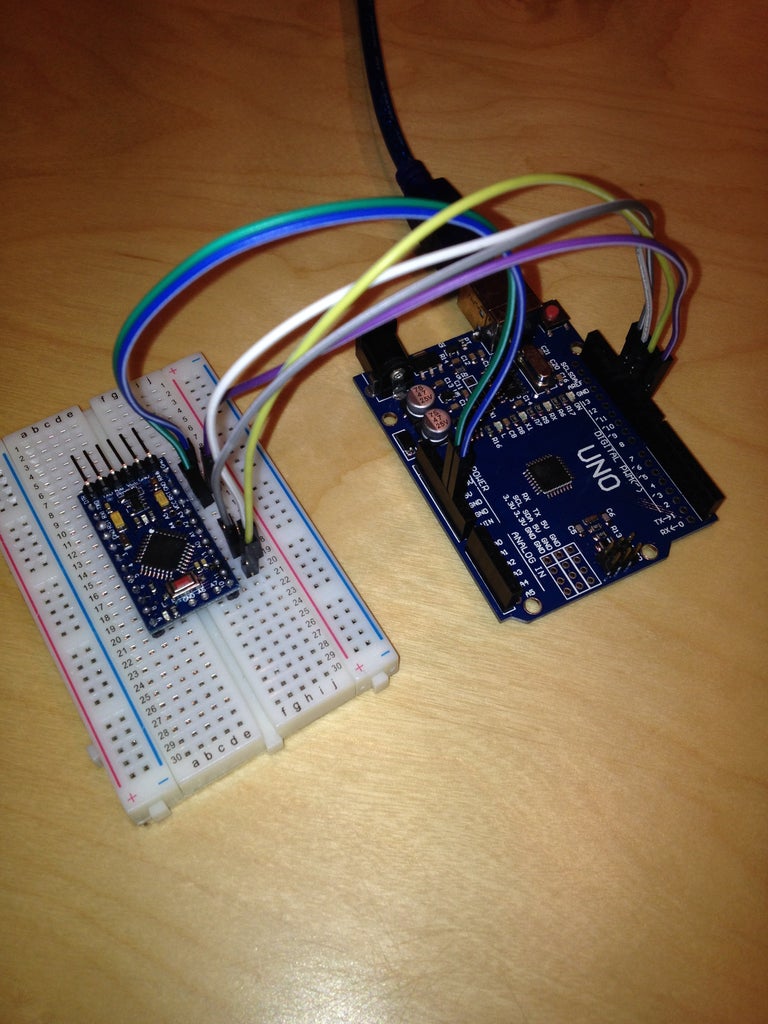
Second Step is to connect the two devices for programming:-

  • Uno Pro Mini
  • 5V (vcc) ------------------- VCC
  • GND ------------------------GND
  • Pin 10 ---------------------- RST
  • Pin 11 ---------------------- Pin 11
  • Pin12 ---------------------- Pin 12
  • Pin 13 ------------------- -- Pin 13

The connections are straightforward and, as can be seen in the photograph, I used a breadboard. I was going to include a Fritzing diagram, but it was more confusing.

Third step is to burn the bootloader:-

  • Connect the Uno to the PC (Arduino IDE still open)
  • Change the board: Tools Menu -> Board ->Arduino Pro or Pro Mini
  • Check the speed and processor: Tools Menu -> Processor -> ATmega328 (5V, 16MHz)
  • Choose the programmer> Tools Menu -> Programmer -> Arduino as ISP
  • Burn the bootloader: Tools Menu -> Burn Bootloader

The LEDs on the two Arduinos should now perform a synchronised dance while the bootloader is written - only takes a few seconds, and then the IDE shows a completed message.

Fourth step, if you want, is to perform a test upload using your FTDI programmer. If the new bootloader is working, you should see the LEDs on the FTDI programmer and the Pro Mini showing activity.

STEP 4: Wrap Up

I hope I've made it easy to see that, if you come across an Arduino or similar device whose bootloader is messed up, it isn't too arduous a task to burn a new one. As long as you have access to a Uno or similar, the IDE and some cables, you can be on the way to uploading the sketch for your next Evil Genius weapon or World Domination IoT thing in next to no time.

This is my first Instructable. I've enjoyed putting it together, and I'd be happy to receive any constructive comments or criticism.

28 Comments

Thanks! I thought I'd bricked one of my Arduino Pro Minis (5V/16 MHz), but I was able to re-program the bootloader using these instructions. I avoided having to use the solderless breadboard by using M-F jumpers, male side on the Uno and female side on the Pro Mini, on which I'd installed headers.

The reason I thought I'd bricked the Pro Mini is that I did a watchdog timer (wdt) test, and evidently, the Pro Mini bootloader doesn't handle the wdt correctly. See https://forum.arduino.cc/t/atmega328-locks-up-on-watchdog-reset/921269 . Some people say you can fix this by putting an Arduino Uno bootloader on the Pro Mini, and thereafter treating the board as a Uno. To do this, in the Third Step above, do NOT change the board type to Pro or Pro Mini, leave it as Uno. I tried it, and it seems to work (at least my code, including the wdt seems to work), but there may be side effects that remain to be discovered.

Some question the need for using the wdt. My reason is that I will be running the Pro Mini in an environment that may have glitchy power, and I'd like it to be able to recover from a power glitch. Think about what happens to the 12 VDC power in a car when you energize the starter, for example.

Hello, With your help I was able to reset my Arduino Mini Pro.
After that I directly load the example "blink". It works fine.
But when I want to reload the same program (by changing the timing) the loading doesn't happen anymore.
Then I have to reset the Mini Pro again in order to be able to reload a program.
Do you have any idea what happens?
Thank you again for your publication.
My best regards.
Dan
I'd like to use a Nano as the ISP, because I do not have a Uno. I assume the same pins will apply, correct?

This doesn't work for me, I get this:

Arduino: 1.8.1 (Windows 10), Board: "Arduino Pro or Pro Mini, ATmega328 (5V, 16 MHz)"

avrdude: Yikes! Invalid device signature.

Double check connections and try again, or use -F to override

this check.

Error while burning bootloader.

This report would have more information with

"Show verbose output during compilation"

option enabled in File -> Preferences.

Do you mean pin 10 of the Uno to RST pin on Pro-Mini ?

I'm solved it, connecting pin 10 (ARDUINO UNO) to reset (ARDUINO MINI)

Sorry to hear you're having difficulties JohnN3. That sort of error can occur if the IDE thinks that the version of the Atmega328 chip is different. The Atmega chip can have 2 versions - 328pu or 328p-pu. There's a change you can make to the avrdude.conf file - I'm sure you can find help if you Google it. Also worth checking any wiring, just to make sure :-)

Hi Legandir, I did get it to work with some help from the Arduino team. It seems I have a pro-mini with some miss labeled pins. I got the boot loader uploaded. but I did notice that on some instances it would not accept a sketch upload without pressing the reset button. Any thoughts on that?

Hi John,

Like SimonS157 a few months ago, I'm having the same problem and would be very interested in how you got it solved.

Hey John,

i got the same problem. Can you tell me your solution? Would be very helpfull.

After completing the 4th step, the Arduino which was flashed with the new bootloader from the UNO, now all future uploading of new sketches, you must select "UNO" as you destination board for your sketches.

Step 5: Change the board: Tools Menu -> Board ->Arduino Uno

Amazing, as I was reading through this, though, familiar with the process because I'm been researching to do just this, I was thinking what a excellent cleanly written and to the point article!!! Your use of the KISS principle is spot on.

I look forward to seeing your future Insturtables.
This issue can also occur due to these two problems:
  1. Maybe you are trying to upload program while your rx and tx pins are connected with other components.
  2. Or maybe your Arduino is bricked.
For the 1st problem solution is just disconnect wires rx,tx and try to upload the sketch. For 2nd problem use another Arduino to upload program on it(SPI connection). You can follow these steps to resolve your issue written in this article:Programmer is Not Responding Arduino - avrdude: stk500v2_getsync() | Solution
Thanks to this "I did remember (it works sometimes) that I had an ESP8266 arrive with a corrupted bootloader and had similar issues", I've understood why one of my Arduino Pro Mini refuses to upload sketchs.
So I have flashed the bootloader, with an usbasp in my case.
After that it worked. But at next upload, I had the same error.
In fact, after flashing the bootloader, I can upload a sketch only once!
I always need to reflash the bootloader before.

I use IDE option "Burn bootloader". It uses the 2 following commands:

/Applications/Arduino.app/Contents/Java/hardware/tools/avr/bin/avrdude -C/Applications/Arduino.app/Contents/Java/hardware/tools/avr/etc/avrdude.conf -v -patmega328p -cusbasp -Pusb -e -Ulock:w:0x3F:m -Uefuse:w:0xFD:m -Uhfuse:w:0xDA:m -Ulfuse:w:0xFF:m

/Applications/Arduino.app/Contents/Java/hardware/tools/avr/bin/avrdude -C/Applications/Arduino.app/Contents/Java/hardware/tools/avr/etc/avrdude.conf -v -patmega328p -cusbasp -Pusb -Uflash:w:/Applications/Arduino.app/Contents/Java/hardware/arduino/avr/bootloaders/atmega/ATmegaBOOT_168_atmega328_pro_8MHz.hex:i -Ulock:w:0x0F:m

Any idea?
I solved the Pin 11 = MOSI, Pin12 = MISO and Pin 13 - SCLK I think but now I get this error on the upload.

avrdude: Version 6.3-20190619
Copyright (c) 2000-2005 Brian Dean, http://www.bdmicro.com/
Copyright (c) 2007-2014 Joerg Wunsch
System wide configuration file is "/Applications/Arduino.app/Contents/Java/hardware/tools/avr/etc/avrdude.conf"
User configuration file is "/Users/roberthancock/.avrduderc"
User configuration file does not exist or is not a regular file, skipping
Using Port : /dev/cu.wchusbserial1420
Using Programmer : stk500v1
Overriding Baud Rate : 19200
AVR Part : ATmega328P
Chip Erase delay : 9000 us
PAGEL : PD7
BS2 : PC2
RESET disposition : dedicated
RETRY pulse : SCK
serial program mode : yes
parallel program mode : yes
Timeout : 200
StabDelay : 100
CmdexeDelay : 25
SyncLoops : 32
ByteDelay : 0
PollIndex : 3
PollValue : 0x53
Memory Detail :
Block Poll Page Polled
Memory Type Mode Delay Size Indx Paged Size Size #Pages MinW MaxW ReadBack
----------- ---- ----- ----- ---- ------ ------ ---- ------ ----- ----- ---------
eeprom 65 20 4 0 no 1024 4 0 3600 3600 0xff 0xff
flash 65 6 128 0 yes 32768 128 256 4500 4500 0xff 0xff
lfuse 0 0 0 0 no 1 0 0 4500 4500 0x00 0x00
hfuse 0 0 0 0 no 1 0 0 4500 4500 0x00 0x00
efuse 0 0 0 0 no 1 0 0 4500 4500 0x00 0x00
lock 0 0 0 0 no 1 0 0 4500 4500 0x00 0x00
calibration 0 0 0 0 no 1 0 0 0 0 0x00 0x00
signature 0 0 0 0 no 3 0 0 0 0 0x00 0x00
Programmer Type : STK500
Description : Atmel STK500 Version 1.x firmware
Hardware Version: 2
Firmware Version: 1.18
Topcard : Unknown
Vtarget : 0.0 V
Varef : 0.0 V
Oscillator : Off
SCK period : 0.1 us
avrdude: AVR device initialized and ready to accept instructions
Reading | ################################################## | 100% 0.08s
avrdude: Device signature = 0x059505
avrdude: Expected signature for ATmega328P is 1E 95 0F
Double check chip, or use -F to override this check.
avrdude done. Thank you.
Error while burning bootloader.
Nice description and I now have Uno in Arduino ISP mode but the target device is an Elecrow LoRa Radio Node v1.0, which uses the Arduino Pro or Pro Mini bootloader and none of the Pins 11, 12, or 13 are labelled! So how to complete the connection between the Arduino ISP and the Elecrow?

I do have a choice of pin labels
D8 DIO5
D7 DIO3
D6 DIO2
D5 DIO1

and
MOSI
MISO
SCK
RXI
TXO
DTR

Can any of these be used for the Pin 11, 12, and 13 connections from the Arduino Uno?

Thanks
Hi Mr., thank you by help me, but it donĀ“t work for me with Arduino IDE 1.6..., 1.8... versions, it works properly when I use 1.05 version. Ok, no problem. Bye...
Nice work. Thank You. helped heaps. BUT.....on first run, error msge:avrdude: Error: Could not find USBtiny device (0x2341/0x49). Another site suggested select TOOLS>Programmer:Arduino As ISP. Subtle difference. Now gets to about 10 seconds with error msge: avrdude: stk500_getsync() attempt 9 of 10: not in sync: resp=0xe0 . avrdude: stk500_getsync() attempt 10 of 10: not in sync: resp=0x00
Error while burning bootloader.
Hi StephenW209. When I've seen the stk500_recv() error in the past it's been because the COM port is wrong or the wrong board has been selected in the Tools menu. Remember that this is a 2 step process. First you have to prepare the Uno as a programmer, then change the target board before attempting to burn the bootloader. Also worth checking the processor and speed is set correctly. HTH
Merci j'ai suivi le tutoriel et tout est correct. merci pour cette application.
More Comments