CanardWings - a Variation of Paperang, a Cool Paperplane/glider
Intro: CanardWings - a Variation of Paperang, a Cool Paperplane/glider
This is a variation of the famous Paperang. I found the Paperang works, but does not fly as well despite tweaking the trailing edge.
I began to explore to see if I can somehow create a pair of canards or stabilizers at the nose since the wings are aerodynamically shaped.
After several attempts...the CanardWings was born....
I began to explore to see if I can somehow create a pair of canards or stabilizers at the nose since the wings are aerodynamically shaped.
After several attempts...the CanardWings was born....
STEP 1: You Need a Sheet of A4 Paper 70~80gm
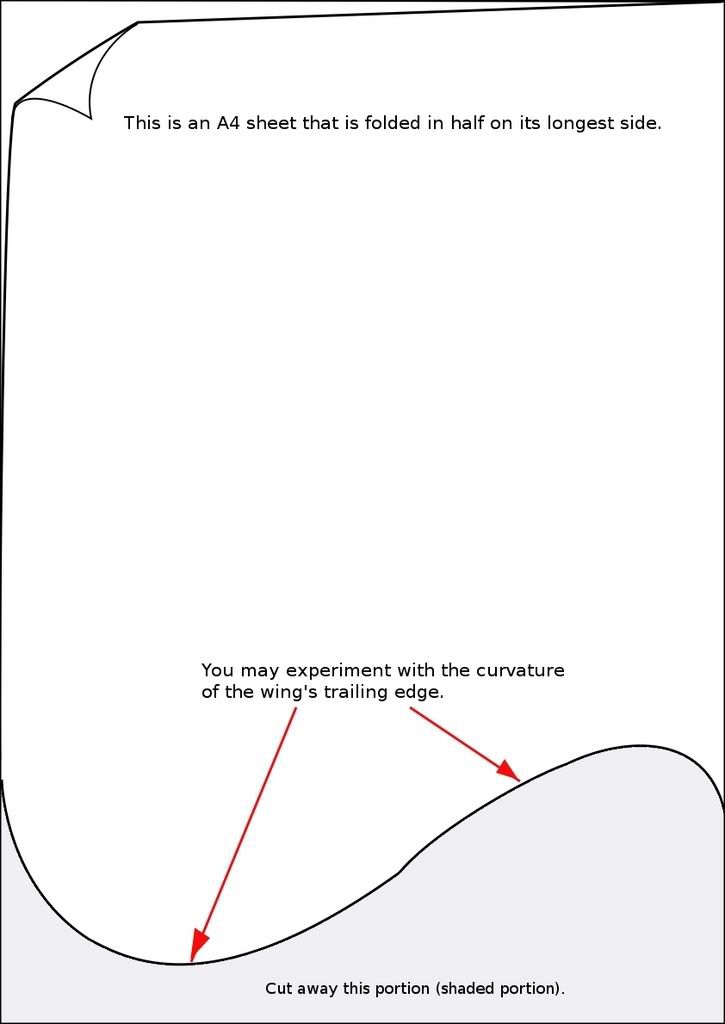
First print out this trailing edge curvature for the wings.
You may also want to experiment with different curvatures.
After printing, cut along the curve line, set it aside. It will be used for tracing onto the actual glider.
Print this
You may also want to experiment with different curvatures.
After printing, cut along the curve line, set it aside. It will be used for tracing onto the actual glider.
Print this
STEP 2: The Fold...
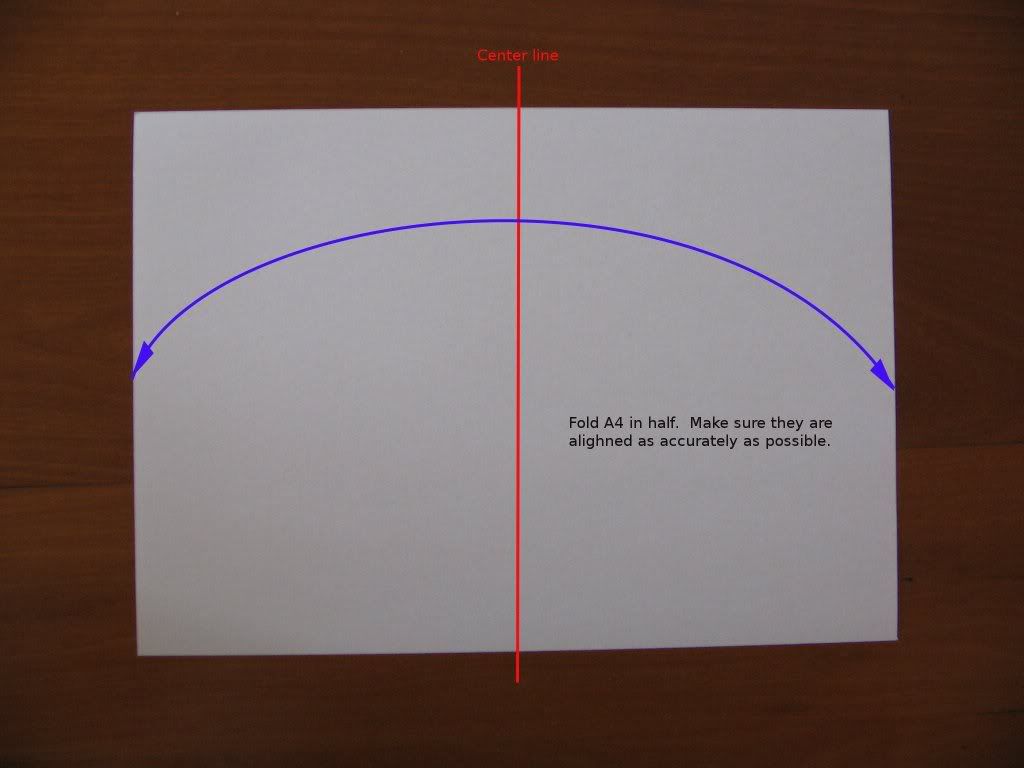
Use a fresh sheet of A4 paper, place it on a table with the long side towards yourself.
Fold in half, aligning the edges as accurately as possible. Crease the fold.
Fold paper in half
Fold in half, aligning the edges as accurately as possible. Crease the fold.
Fold paper in half
STEP 3: Paper Folded in Half
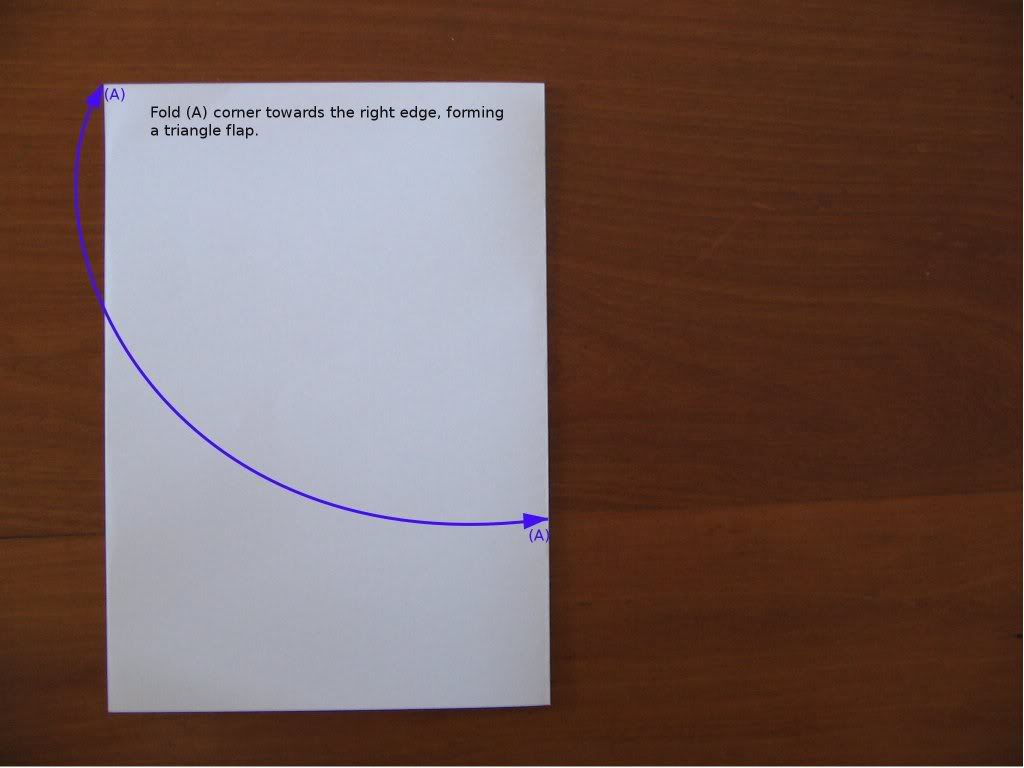
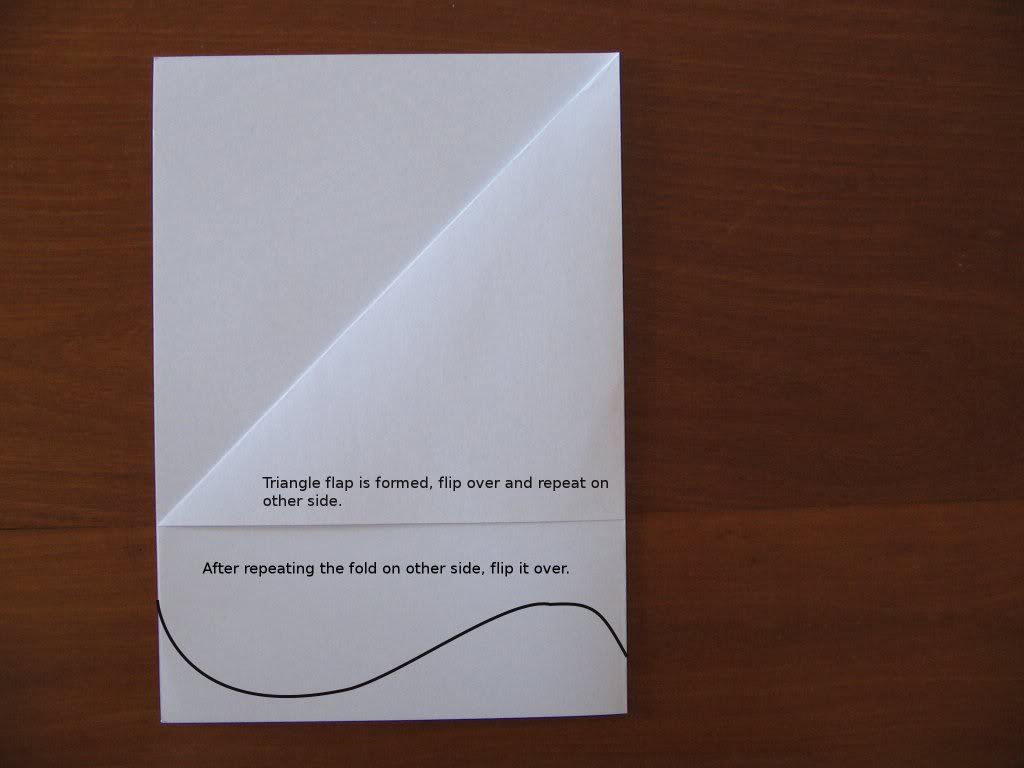
STEP 4: Triangular Flap Formed
Crease the fold and repeat on other side, then flip over.Folded triangle flap
STEP 5: Next Fold...
STEP 6: Fold Up (C)
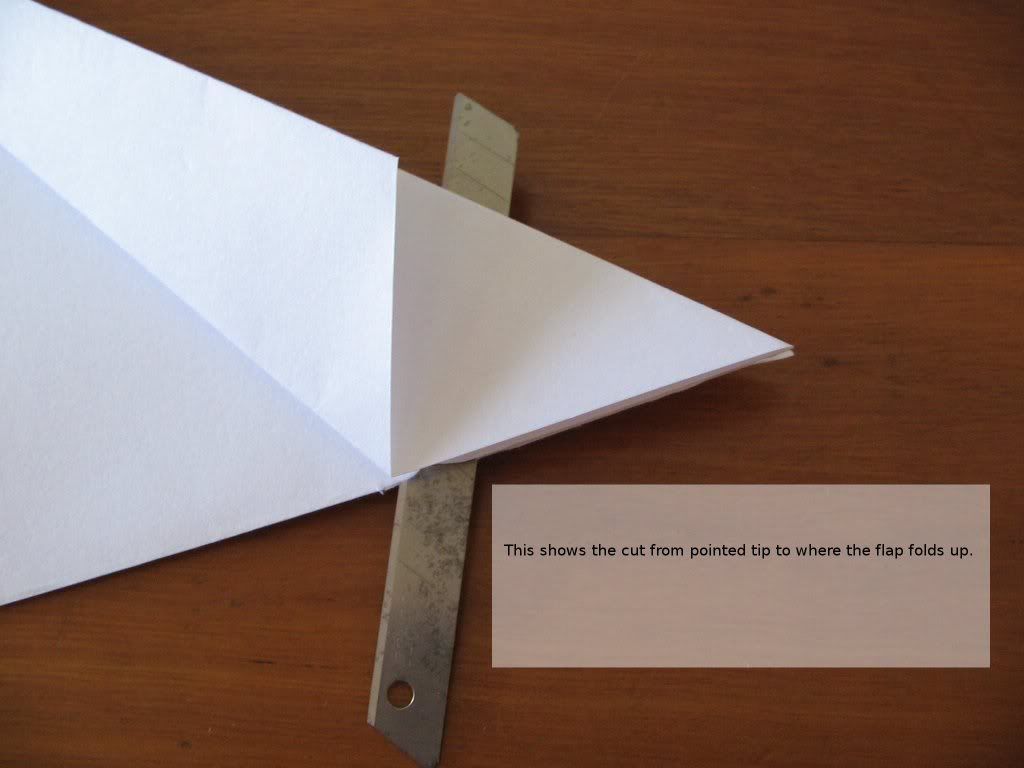
STEP 7: Make a Cut in the Folded Center
Cut the folded center according to the photo below, use a sharp razor for a neat cut:
Cut the folded center
Cut the folded center
STEP 8: Center Fold Cut...
STEP 9: Fold Down Along Center Cut...
Fold down the flap made possible by the cut center fold.
Repeat fold on other side and flip over again.
Fold down along cut center
Repeat fold on other side and flip over again.
Fold down along cut center
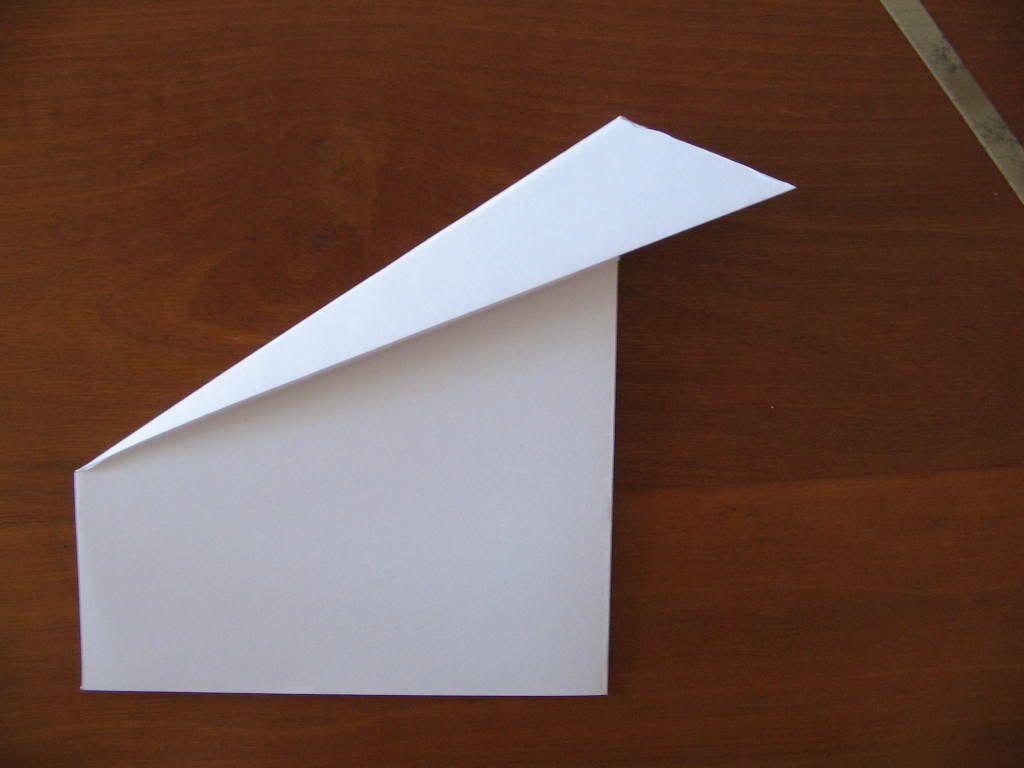
STEP 10: Both Sides Done...
This photo shows both sides folded down...ready to trace the printed curvature on the trailing edge and cut the curve.
Both side folded down
Both side folded down
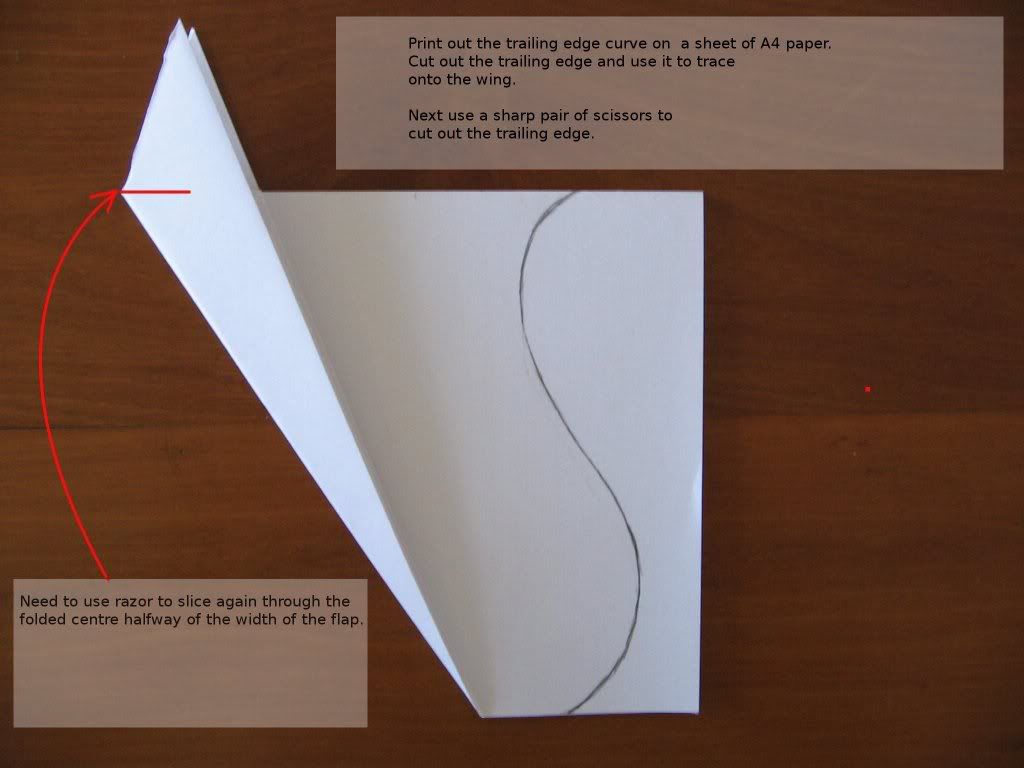
STEP 11: Trace and Cut the Curved Trailing Edge.
Now take the template from the previously printed trailing edge curvature and trace it to the wings as shown. Next cut out along the curve line forming the trailing edge. Do this by holding the folded sheet firmly and cut as close to the curvature as possible. When opened up, you will get identical curved wings on both sides.
Trace and cut trailing edge
Trace and cut trailing edge
STEP 12: Cut Center Fold Again
Now use the razor and cut the center fold as before, but this time only HALF of the length as shown by the RED line in the previous photo. This cut allows 1 final fold to the leading edge, it also stiffens the wings and gives the right aspect ratio.
Cut center fold again
Cut center fold again
STEP 13: Cut Center Fold Halfway...
This photo shows the exposed view of the center fold being cut halfway.
This cut will allow the final fold for the leading edge of the CanardWings.
cut center fold halfway
This cut will allow the final fold for the leading edge of the CanardWings.
cut center fold halfway
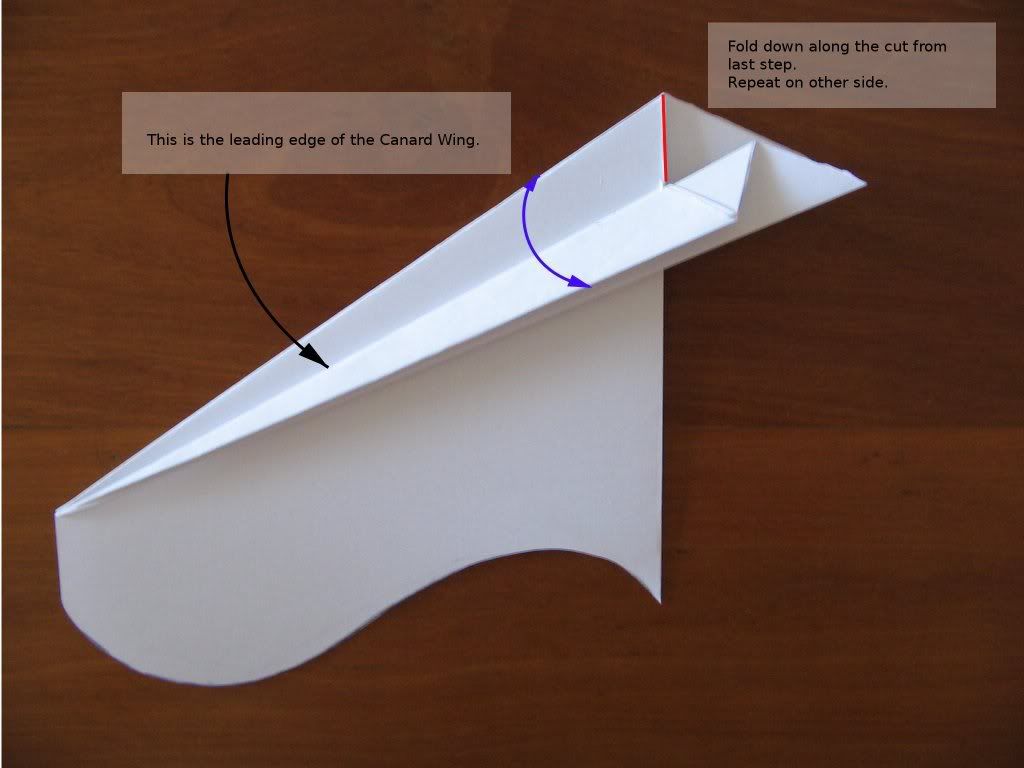
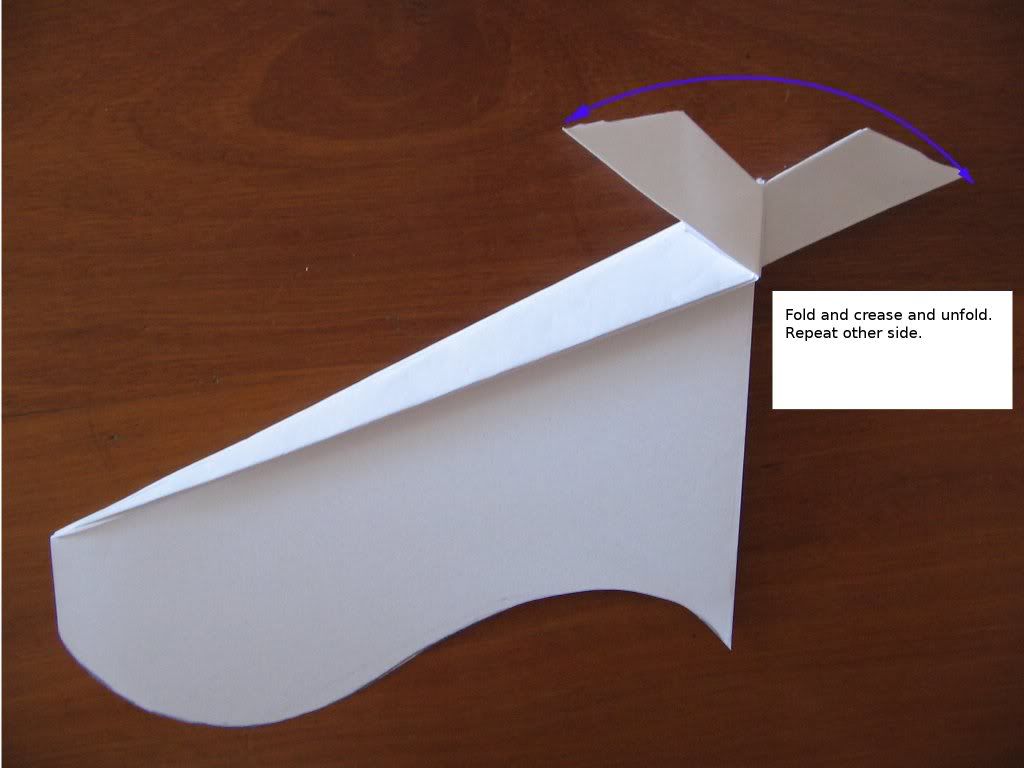
STEP 14: Forming the Canards
Now to fold the canards. Just fold it along the folded center fold, crease and unfold, repeat on other side and flip over:
Folding the canards
Folding the canards
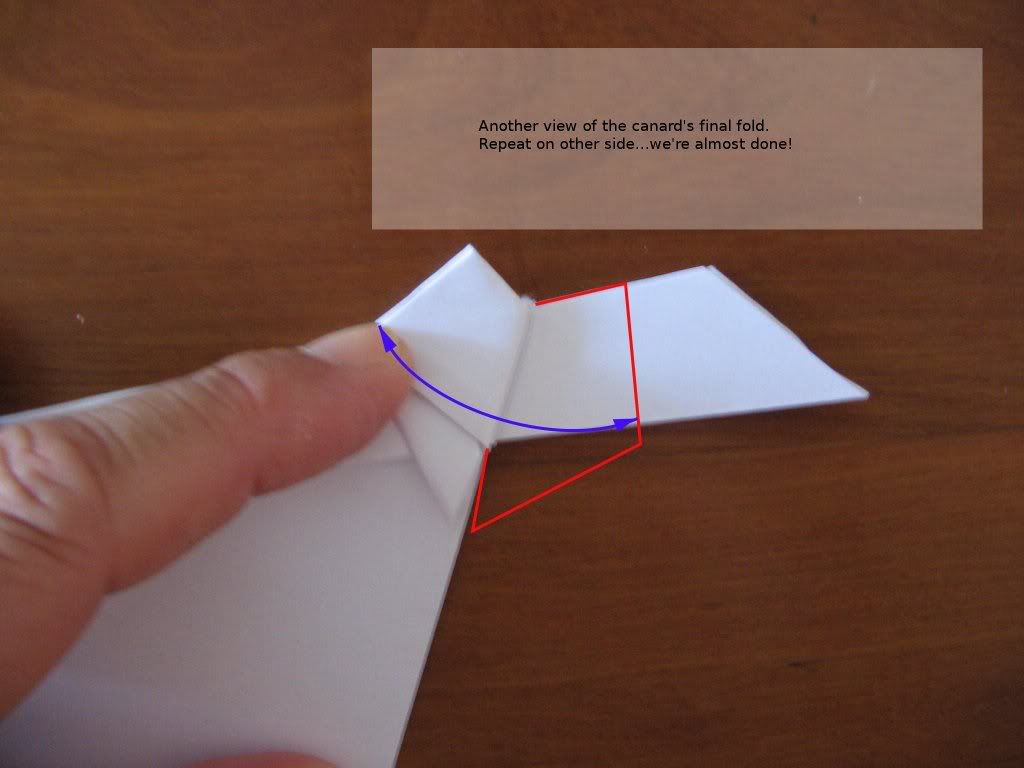
STEP 15: Final Fold of the Canard
Fold the right edge to meet with the center fold.
Then fold the whole folded canard to the left again, repeat on other side.
Fold in the canard
Then fold the whole folded canard to the left again, repeat on other side.
Fold in the canard
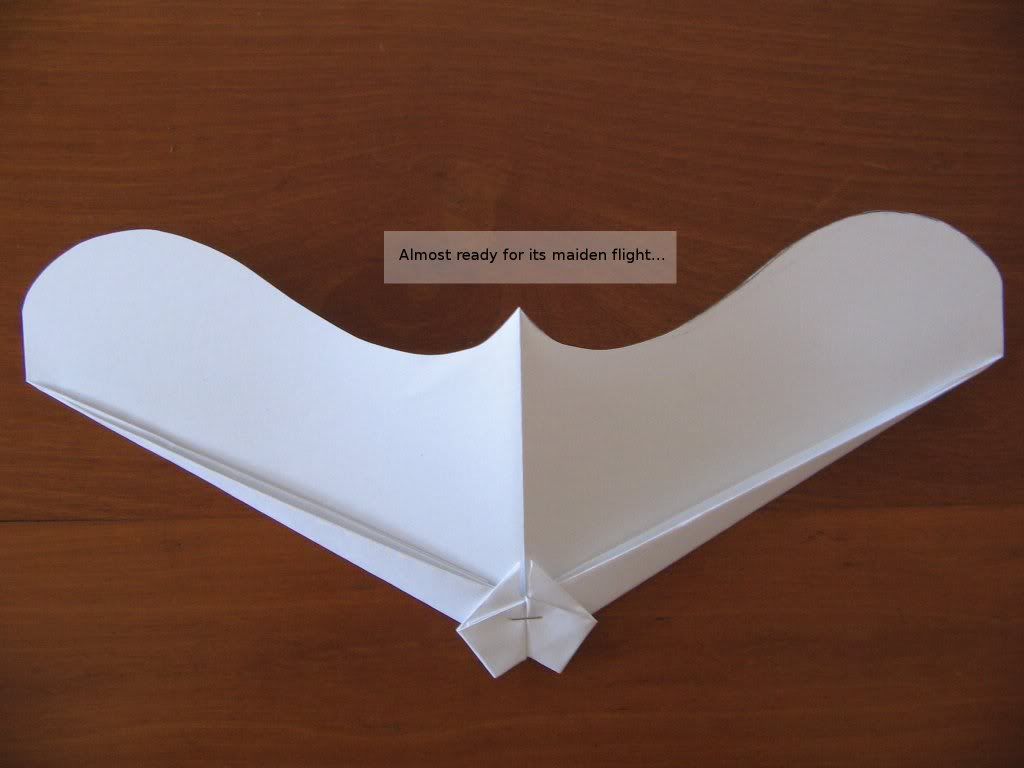
STEP 16: Almost Done...
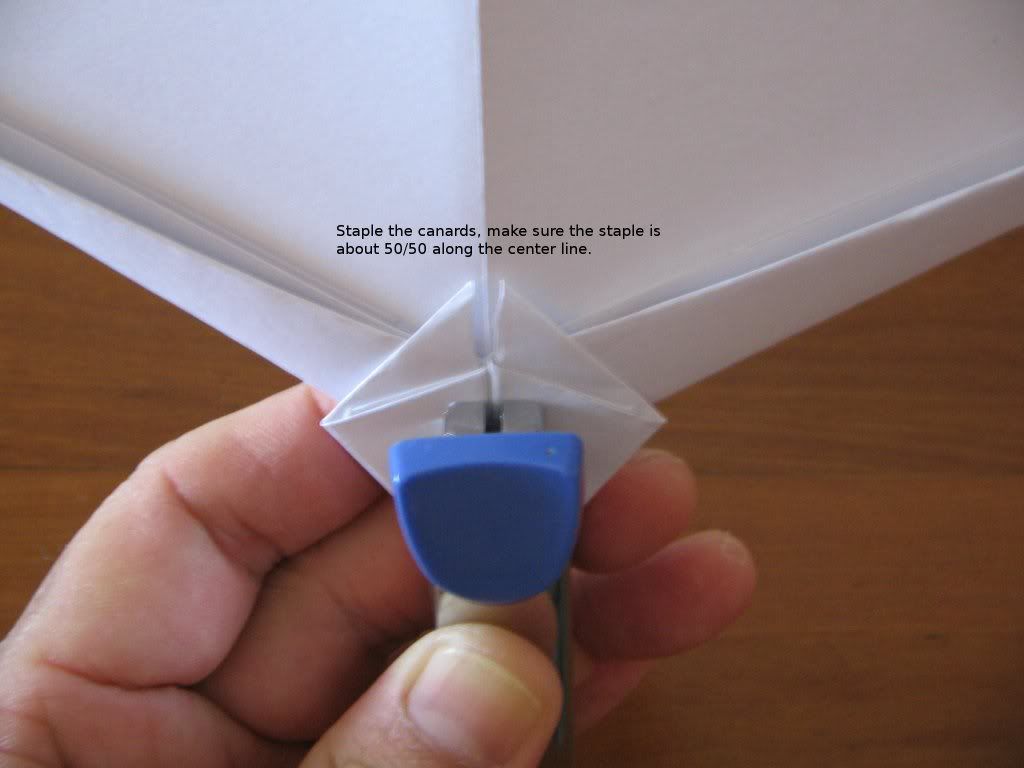
STEP 17: Staple the CanardWings Together
Next carefully align the spread wings and canards centrally, staple ONCE across the center fold.
Staple it...
Staple it...
STEP 18: Underside View of CanardWings
This is a shot from underside, your almost finished CanardWings should look like this.
The stapled is bent slightly to create a dihedral and the staple retained the shape well. The degree of angle of dihedral plays an important role on the flight characteristics of the CanardWings. Experiment and have fun.
A view from under side
The stapled is bent slightly to create a dihedral and the staple retained the shape well. The degree of angle of dihedral plays an important role on the flight characteristics of the CanardWings. Experiment and have fun.
A view from under side
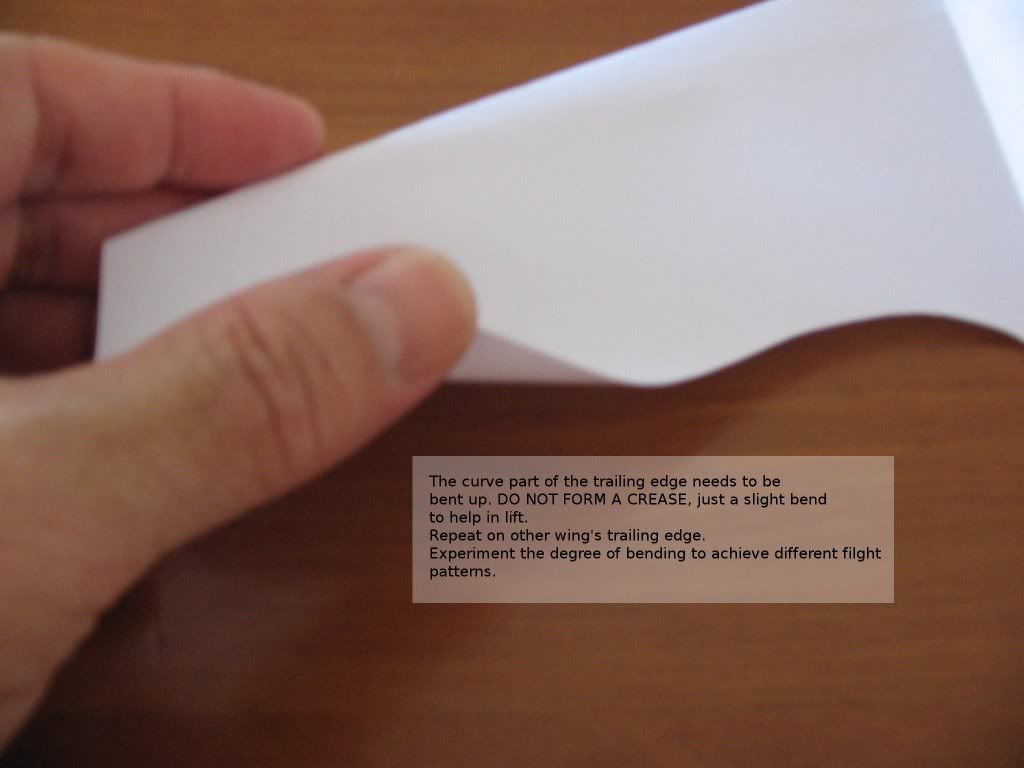
STEP 19: Finishing Touch...
Slightly bend UP the trailing edge. This creates a foil that gives the wings lift.
Bend up the trailing edge
Bend up the trailing edge
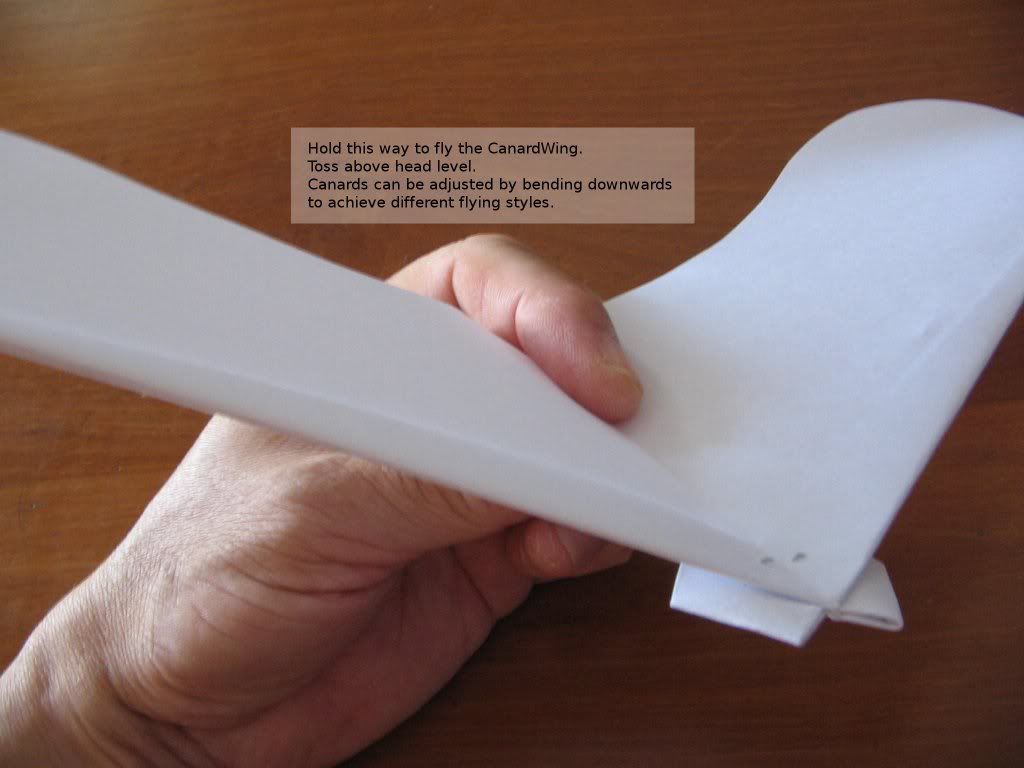
STEP 20: Now Launch the CanardWings
Hold the CanardWings as shown in photo.
To launch hold it above your head and lightly toss.
This wings are great indoors and outdoors...tweak the trailing edge and canards (can be slightly bend DOWNWARDS) to create different flight patterns...enjoy your flight!Hold this way to launch
To launch hold it above your head and lightly toss.
This wings are great indoors and outdoors...tweak the trailing edge and canards (can be slightly bend DOWNWARDS) to create different flight patterns...enjoy your flight!Hold this way to launch
STEP 21: Video of CanardWing's Long Distance Flight...
The CanardWings was launched from the 17th floor. The distance travelled was roughly 60~80 meters then caught the wind and was blown back a bit.
It flew to the left and was hidden was a few seconds and then came back into view, appearing on the left screen again, flew across the street towards the opposite apartment block and was blown back. It finally landed on the top deck of a multistorey carpark.
A slightly larger and better video hosted by VEOH
34 Comments
Peepman99 12 years ago
jheadrick 13 years ago
plyalex1994 13 years ago
muthaw 13 years ago
macboy98 13 years ago
Edhui 16 years ago
Jaquezy 15 years ago
Edhui 15 years ago
I thought of using other methods, but this seemed the most sensible. It's not something I can just show with photos, or on youtube, because its performance is due to complete freedom from the rules of origami. So, there are no 'self templating' folds, no relationship with the straight edges of the paper, and the entire outline of the design is cut out. Having gone to the trouble of describing it properly, it seemed to me that it made a pretty little book perfect for the 'print to order' model of lulu.com so I thought I'd give it a go. It does mean that parents and grandparents can have something physical to send as a gift. It's a rare thing nowadays for a really original craft idea to be available in this way and I make no apologies for it. yes, it'd be nice to make a few pennies, but I'm far more excited by the fact that it's something you can hold. For those who don't know, the flight of the Paperang Moth can be seen at
http://uk.youtube.com/watch?v=I1QZbekTXQo&fmt=18
The book can be bought from
http://www.lulu.com/content/5125220
Jaquezy 15 years ago
Edhui 15 years ago
Mr.A-Z 14 years ago
Edhui 14 years ago
Ed
Jaquezy 15 years ago
Mr.A-Z 14 years ago
Mr.A-Z 14 years ago
flactemnad 16 years ago
Edhui 16 years ago
sgt.paper 16 years ago
layangman 16 years ago
Mr.A-Z 14 years ago