

Introduction: Casting Glass


This was a project I did in a group for my Materials Science class. Since I had access to a laboratory full of materials testing equipment, I'll give you some extra scientific data. But if you happen to have access to casting equipment at home, you should be able to produce similar effects!
Necessary materials:
-glass
-something to smash glass
-materials to make an investment mold (wax, investment plaster, flasks, a vacuum sealer)
-something big enough to hold glass over investment at around 850 degrees C
(Please read through the steps first- this materials list is probably not comprehensive.)
I'm not an expert- none of us had tried working with glass before this project. If you have advice, please comment!
Step 1: Make Wax Pieces


Make positives of whatever it is you plan to cast. Sculpting, carving, or braiding thin wax pieces is easiest.
Another option is to copy an existing object using silicone molding and a wax injector. I used mold-making rubber, but here is an instructable for a different way to make silicone molds. Make sure there is an opening from the side of your mold to your object so that you can inject wax with the wax injector. I made several wax copies of a phoenix figurine using the silicone mold pictured.
The objects which cast best in glass for us were the solid figurines, such as the animals pictured. However, some of the more delicate objects (some rings, a phoenix) also came out well.
Attach your objects to a wax sprue.
Step 2: Make an Investment


Place your sprue into a stainless steel flask and seal the holes. You will pour your investment into the flask to completely cover the wax pieces.
Follow the instructions for your investment mix to properly mix and set your investment.
Put the investment in the furnace to melt out the wax, leaving holes for your glass to fill.
Step 3: Gather Base Glass


Find some glass. You can purchase glass, or you can repurpose old glass. In this project, we used four different types of glass. I have details on them below.
While it's helpful to do analysis on the glass- particularly thermomechanical analysis- I assume you don't have access to a full lab. The important thing you need to know is the softening temperature of your glass, so that when you cast, you can make sure to be above it. Internet searching your glass type will probably yield decent results.
Wine bottle glass
This glass is soda-lime container glass. This is the most common type of glass currently in use. It's a nice green color, and perhaps you can see the ideological appeal behind turning empty wine bottles into art and jewelry.
Composition data was taken using energy-dispersive X-Ray spectroscopy (EDS) on a scanning electron microscope (SEM). Our wine bottle sample was 50% Silicon, 22% Oxygen, 15% Calcium (lime) 9% Sodium (soda), 3% Carbon, 1% Aluminum, and 1% Potassium. (Compositions listed by elemental weight %. My percentages won't add up perfectly because they are rounded.)
When subjected to thermomechanical analysis (TMA), the sample showed a softening point of 641C.
Pyrex
Pyrex made its name in glass for laboratories by using borosilicate glass, which has a very low coefficient of thermal expansion (so it won't explode). We used Pyrex cookware, and found it to be more of a hybrid borosilicate-soda-lime glass.
Composition: 47% Silicon, 22% Oxygen, 10% Calcium, 10% Sodium, 5% Boron, 4% Carbon, 1% Mg, 1%Al.
TMA showed a softening point of 660C.
Red and Purple Gaffer's Glass
The red and the purple glasses are glassblowers' glass. The red seems to be potassium silicate glass, and the purple a lead glass. Lead is added to glass to increase the refractive index- to make it sparkle more. Examples of leaded glass include some cut crystal stemware and Swarovski crystals. I'm not sure what the potassium content does to the red glass- brief internet research suggests that it may be a strengthening agent. The absence of lime in the sample may also help it to avoid devitrification (where heated glass develops crystal structure and becomes opaque- see Step 8: Clean and polish).
Red glass composition: 37% Silicon, 16% Oxygen, 11% Potassium, 8% Sodium, 4% Carbon, 3% Boron
Red glass TMA: softening point at 631C.
Purple glass composition: 47% Lead, 25% Silicon, 11% Potassium, 8% Oxygen, 6% Barium, 2% Carbon, 1% Sodium.
Purple glass TMA: 627C
Step 4: Smash Glass Into Pieces


Take your pieces of glass somewhere safe, wrap them up in fabric, then hit them multiple times with a hammer. We used a blacksmith's hammer and worked on a paved surface.
Be very careful- note in the picture of red glass that the fabric has cuts in it. Our fabric was extra-tough canvas, and this just shredded it.
Use gloves, maybe a mask if you're worried about dust. Wear shoes. Pour your smashed glass into safe containers to transport it.
IMPORTANT: Don't smash your glass too small! We overdid it. You want inch-sized cubes at the smallest. If you make chunks that are too small, the opacity of your glass will decrease.
Step 5: Melt Glass Pieces

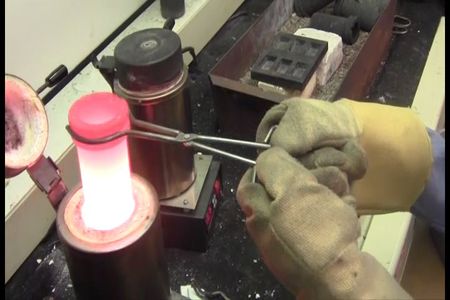
Put your glass in a clean graphite* crucible. Heat in a furnace until glass pieces all meld together. This should be around 800 degrees C for a long time, or closer to 1000C for a short time (but no promises that your glass will be pretty).
Let glass cool in crucible.
It is also possible to skip this step if you can find a different way to position your glass pieces directly over the opening to your investment.
*We used graphite, but you probably want to find something else. Ceramic, perhaps? Maybe stainless steel? Our graphite crucibles ended up disintegrating, which made a huge mess.
Step 6: Kiln Cast Glass


Now you need a furnace big enough to hold your investment in the flask and your glass piece over it. We simply upended the crucibles full of glass over the mouth of the investment.
Close furnace and turn the heat up to 800C.
Leave it in there for six days.
We also put some little ceramic boats with extra glass chunks in the furnace, just so that we'd have some visual feedback.
(We did 900C for 12 hours, but our glass didn't turn out very pretty. The six-day figure is from this source: http://www.glasskulls.com/asending-sequence/)
The last picture shows our graphite crucibles disintegrating all over the furnace. That's why you should use a different material, I guess...
When you're casting metal, you can just quench your investment in cold water and it will pop right off, giving you access to your pieces. However, glass cracks when cooled too quickly, so you'll have to let it slow cool. Turn your furnace off and let it sit until it returns to room temperature.
Step 7: Recover Glass Pieces


When your investments are cool, remove them from the furnace. Put them somewhere that can get messy.
Wear a dust mask so that you don't breathe too much investment powder in.
Scrape at the investment around the edges of the flask. It should be pretty easy to scrape and make a big powdery mess. If you can, try to scrape around all of the investment until it dislodges from the flask. If not, just dig down into the investment to treasure hunt for your pieces. Be careful- depending on how delicate your pieces are, you could accidentally break them.
Once you're out of the flask, put your pieces in a big sink and run water over them while continuing to scrape and clean. You're trying to remove all of the investment from your glass pieces.
Once you're down to just glass pieces and glass sprue, you'll want to take your pieces off of the sprue. I used a tabletop diamond bandsaw. (Note to my friends: if you ever want to get me an expensive present, this is it.)
If you don't have one of those, try scoring and very carefully breaking your pieces off of the sprue, then sanding down the sharp edges.
Step 8: Clean and Polish


Wash your pieces with soap and water. Use a brush to get into the crevices.
If you're lucky like me, you have access to an ultrasonic cleaner. If that's the case, put soap and water in that, throw your piece in, and let it vibrate for five minutes. Rinse and repeat for all pieces. Then replace your soap and water with a coarse polish, vibrate and repeat. And one more time with a fine polisher (I used an oil-based diamond slurry). That should get your glass looking lovely!
For flat sides, you can also try grinding with wet fine-grit sandpaper.
Our pieces, as you'll note from the pictures, have a distinct non-glass quality to them. Specifically, they're opaque.
We're not entirely sure what happened to cause this, but since our processing was rather messy, there are a number of possible points where this could have occurred:
-Melting could have introduced debris into the material. Our crucibles weren't perfectly clean, so little bits of dust and graphite got mixed in.
-Kiln casting occurred at a temperature higher than strictly necessary for slumping. We were trying to save time, but we might have introduced defects into our product.
-Devitrification could have occurred in our glass- crystals could have formed. Clear materials, such as glass and clear plastic, have amorphous microscopic structures, which means that they have no crystal structure. Sometimes, when glass is cast, it forms a milky, opaque surface, where the glass has crystallized around foreign particles.
The diamond slurry polishing should have removed any surface devitrification, but since the glass was mixed with foreign debris throughout in the melting step, this isn't enough evidence to cross off devitrification as a possible source of opacity. So I took samples of each type of cast glass to the SEM to look for crystal structure.
Two of the pictures above are through the SEM. They show the red glass at 60X and 500X magnifications. No clear crystal structure emerges, because the surface is too textured. The glass looks porous- there are hollows for many tiny bubbles within the glass.
INSERT COMPOSITION DISCUSSION
Step 9: Show Off Your Homemade Glass Pieces!

If you made anything, be proud! This is a really difficult and time-intensive process.
I'd love to see pictures of other people's homemade cast glass!
I hope I didn't bore you with the science :)


