

Introduction: Changing the Shape of Catch Lights in Photography


When taking portraits of living things catch lights in the eyes are essential, whether it's from a natural light source or artificial one (LED, flash, etc), they make eyes look alive and give them a 3 dimensional look. With practice you can tell a lot about how a photo was taken just by looking closely at the catch lights too. Sometimes you can see the photographer and background, in studio set ups you can see what shape the flashes are and start guessing at the lighting setup.
So catch lights are quite cool!
A while ago I had the idea of creating custom shaped catch lights by adding a lightweight styrofoam modifier to a flash softbox and ended up making one prototype which worked surprisingly well. It's not the best fit on my old softbox though and needed heaps of gaffa tape to hold it on and stop light from spilling out the sides. The second photo here was taken with the my old speedlight/cheap softbox system.
I have a new lighting setup now and wanted to make a better version that looks and fits better so was time for version 2!
The minimum photography equipment to use this modifier is:
- DSLR camera or a camera that can talk to an external flash (surely iPhones are close?)
- Camera flash - a speed light works fine, but the more light the better. I used a Nikon SB700 speed light first time, now it's a Godox AD600
- Light stand or someone who can hold the flash in place
- Softbox of any size - I used a 60cm square one originally, now it's an 80cm octagonal
- Flash trigger and receiver so you can use the flash off camera (or a flash that can be triggered by your camera's inbuilt flash)
- Subject with eyeballs (a human would be much easier than a dog)
Supplies


- styrofoam sheets - you can probably find them at hardware or craft shops, but if you can find some that are heading to landfill that's ideal. Mine were used as chicken shed insulation in their previous life and were destined for the bin. They're a bit grubby and dented, but nothing paint can't fix. My sheets are around 2cm thick, but as long as you're careful it could be much thinner and still be fine.
- very sharp stanley knife - if it's blunt it's more likely to tear than cut and won't be pretty
- plaster/drywall saw
- tape measure
- marker - different colours are useful if you're like me and stuff up the measurements a lot
- protractor if you want a star shape (any basic shape would work though)
- matt black acrylic paint
- metal ruler (optional but very handy)
- painter's tape (optional, depending on the size of your sheets)
- stick on velcro or velcro and glue (optional)
- an area you can make a big mess in
Plus previously mentioned photography equipment.
Step 1: Measure


I measured the inside width of my softbox from flat edge to flat edge which was 72cm. Softboxes are pretty flexible so there's some wriggle room, but I do want it to sit snugly so there's minimal light leaking out the sides.
I also measured my styrofoam sheets and they were 60cm by 160cm so more than one sheet was needed. This wasn't a bad thing though as space is limited in my studio so it's nice that it can be packed down small. The sheets are also made to link together which means light won't leak through the crack.
I slotted the 2 pieces together and then used painter's tape to keep them together. As it was a pretty big sheet now I cut it down to 80cm tall by cutting first with the stanley knife and and then cutting with the plaster saw.
The stanley knife wasn't long enough to pass through the whole sheet, so I just used it as a way to create a cut for the plaster saw to follow. I used this for all of the cuts as a precaution as it would have been easy to stuff it up just using the saw.
Step 2: Start Drawing Lines


Knowing that the softbox is 72cm from edge to edge, I started by drawing a box in the centre of the foam that was 72cm square, then marked the horizontal centre line. The vertical centre was already marked by the join in the 2 pieces of foam.
I Googled how to draw an octagon and sensible people start with a circle, but I didn't have a compass lying around so decided to wing it. Given I knew how many cm it was between the flat edges and I had horizontal and vertical lines it was pretty straightforward.
To draw the star I roughly followed FrankTheTurk's instuctable: https://www.instructables.com/How-to-draw-a-5-point-star/. I still didn't have a compass to draw a circle, but did manage to find a protractor to measure the angles. You could guess these but I didn't want it to look wonky. I figured around 10cm into the octagon would be a good size for the star so it wasn't too close to the edges.
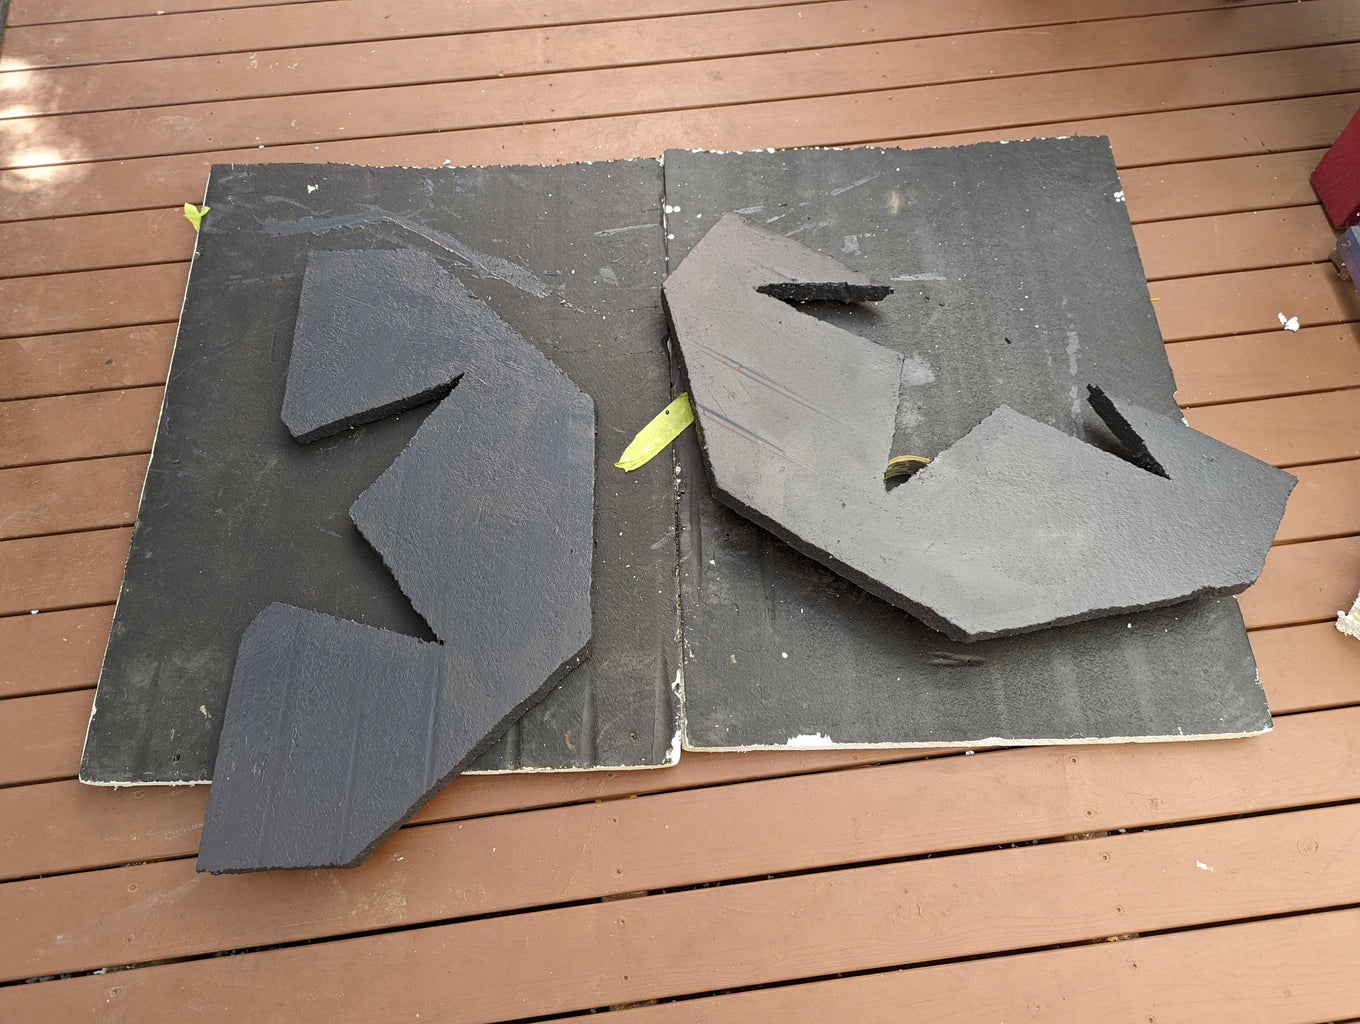
Step 3: Cut It All Out


I decided to cut the octagon shape first as it'd make cutting out the stars less awkward, so once again cut it with the stanley knife first and then the plaster saw. I used the metal ruler to guide the knife, but this could also be done by eye.
The 2 sides were split apart for this and it made cutting out the inner star shape really easy, although care still needs to be taken in the corners. Foam is both strong and fragile and it can snap easily.
After cutting them out I taped the 2 halves together again to check it fit in my softbox and it was perfect!
Step 4: Paint


When you're making your own light modifiers there are a couple of very important considerations:
- colour cast
and
- how light will reflect
We don't see colour casts with the naked eye very well, but a camera definitely does! So if you're using a coloured material you're inevitably going to see it turn up in your photos. My foam sheets were originally a pale blue and had already been painted black and white, but they needed fresh coats because they looked crappy and I didn't want the pale cut outs bouncing light around in a weird way and affecting the outline of the star.
So I painted the freshly cut areas thoroughly with matt black paint which will also seal the edges a bit and protect them from damage. I also put a bit of painter's tape over any holes and painted over it before recoating everything in black.
Step 5: Add Velcro (optional)


I tested the fit again and was very pleased, but did note that there were some gaps which could potentially let light escape. As there's already velcro on the inside of the softbox I added stick on velcro to the edges of the foam so it'll pull the edges in towards it and make it a tighter fit.
You can see in one of the photos how much of a difference it makes - one side has velcro, the other doesn't.
The glue on the stick on velcro is a bit rubbish and I'm assuming it'll pull away from the foam as soon as I pull the foam out of the softbox* as it's not very good quality stuff. I used some contact adhesive in spots where I thought it'd pull away the most, but have had mixed results with that so far (meaning I'm too impatient to let it set properly and there is glue everywhere right now).
* it did
Step 6: Let the Photography Begin!


This is both the easy part and the hard part. A bit of trial and error is required to get the angle of the subject's face and/or softbox right. The closer the softbox is to the subject the larger the star will be*, so keep this in mind when setting up the flash. I closed the curtains in the living room and used a dark grey curtain for the backdrop when I tried this the first time, this time it was in a dark studio with a black paper backdrop. Both work equally as well, although the studio is a lot easier to work in!
There's a bit of light being lost and the subject won't be evenly lit, so these need to be considered. For my first go at it I used a fairly wide aperture - f5.6 with a 105mm macro lens so I could get a detailed shot of my dog's eyes, but this also left the depth of field very shallow. Some people love this kind of look, but I'm not a big fan of losing so much detail. My speed light doesn't have a modelling light (a constant light on the flash that dimly illuminates the model so you can see where the light is pointing) either so there was a lot of guess work to get the positions of everything correct.
This time I used a 50mm lens and this flash has a modelling light so the shape could be seen reflected in my dog's eyes before the photo was taken. The aperture was set to f8 as there was plenty of light to play with, resulting in a deeper depth of field and more dog in focus. The ISO was on 200, shutter speed 1/180 second. I also took some at f16 and there was still plenty of light, but I liked the poses more from the first batch at f8.
I also played around with the lighting set up a bit. Initially it was the one light with the star modifier, but then I tried a reflector on the other side of the dog to fill in a bit of light, then added a second light with a grid on it to the right of the dog to fill it in even more. This was a bit tricky to do as it risked adding a octagonal catch light to their eyes as well and I can see it a bit in one of them but it's not too bad.
Ultimately this step is about playing around to get the look you're after :) Photography is a very creative endeavour, especially when you start adding in artificial light, so you can spend hours playing around with these things.
* my dogs are very used to this and will jump onto the platform as soon as the flashes turn on as they know they'll get a lot of treats and praise for their work
Step 7: Review Photos & Edit


As you can see in the camera the catch lights worked really well! After importing into Lightroom and doing some basic colour and exposure adjustments I pulled them into Photoshop for a quick tidy up. But they were pretty much exactly where I wanted them straight out of camera which is always very satisfying.
I'm planning on making a second one with a moon shape on it and seeing if I can have both star and moon in their eyes at the same time, that should be a fun one to try.
And that's it! If you have any questions please leave comments below, especially if some of the photography terms were confusing. Please also share your own versions of this if you end up making this too, I'd love to see what kind of variations could be made, as well as improvements on my own somewhat dodgy modifier design :)

Second Prize in the
Photography Challenge


