

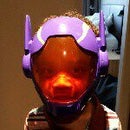
Introduction: CheApR - Open Source Augmented Reality Smart Glasses


[Another Update: A kind user made me notice that the top frame is different from the one in the tutorial and it's true, it seems I have uploaded the old one instead of the latest. Will make the update now, Thank you]
[Update: Prints have been repositioned to make them easier to print. Added the part for the ESP-EYE, I've also included a Leap Motion mount for those who want to try hand control. I rewrote the GPIO pinouts to make it easier to understand]
-------------------------------------------
A little backstory. This project began when I saw a video from Tilt Five on Youtube. I did a quick google search to learn more about this amazing device. Sadly like every cutting-edge hardware, it is hard and pricey to put your hands on the early runs, so I decided to try to build one for myself.
While I was doing the early research, a few projects inspired me, but none were as mind-blowing and eye-opening as the ScreenshotSender by Lovyan03. Without his help and amazing Lovyan03 GFX library, this project would not have been possible. So feel free to visit his blog, Twitter, and Github to get inspired.
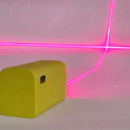
Step 1: Super Simple Lens System

Step 2: Prologue

It may come as a surprise, but I have no engineering, nor do I have an electronics background, which means I will try to explain things that I often don't understand myself. But if you've read until here, it means you are ready to proceed.
How does it work?
cheApR doesn't process the data onboard but only displays what your machine sends to it. To make all of this possible, I was guided by Lovyan03 on how to rewrite his screenShotSender to work on my Mac because his version is only available for PC, and I do not own one.
From there, I created a suite of apps to help you get started with cheApR.
Step 3: Gather the Materials and Tools


Go to my Github and download section and download all project files.
Download the STLs from Thingiverse
If you already have an ESP32 microcontroller and some TFT or LCDs lying around, I rather you give this setup a try before ordering new parts.
This project requires a 3D printer to produce the parts needed for the body and will be fine to print with any filaments. The initial build was made out of cardboard, so feel free to use whatever you have at home.
>> Parts to build cheApR: for the frame:
• A few pairs of second hands or cheap sunglasses (for the lenses)
• MPU6050 (aka gy-521)
• 2 x 1.54 LCDs based on the ST7789 driver
• Wemos D1 Mini esp32 (tested on Node32S and TTGO Display boards)
• 1mm thickness mirrors
• 3.7V LiPo battery - the bigger and flatter, the better
• TP4056 battery manager (using the Type C, but all models should be ok)
• 2x6mm Pushbuttons • Slide switch to control power
• Resistors: 100K & 10K value
One ESP-EYE to add the vision module
This board is an esp32 camera module that will allow your cheApR to see AR markers and do basic facial recognition with processing. I haven't tested it with the AI-thinker ESP32-cam, but it should work too
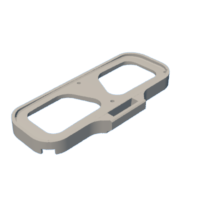
Step 4: Print the Body


[Updated: changed part positions to make it easier to print]
The parts can be printed in any filament you like. I have personally used PLA for mine.
I recommend printing it at 0.2 layer height with support. If you are using Cura, make sure to "lay flat" all the models. The models you will find on my GitHub will be missing the camera addon because this is a work in progress, and I'm still refining the design.
Attachments


Step 5: Download and Set Up Arduino and Processing


cheApR was built entirely with Arduino and Processing. You will find all the necessary libraries here.
If you're already up to speed, download the codes. If not, follow these steps
- - Software prep for Arduino
"Arduino is an open-source electronics platform based on easy-to-use hardware and software."
• Arduino IDE: Download here
• Esp32: Download here > or easy setup with Arduino IDE boards Manager
• Arduino Esp32FS: download here
• LittleFS: Download here
• M5Stack Library: Download here
• ESP32 Cam Webserver: Download here
• Button Fever: Download here
- - Software prep for Processing
• Processing: Download here
Once you've installed it, go to File > Examples > Add Examples > libraries Search and install the following libraries
• Video
• ControlP5: Download and install from Source
• IPCapture: Download and install from Source
• nyar4psg: Download and install from Source
• OBJLoader: Download and install from Source
• OpenCV for processing: Download and install from Source
• PixelFlow:Download and install from Source
• ToxicLibs: Download and install from Source
If everything is installed and running, go to my GitHub to download the codes for cheApR.
Step 6: Build the Circuit


Follow the schematic above and connect all the pins accordingly in a breadboard.
Be careful when soldering the pad at the back of the 1'54" displays, there's an uncorrected serigraphic error. There are only 7 GPIO written instead of 8. They forgot to add [SDA] before [RES] and after [SCL] so please be careful before soldering them.
RIGHT DISPLAY
GND = GND
VCC = 3V3
SCL = IO 17 - GPIO 17
SDA = IO 02 - GPIO 2
CS = TD1 - GPIO 12
DC = TCK - GPIO 13
RST = TD0 - GPIO 15
BL = IO 25 - GPIO 25
LEFT DISPLAY
GND = GND
VCC = 3V3
SCL = IO 23 - GPIO 23
SDA = IO 26 - GPIO 26
CS = IO 32 - GPIO 32
DC = IO 27 - GPIO 27
RST = IO 33 - GPIO 33
BL = IO 16 - GPIO 16
MPU6050
GND = GND
3V3 = 3V3
SCL = IO 22 - GPIO 22
SDA = IO 21 - GPIO 21
PUSHBUTTON
Button A = IO 18 - GPIO 18
Button B = IO 19 - GPIO 19
BATTERY MODULE
SVP - GPIO 36 >> 100K === BATT [ + ]
SVP - GPIO 36 >> 100K === BATT [ - ]
Once done, compile and upload the codes to test your cheApR.
Both displays should turn on and go into SmartConfig mode. Download Smart Config from Espressif. Google Play, or App Store.
Step 7: Build Steps


Step 8: Let's Put It All Together


It is not that difficult to assemble cheApR. Once all parts have been printed, you will need a few M3 bolts/nuts and some hot-glue to put it all together.
Now comes the most tedious part of this project, finding the right optics. It took me a long time to source the right combination of mirrors and lenses for this project. I had to destroy a dozen cheap and pricey pairs of glasses to find the one that works best. For the reflecting mirrors, It doesn't matter if the mirror is glass or plastic. What matters is the thickness. The slimmer the mirror, the better the reflection will be.
What works: Aviator-type lenses work best, but it's not the shape or size that counts; it's the curvature of the lens itself. cheApR needs a flat but slightly curved lens. This type of lens will offer the best reflection without distorting the image too much.
Warning. Be careful with using mirrors made out of glass. They will break and shatter when you drop them.
Follow these steps to assemble the body:
Use the "mirror tool" to draw and cut the right sized mirror for part [4]. Remove the adhesive protection behind them and use some double-sided tape to reinforce the strength. Place the mirrors with the angled bit facing toward the outside. Once they are stuck, use your cutter to remove the extra mirror.
Part [2] and [3] will hold the lenses you've chosen. You will need 4 x M3 (2.8MM) bolts and nuts to hold them in place. This part requires a "blocker" to be held strongly.
The main body requires you to sandwich together part [1], [4], [6] using 3 x M3 (2.8MM) bolts and nuts. I prefer to use the holes located at the top.
Carefully insert the displays inside part [1] and secure them with some hot-glue. I've been using the "Wemos D1 esp32" clone. There should be enough space for you to hold it in place with some double-sided tape and enough on each side to fit the battery management module.
Part [5] was designed to have enough space for you to insert a TP4056, buttons, switch, and battery. Be careful to use some Kapton to hold the cabling in place.
Step 9: CheApR OS


You will find everything you need in here to get started with your cheApR goggles. I wrote it using Processing because it allows me to run and test the codes on different operating systems easily.
• cheApR_UI: my version of Lovyan03 ScreenShotSender. This app mirrors the center of your display and sends it to cheAprR. It should work on Mac, Pc, and Raspberry Pi (very slow)
• cheApR_IMG_SEND: This demo sends a single image at a time. You can use this script to calibrate the positioning of the lenses
• cheApR_WEBCAM_OPENCV: This demo uses your webcam as an input device and openCV to recognize your face. By changing which camera it gets the feed from, you can also use apps like Snap Camera, etc
• cheApR_WEBCAM_ESP_EYE: This demo is similar to the one above but uses the ESP-EYE by Espressif as an input device. Part [11] was made for the ESP-EYE and can be screwed in front of the part [2].
Everything can be found on my Github.
As I previously said, I'm not the greatest coder in the world, so if you find a way to make any of my codes faster, please leave me a comment.
Step 10: Read A.R. Markers With the Vision Addon


cheApR would not be a real Augmented Reality project without using AR markers to materialize 3D objects in front of you. You will need an ESP-EYE or ESP32-CAM if you want to use this part of the project.
Please do not change the camera's resolution in "config.h"; it will break the processing script. I set the max resolution to be "FRAMESIZE_SVGA" (800px x 600px).
Turn on cheApR and the ESP-EYE addon before running "cheApR_WEBCAM_ESP_EYE.pde," or it will not proceed.
Step 11: Make It Yours


As I said, I build this project to demonstrate that making Open Source A.R. goggles was possible. I hope you are as thrilled as me to see where cheApR could lead in a few years as faster microcontroller enter the market.
If you want to see more of my silliness, Follow me on Instagram:@ THEBESTPHOTOGRAPHERINTHEGALAXY

Grand Prize in the
Battery Powered Contest


