

Introduction: Completing the House


The following information is a single lesson in a larger Tinkercad project. Check out this and more projects on Tinkercad.
Return to Previous Lesson: Coding the House
Lesson Overview:
Now we're going to complete the house.
Step 1: Position the Inner Block in the Center of the Outer Block


In order to simplify the creation of the three shapes that make up the house, each was created using (0, 0, 0) as the base point. If we were to complete our code at this point all the shapes would be stacked on top of each other like the orange shape shown in the image below. The colored blocks are also shown for comparison to the manual design pseudo code seen earlier in the document.
At this point we need to properly position each shape to ensure we get the correct final shape. We will start positioning shapes by moving the inner_mesh to be centered in the outer_mesh.
Moving shapes can be done with a 3D translation matrix or a Matrix3D object in the shape generator. The code to transform the inner_mesh shape is shown below. The Matrix3D object defines how the object should move in 3D space and is passed to the transform function to perform the move.
Note: The image below will not be seen when you are creating this section of code. They were created after the shape generator program was written as a way to show the results of adding these transforms to the code.
Instructions
- Continue by pasting the code from the next step into the Shape Generator code window.
- var mtx = new Matrix3D(); //creates a 3D translation matrix for moving a mesh object mtx.translation(1,1,0); //defines how the object will be moved: +1 in the X and +1 in the Y direction inner_mesh.transform(mtx); //moves the object based on the matrix
- The image below displays a before and after of what adding the above code to the program. The blue shape shows the transform of the inner_mesh object in it's new position along with the results grouping the inner and outer mesh. It positions the inner_mesh in the center of the larger block to be hollowed out. All that remains now is to add a transform to the roof object in order to position it properly on top of the walls.

HINT:
1. The first line of this code creates a variable to hold the information required for the transform function.
2. The second line defines that the shape will be moved +1 in the X and +1 in the Y
3. The third line uses the variable to tell the transform function how the shape should be moved.

Step 2: Position the Roof Centered on the Top of the Walls


Just like the inner_mesh above we need to create another Matrix3D object and transform (move) the roof.
The code below shows how to move the roof into position using both hard coded numbers and the H heightvariable to complete the transform of the roof.
Instructions
- Copy the code shown in the next step into the shape generator window, just below the code you entered in the previous step.
- var roof_mtx = new Matrix3D(); //creates a 3D translation matrix for moving a mesh object roof_mtx.translation(-1,-1,H); //defines how the object will be moved: -1 in the X and -1 in the Y and H in the Z direction roof_mesh.transform(roof_mtx); //moves the object based on the matrix
- Continue to the next step.

HINT:
1. The first line of this code creates a variable to hold the information required for the transform function.
2. The second line defines that the shape will be moved -1 in the X and -1 in the Y and will be lifted off the workplane in the Z direction to the height of the value stored in the H (wall height) variable.
3. The third line uses the roof_mtx variable to tell the transform function how the shape should be moved.
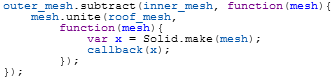
Step 3: Hollow Out the House and Combine the Roof to the Walls


We are now ready to hollow the house by subtracting the inner_mesh from the outer_mesh and combine the roof to the walls.
The Tinkercad API requires that every shape generator return a solid object. The subtract function is set up in a way that allows the subtraction of one or many objects from another using the first parameter of the function, in this case it is the inner mesh. The second parameter is a function that MUST return a solid object. This function can also take other actions, in this case a unite action, before returning that solid object.
We can use the function in the second parameter to unite the roof to the walls of the house before returning the solid created from the mesh.
Note: The image below will not be seen when you are creating this section of code. They were created after the shape generator program was written as a way to show the results of adding these transforms to the code.
Instructions
- Copy the code shown in the next step into the shape generator window, just below the code you entered in the previous step.
- outer_mesh.subtract(inner_mesh, function(mesh){ mesh.unite(roof_mesh, function(mesh){ var x = Solid.make(mesh); callback(x); }); });
- Congratulations! You are finished. If all went well, your code should create a house that looks like the yellow house above. The color of your design may be different.
In the next lesson you will learn to make it your own.
Next Lesson:Make it Your Own


