

Introduction: Control LED Using PushButton With NodeMCU


Hello Makers,
In this instructable we will see the easiest way to connect the Push Button to NodeMCU. And control LED using PushButton.
Step 1: Materials Required

List of parts required for this instructable :
Hardware Required
- NodeMCU
- Push Button
- 10K ohm resistor
- Bread board
- Micro USB cable
- Connecting Wires
Software Required
- Arduino IDE (with ESP8266 Library installed)
Step 2: Description


The PushButton is a electronic component that connects two points in a circuit when you press it. We use these little buttons on everything!
These Miniature Single Pole Single Throw (SPST) switches are breadboard friendly. Perfect as a tactile reset switch. These buttons are rated up to 50mA.
Typical Push Button Switches Applications : Calculators, push-button telephones, various other mechanical and electronic devices, home and commercial.
Step 3: How PushButton Work's
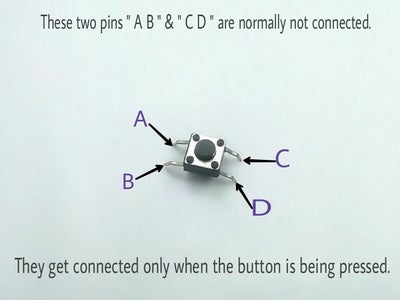

When the pushbutton is open (unpressed) there is no connection between the two legs of the pushbutton, so the pin is connected to 3.3v (through the pull-up resistor) and we read a HIGH.
When the pushbutton is closed (pressed), there is a connection between its two legs, connecting the pin to ground, so that we read a LOW. (The pin is still connected to 5 volts, but the resistor in-between them means that the pin is "closer" to ground)
So, Let's get started with connecting PushButton to NodeMCU and control LED.
Step 4: Wiring Connections


Push Button connections :
The first pin goes from one leg of the pushbutton through a pull-up resistor(here 10K Ohms) to the 5v supply.
The second pin goes from the corresponding leg of the pushbutton to Ground (GND) pin.
The third pin connects to a Digital I/O pin (here pin D0) which reads the button's state.
LED connections :
LED Anode is connected to Digital I/O pin (here pin D1) and Cathode to ground (GND) pin.
Step 5: Coding Process

int led = 5;     // LED pin
int button = 16; // push button is connected
int temp = 0; 	 // temporary variable for reading the button pin status
void setup() {
  pinMode(led, OUTPUT);   // declare LED as output
  pinMode(button, INPUT); // declare push button as input
}
void loop() {
  temp = digitalRead(button);

     if (temp == HIGH) {
        digitalWrite(led, HIGH);
        Serial.println("LED Turned ON");
        delay(1000);
       }
     else {
        digitalWrite(led, LOW);
        Serial.println("LED Turned OFF");
        delay(1000);
       }
}
Download the "Button_NodeMCU.ino" file and open it up in the Arduino IDE.
Then Create a new sketch and paste the code below in the Arduino IDE and hit Upload. You can tinker with it if you like based on the application, or just use it as it is.
Attachments

Step 6: Output


That's all Makers.
You have successfully completed another instructable, It takes pretty less time to create this instructable, and its fun too.
