

Introduction: Haywired Hackduino


A commercially-made Arduino consists of nothing more than a power supply,
an ATMega328 chip, a crystal and a few support components, and sets of
female headers connected to the signal lines of the chip. And, oh yes, the
nice professionally-made printed circuit board. But, all the the heavy lifting
is done by the 328. So, in theory at least, it's possible to duplicate
the complete functionality of an Arduino Uno on a hand-wired board.
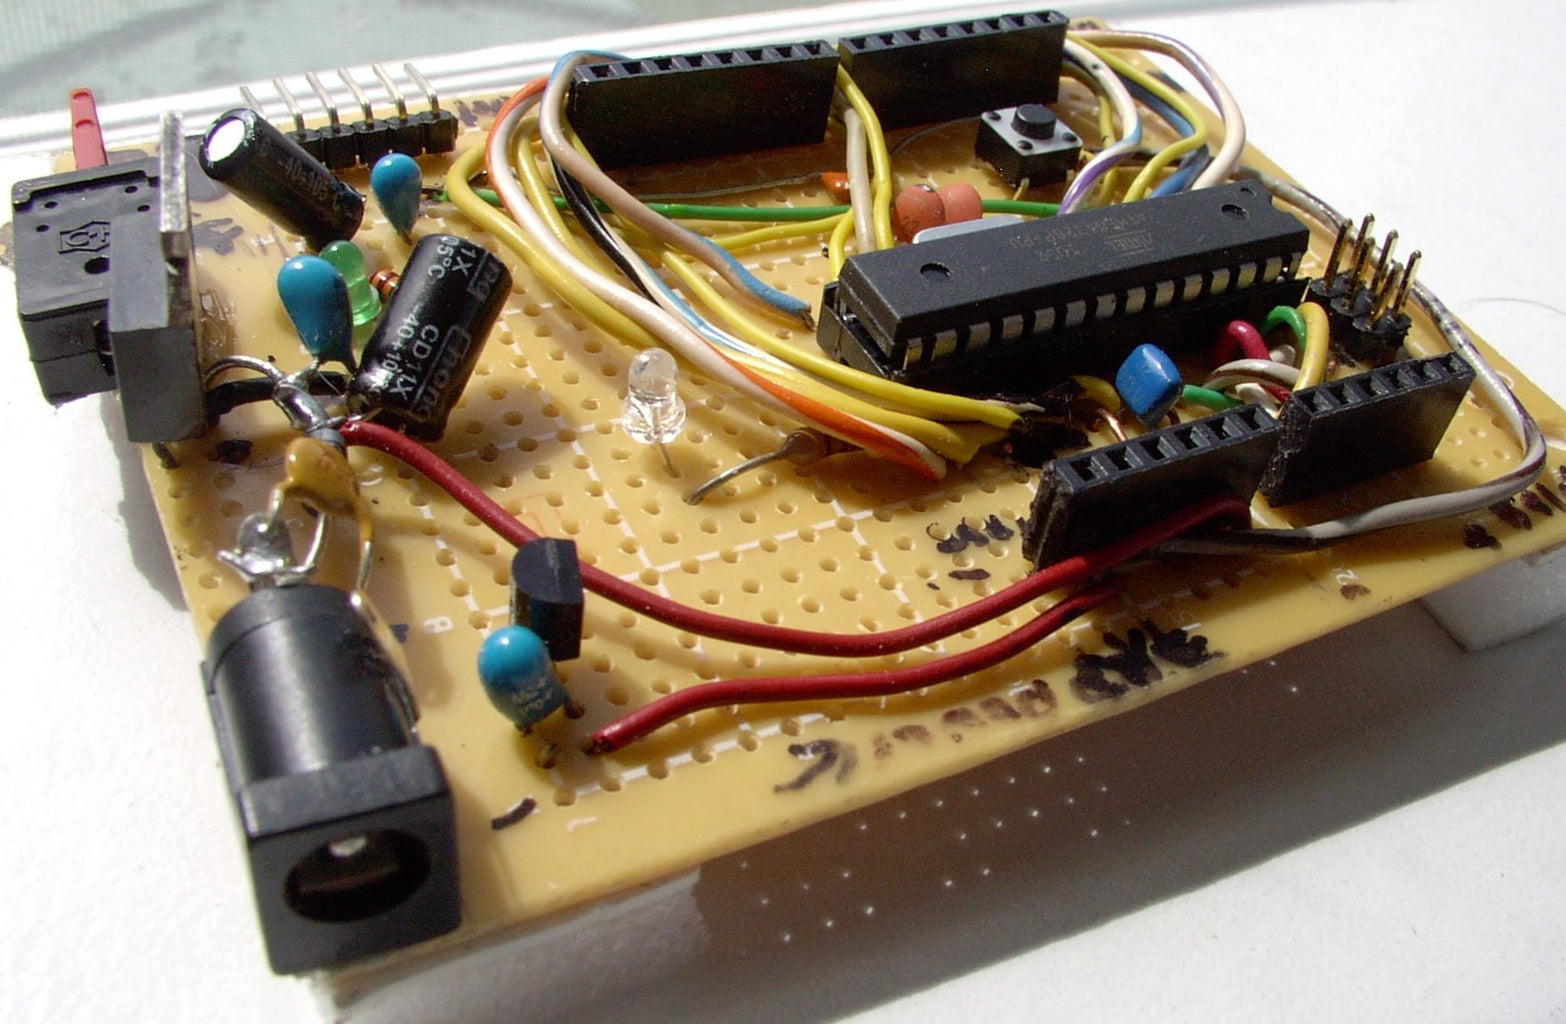
I did it. I painstakingly built my "Hackduino Zero" one section at a time
on a Radio Shack general purpose PC board, part number 276-168.
http://www.radioshack.com/product/index.jsp?productId=2103800
First, I built a power supply on one corner of the board: a standard 2.1 mm
DC power jack, a 7805 5-volt regulator, a 2N4001 rectifier diode, and two
100 uF capactors.
The ATMega 328 chip needs a 28-pin (narrow) socket,* the power supply
connections, a 16 MHz crystal, and two 22 pf capacitors. That's all it takes
to make a barebones hackduino!
*For example, http://www.protostack.com/connectors/ic-sockets/ic-socket-28-pin-7.62mm-0.3.
A few add-ons and frills might be nice. A reset button is almost essential.
And, the standard 6-pin programming header that connects to an FTDI cable
or breakout board is very nearly indispensable. Add a power-on LED and
an LED connected to SCK/PB5/Digital-13. All right, now we're talking
about a reasonably well-equipped hackduino.
What's missing? The female headers, of course. With those installed,
we'll be able to plug in standard Arduino shields. Unfortunately, the
headers are difficult to install. The spacing is a bit weird, and it means lots
and lots of wiring to connect with the ATMega chip. All told, maybe 48
wired connection. Whew!
This is essentially a Proof of Concept project. I built it just to prove
that it can be done with point-to-point wiring, that anyone fool enough
to try to haywire a full-function hackduino can do it . . . if she's
stubborn enough . . . and lucky.
I give no detailed instructions for this Instructable because it is not
a feasible project for the average builder. The level of complexity is
high and there are too many chances for error. And if you don't already
have at least some of the parts on hand, then you're not even saving
money over a commercially-made Arduino.
The end result of the project is a near equivalent of a Sparkfun PTH
kit (http://www.sparkfun.com/products/10523), but lacking the elegant
layout and beautifully-designed red PCB. There's even a PPTC resettable
in-line fuse, just like the Sparkfun kit. My own "innovation" is adding
a miniature 3-position paddle switch at the power supply, to select the
power source (USB, external, off). I used a Cutler Hammer #T8206,
All Electronics catalog number MTS-71 ($1 ea.).
The Hackduino pretty much follows the schematic of the above-mentioned
Sparkfun PTH kit:
http://dlnmh9ip6v2uc.cloudfront.net/datasheets/Kits/Arduino-Compatible-PTH-v13.pdf
First, build the power supply section . Mount a standard 2.1 mm barrel
jack on one edge of the board. Then, a diode to protect against reverse
polarity input. A PPTC resettable in-line fuse (for circuit protection) is nice,
but not absolutely necessary. A 7805 5-volt regulator and two electrolytic
filter caps round out the parts. Now, connect them together.
It's quite a challenge to position and then solder the female header strips
which accept plug-in shields. The trick is to take an already assembled
shield and press the loose female headers onto the male header pins of
the shield. Then place the hackduino board atop the upside down shield,
so the solder pins come through in the correct spacing. Note that the
PC board might buckle slightly after soldering the headers, but this is okay.
Add a strip of 6 right-angle headers on the edge of the board, and connect
the appropriate pins to Rx, Tx, DTR, Gnd, and +5, per the schematic. The FTDI
cable or breakout board will connect here for programming the hackduino.
Now to connect all the wires. Lots and lots of wires. Follow the schematic
and check for solder bridges to adjacent pins. Then, double check.
Use an ohmmeter to check the resistance between the ground and power
busses (it should be greater than zero).
Done? Don't insert the ATMega 328 just yet. We'll do a "smoke test" first
by applying power and seeing if the power-on LED lights up.
All right so far? Insert the 328 and power it up! Connect to your computer's USB
port with an FTDI cable and load the blinking LED sketch
(http://arduino.cc/en/Tutorial/blink). Does it work? Yes?
Congratulations!
an ATMega328 chip, a crystal and a few support components, and sets of
female headers connected to the signal lines of the chip. And, oh yes, the
nice professionally-made printed circuit board. But, all the the heavy lifting
is done by the 328. So, in theory at least, it's possible to duplicate
the complete functionality of an Arduino Uno on a hand-wired board.
I did it. I painstakingly built my "Hackduino Zero" one section at a time
on a Radio Shack general purpose PC board, part number 276-168.
http://www.radioshack.com/product/index.jsp?productId=2103800
First, I built a power supply on one corner of the board: a standard 2.1 mm
DC power jack, a 7805 5-volt regulator, a 2N4001 rectifier diode, and two
100 uF capactors.
The ATMega 328 chip needs a 28-pin (narrow) socket,* the power supply
connections, a 16 MHz crystal, and two 22 pf capacitors. That's all it takes
to make a barebones hackduino!
*For example, http://www.protostack.com/connectors/ic-sockets/ic-socket-28-pin-7.62mm-0.3.
A few add-ons and frills might be nice. A reset button is almost essential.
And, the standard 6-pin programming header that connects to an FTDI cable
or breakout board is very nearly indispensable. Add a power-on LED and
an LED connected to SCK/PB5/Digital-13. All right, now we're talking
about a reasonably well-equipped hackduino.
What's missing? The female headers, of course. With those installed,
we'll be able to plug in standard Arduino shields. Unfortunately, the
headers are difficult to install. The spacing is a bit weird, and it means lots
and lots of wiring to connect with the ATMega chip. All told, maybe 48
wired connection. Whew!
This is essentially a Proof of Concept project. I built it just to prove
that it can be done with point-to-point wiring, that anyone fool enough
to try to haywire a full-function hackduino can do it . . . if she's
stubborn enough . . . and lucky.
I give no detailed instructions for this Instructable because it is not
a feasible project for the average builder. The level of complexity is
high and there are too many chances for error. And if you don't already
have at least some of the parts on hand, then you're not even saving
money over a commercially-made Arduino.
The end result of the project is a near equivalent of a Sparkfun PTH
kit (http://www.sparkfun.com/products/10523), but lacking the elegant
layout and beautifully-designed red PCB. There's even a PPTC resettable
in-line fuse, just like the Sparkfun kit. My own "innovation" is adding
a miniature 3-position paddle switch at the power supply, to select the
power source (USB, external, off). I used a Cutler Hammer #T8206,
All Electronics catalog number MTS-71 ($1 ea.).
The Hackduino pretty much follows the schematic of the above-mentioned
Sparkfun PTH kit:
http://dlnmh9ip6v2uc.cloudfront.net/datasheets/Kits/Arduino-Compatible-PTH-v13.pdf
First, build the power supply section . Mount a standard 2.1 mm barrel
jack on one edge of the board. Then, a diode to protect against reverse
polarity input. A PPTC resettable in-line fuse (for circuit protection) is nice,
but not absolutely necessary. A 7805 5-volt regulator and two electrolytic
filter caps round out the parts. Now, connect them together.
It's quite a challenge to position and then solder the female header strips
which accept plug-in shields. The trick is to take an already assembled
shield and press the loose female headers onto the male header pins of
the shield. Then place the hackduino board atop the upside down shield,
so the solder pins come through in the correct spacing. Note that the
PC board might buckle slightly after soldering the headers, but this is okay.
the appropriate pins to Rx, Tx, DTR, Gnd, and +5, per the schematic. The FTDI
cable or breakout board will connect here for programming the hackduino.
Now to connect all the wires. Lots and lots of wires. Follow the schematic
and check for solder bridges to adjacent pins. Then, double check.
Use an ohmmeter to check the resistance between the ground and power
busses (it should be greater than zero).
Done? Don't insert the ATMega 328 just yet. We'll do a "smoke test" first
by applying power and seeing if the power-on LED lights up.
All right so far? Insert the 328 and power it up! Connect to your computer's USB
port with an FTDI cable and load the blinking LED sketch
(http://arduino.cc/en/Tutorial/blink). Does it work? Yes?
Congratulations!
