

Introduction: HiFive1 Arduino With HC-05 Bluetooth Module Tutorial


The HiFive1 is the first Arduino-compatible RISC-V based board built with FE310 CPU from SiFive. The board is about 20 times faster than Arduino UNO and as UNO is lacking any wireless connectivity. Fortunately, there are several inexpensive modules on the market to mitigate this limitation.
For WiFi connectivity with ESP01 / ESP32 / ESP8266, you can check the AT, WEB and MQTT tutorials.
In this tutorial, we use an HC-05 Bluetooth module. It is cheap, can work as a slave or master and is easy to work with via AT commands. Another option is the ESP32 but it's more expensive and needs to be programmed separately.
This project is focused on creating a wireless connection between HiFive1 and Windows PC or Android Phone using the HC-05 Bluetooth module. Through the connection, we will control the HiFive1 built-in RGB LED colors.
For this project you will need:
Step 1: Setting Up the Environment


- Install the Arduino IDE
- Follow the instructions to install the HiFive1 board Arduino package and USB driver.
Attachments

Step 2: Wiring the HC-05


DI/O 10 (HiFive1) - > Tx (HC-05)
DI/O 11 (HiFive1) - > Rx (HC-05)
GND (HiFive1) - > GND (HC-05)
3.3v (HiFive1) - > VCC (HC-05)
Make sure that IOREF jumper is set to 3.3V as shown in the picture by the red circle.
Step 3: Programming
Before programming set the "Tools->Board" to HiFive1 board, the "Tools->CPU Clock Frequency" to "256MHz PLL", the "Tools->Programmer" to "SiFive OpenOCD" and set the correct Serial Port.
After connecting everything together we can try to talk to the HC-05 via Arduino Serial Monitor. For this, we need to program a simple sketch attached below. It's listening to the AT commands coming from the Monitor via the HW Serial channel and forwards them to the HC-05 via SoftwareSerial32 channel.
It is listening to the HC05 replies from SoftwareSerial32 channel and is forwarding them to the Monitor via HW Serial channel.
If everything was setup correctly in the previous steps, each AT Command should return an "OK" response from the HC-05.
Note: Remember to set the Serial Monitor to 9600 baudrate with "Both NL & CR"
The sketch is based on the code found here
More about AT Commands can be found here
Attachments
Step 4: Configuring the HC-05
- Enter the AT Mode on the HC-05. This is done by removing the VCC cable from the HC-05, then pressing the button at the bottom right while plugging the VCC back in. If done correctly the light should turn on and off at ~2 seconds interval.
- Open the Serial Monitor in the IDE that corresponds to the board connected to the HC-05. Make sure the Serial Monitor is set to Baud Rate 9600 and "Both NL + CR" is selected. If done correctly, when you send “AT”, it should return “OK”.
- Enter “AT+ORGL” (This resets the module to factory settings).
- Enter “AT+ROLE=0” (This sets the module to "Slave" role).
- Enter “AT+CMODE=0” (This sets the module to connect to any device).
- Enter “AT+NAME=____” Replace underscores with a name of your choice (This name will be displayed in Bluetooth discovery).
- Enter “AT+UART=38400,0,0” (This sets the module’s baud rate to 38400)
- Enter “AT+RESET” to exit AT Mode.
- Now upload the final sketch attached to this step
In this step, we will be configuring the HC-05.
You only need to do this step once as the config will then be remembered in HC-05.
Attachments
Step 5: Setting Up the Remote (Windows PC)


Note: If you are using an Android Phone instead skip to the next step.
- Turn on Bluetooth.
- Under devices look for the name you gave in Step 3 - Setup Slave.
- The pairing code is 1234.
- In the device manager, you should see a new COM port for Bluetooth. *
- Download and install PuTTY.
- Open PuTTY.
- Check the “Serial” option and replace “COM1” with “COM_” (underscore should be your new COM port number).
* If more than one COM port was added try step 7 with the different ports till one works.
Step 6: Setting Up the Remote (Android Phone)

- Turn on Bluetooth.
- Under Bluetooth devices look for the name you gave in Step 4 - Configuring the HC-05.
- The pairing code is 1234.
- Open your Arduino Bluetooth App.
- It should prompt you to select the device again.
- Open the terminal.
Step 7: Final Result

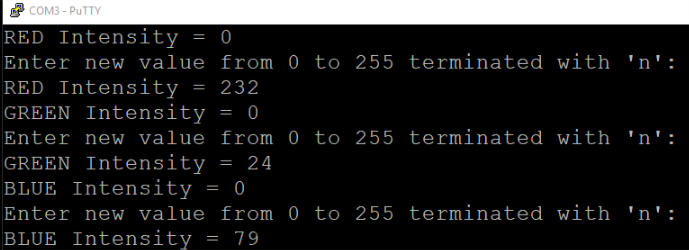

Reset the HiFive1 Board (just in case) and open the Serial Monitor.
Type ‘r’, ‘g’ or ‘b’ into your terminal and then choose an intensity between 0 and 255 and add 'n' to the end of the intensity you chose ('n' is used as a terminating character).
This will light up the built-in RGB LED to the values according to your chosen intensities.


