

Introduction: Homemade Table Saw - Part 2 - DIY Sledge, Runners & Mitre Slots


This is part two of the Homemade Table Saw video, where I make the mitre slots on the bed and my first basic sledge. I decided to make a sledge first before a guide rail, partly because I'll probably wont need the guide rail while I have a skill saw. I have never used a sledge before and have to admit this is the nicest way to work on a table saw. It feel safe which is not a feeling I normally associate with table saws and I am already having several ideas of how to modify the sledge to allow for more interesting cuts.
0:07 I used a steel ruler to mark two parallel lines on either side of the blade. From these marks I measured and drew two the mitre slot lines.
0:48 After removing the adjustable bed, set the depth of the skill saw and start channelling the grooves. I cut two lines first and measured from them.
1:50 Note that the teeth of your saw blade will vary, some leaving a flat cut and other needing paring.
2:00 chiselling away any excess and sanding.
2:11 I laminate the surface for the sledge.
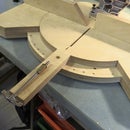
2:31 Cutting the runners for the sledge and planning them down to size.
3:12 Using some pennies or washers in the mitre slots to raise the runners above the beds surface height, add glue and place sheet material in position. I used weight to keep everything in place.
3:38 When the glue dried simply hammer pin nails into runners to add further rigidity.
4:05 I made a cut into the sledge about half way.
4:26 Cutting the front and back fences for the sledge.
5:40 Using engineers squares I laid out the fence 90 degrees to the line and saw bald.
7:21 When the glue dried, removed all the clamps and crew the sledge to the fence, making sure to sink the head of the screw fully to prevent drag.
9:31 Running the entire sledge into the saw to cut the fences.
10:00 Cutting a bit of scrap to test the angle of the cut. By flipping the off cut around and pressing the cut surfaces against the fence and each other you can gage how accurate you have been.
In part 3 I will add a lead screw and stop along the fence of the sledge, which should help me to make finger / comb joints. I will at some point also add this extraction unit!


