

Introduction: Introducing the Tiny 2040 Microcontroller | IR Communicator


What is this and why should you care? I hope to answer that question because I'm super glad I found this microcontroller while randomly looking in Microcenter. I have no affiliation, I just found it and I'm really enjoying it.
It is the same Raspberry Pi chip on the Pico, but this is better in my opinion! This is much smaller, it has a USB-C for programming or power, it has more flash memory, 3 RGB LED's built into the board for testing, a reset and boot button, and the small size and number of pins is perfect for most small project so I really want to share what I have learned with you! I will teach you how to easily set this up with C and Arduino IDE and also Micropython and Thonny IDE. Then I will show you a how to make an IR emitter and receiver! Sound fun? It is so let's do this!
Check out my YouTube Channel for more projects with this little board. Thank you for watching! https://www.youtube.com/c/3DSage/videos
Supplies

2 Pimoroni tiny 2040
1 IR receiver (2 pins)
1 IR emitter
3 buttons
Step 1: Setup in Arduino


Before I explain how to set this up in Arduino IDE, I want to say that I don't recommend it. As of writing this, Arduino just started supporting this board and the code takes a long time to compile, the file size is huge, and not all libraries work, but for simple projects, it's great! Skip to the next step for Micropython and Thonny which is much better!
To use this board in Arduino IDE, go to tools, boards, boards manager. Search for "pico" and install "Ardiuno MBed os RP2040 boards" install any drivers it asked for too. Hold down the boot button when inserting the usb-c and release it. Enter the code I have shown here to make the board blink red, green, then blue. We are now communicating Arduino IDE with the Tiny 2040!
Step 2:


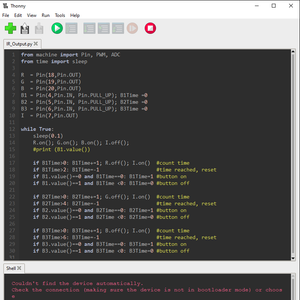
This is the programming method I prefer! Download Thonny IDE and hold down the boot button while inserting the usb-c to the computer. Go to run, then interpreter. Select Micropython raspberry Pi. Click install firmware.
Enter the code I have provided to make the RGB led blink! You can save your code to the board and save it as main.py so anytime the board has power it will automatically run that file.
Step 3: IR Send / Receive


Let's have fun and communicate without wires!
Infrared light is just light but at a frequency our eyes can't see.
The Tiny 2040 emitter will flash that light for a duration of 0.2, 0.4, or 0.6 seconds.
The receiver will detect that IR light and duration and then it knows which function to call.
In this case, what color LED to light up, red, green, or blue but this could be sent to the pins to control speakers, music, servos, lights, anything you desire!
I hope you enjoyed this tutorial and getting to know this cute new little Microcontroller that I hope will become more popular.
https://shop.pimoroni.com/products/tiny-2040?variant=39560012267603
Participated in the
Raspberry Pi Contest


