

Introduction: Iot Weather Station - Part 1


This guide is to present how to implement a simple Iot device with a transceiver, that will publish info from a Temperature/Humidity sensor to an Iot provider, and a receiver that will read the infor published and show it in a Oled display.
This device will be using an ESP8255 family device. It is a good way to illustrate its capabilities and show you how transferable it is from any ESP8266 family device.
I will not be using Arduino IDE for this project. Although I love the tool, I dont think it is a good tool for big projects once it lacks lots of features more modern IDEs could provide.
I will be using Eclipse with platformio but any other platformio IDE could be used.
I will do this in 2 parts. The scope of this first part is to put together the device that later will be used as receiver. For this part, I will use this device to read temperature from a peripheral instead of reading from the internet.
In the second part, I will build a device that will read the Temperature/Humidity from a peripheral connect to its own circuit and publish it to the internet. Then, the receiver we are building now will be changed to read data from the internet along with its own peripheral. It is a good way to illustrate a device that will show the temperature from outside and also the temperature of the room it is in
Lets go to the parts for the receiver:
Supplies
For this guide we will need the following materials. Keep in mind some materials can be adapted to your needs:
- Receiver
- 1 FSEESP-85V13 or any ESP-01 type device to work as the receiver
- 1 Oled Display
- 1 DHT11 Sensor -
- 1 3V3 voltage regulator
- 1 break out board
- 1 Breadboard
- Jumper Wires
- 1 5K resistor
- Additional tools
- USB to UART programmer. Give preference to one that has the auto upload circuitry. As we are writing code as it goes, it is nice to have something that you wont need to press any button in order to have your code uploaded. The suggested below also expose the connections to connect your peripherals without having to plug/unplug all the time. Really convenient
Additionally, you could be using any ESP8266 development board for your coding phase.
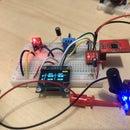
Step 1: Wiring Up - Prototyping Phase

The wiring is kind of straight forward. I am using a breadboard for prototyping the solution. Because I am in the prototype phase, I am using the programmer to interface with the adapter in the breadboard. That way, I can have all hooked up and ready to upload my code as I make the changes.
After everything is done, the device can be connected directly to the breakout board
Notice that, for this Phase, I am not using the voltage regulator as the power is been supplied by the programmer. Which is compatible with the device.
Step 2: Requirements
As I mentioned before, I am using platformio framework with Eclipse IDE. The code for this part is available on gitbhub Weather_Receiver
For this first part, we are just using some libraries to make our device ready to access internet. For that, I am using a library that will open a AP to configure the network and save any extra parameter to SPIFFS. That way, once saved, we will have it persisted in case of future resets.
All the requirements for the code to run is listed as dependency in the platformio.ini file. And this is the very reason I prefer to use this tool. As the project grows, without a robust dependency management we wont be able to keep ourselves productive. Follow below how is my platformio.ini file:
[env:esp8285]
platform = espressif8266
board = esp8285
framework = arduino
lib_ldf_mode = chain+
upload_resetmethod = nodemcu
board_build.f_cpu = 26000000L

lib_deps =
	olikraus/U8g2 @ ^2.28.8
	tzapu/WifiManager @ ^0.15.0
	arduino-libraries/NTPClient @ ^3.1.0
	fullstackelectron/FSEDTH11 @ ^1.0.0
	fullstackelectron/FSESPIFFS @ ^1.0.0
	fullstackelectron/FSEWifiManager @ ^1.0.0

	bblanchon/ArduinoJson @ ^6.17.2
upload_speed = 460800
After all dependencies in place, we are now able to discuss the code.
Step 3: The Code


The code is as below.
#include <Arduino.h>

#include <U8g2lib.h>
#include <ESP8266WiFi.h>
#include <ESP8266HTTPClient.h>
#include <WiFiClientSecureBearSSL.h>
#include "ESP8266WebServer.h"
#include <DNSServer.h>
#include <FSEWifiManager.h>
#include <NTPClient.h>

#include <FSEDHT.h>
//#include "FSEThingSpeak.h"
const long utcOffsetInSeconds = -18000; // -4 hours
WiFiUDP ntpUDP;
NTPClient timeClient(ntpUDP, "pool.ntp.org", utcOffsetInSeconds);

U8G2_SSD1306_128X64_NONAME_F_SW_I2C u8g2(U8G2_R0, /* clock=*/ 2, /* data=*/ 0, /* reset=*/ U8X8_PIN_NONE);

FSEDHT dht(3);

#define IOT_URL_PARAM_NAME "iot_thingspeak_url"
#define IOT_API_KEY_PARAM_NAME "iot_api_Key"
#define IOT_TEMP_PARAM_NAME "field1" // humidity
#define IOT_HUM_PARAM_NAME "field2" // temperarure

#define MYSERIAL

FSEWifiManager myWifiManager;
void writeOled(float number);
void writeOled(String text);
void waitingWifiConfig(WiFiManager *wifiManager);
void wifiFailedMessage();
void readDHT();
void writeDataToOled();
void setData(FSEDHT *dht);
void error(FSEDHT_error_t error);
volatile float humidity=0.0, temperature=0.0;
void saveConfig();

void setup() {
	//reseting wifi
	//myWifiManager.resetSettings();
#ifdef MYSERIAL
	Serial.begin(115200);
	Serial.setTimeout(2000);
	// Wait for serial to initialize.
	while(!Serial) { }

#endif
	pinMode(3, FUNCTION_3); // setting RX pin to FUNCTION_3
	u8g2.begin();

	u8g2.setFont(u8g2_font_ncenB08_tr); // choose a suitable font
	writeOled("Connecting Wifi...");
	myWifiManager.addParameter(IOT_URL_PARAM_NAME, "Iot Server URL", "https://api.thingspeak.com");
	myWifiManager.addParameter(IOT_API_KEY_PARAM_NAME, "API Key", "");

	myWifiManager.setAPCallback(waitingWifiConfig);
	myWifiManager.setSaveConfigCallback(saveConfig);
	myWifiManager.begin("WEATHER_REC");

	if (WiFi.status() != WL_CONNECTED) {
		wifiFailedMessage();
	}

	dht.afterRead(setData);
	dht.onError(error);
}

void saveConfig() {
	Serial.println("If we wish to do something after saving");
}

void error(FSEDHT_error_t error) {
	Serial.println("Error");
	Serial.println(error.errorNum);
	Serial.println(error.errorMsg);
}

void setData(FSEDHT *dht) {
	humidity = dht->getHumidity();
	temperature = dht->toCelsius();
	writeDataToOled();
}

String getTime() {
	//only will get next time if passed more than 30 secs
	static unsigned long last_update = 50000;
	static String lastTime;

	if (millis() - last_update > 30000) {
		timeClient.update();
		char buff[5];
		sprintf(buff, "%.2d:%.2d", timeClient.getHours(),timeClient.getMinutes());
		lastTime = buff;
	}
	return lastTime;
}

void readDHT() {
	dht.read();
}

String toString(float f) {
	char buff[100];
	dtostrf(f, 2, 2, buff);
	return buff;
}
void writeDataToOled() {
	u8g2.clearBuffer();
	u8g2.drawStr(100,10,getTime().c_str());
	u8g2.drawStr(0,30,"T:");
	u8g2.drawUTF8(40, 30, toString(temperature).c_str());
	u8g2.drawStr(0,50,"H:");
	u8g2.drawStr(40,50, toString(humidity).c_str());
	u8g2.sendBuffer();
}
void wifiFailedMessage() {
	for (int i = 5; i > 0; i--) {
		u8g2.clearBuffer();
		u8g2.drawStr(0,10,"WIFI Failed");
		u8g2.drawStr(0,30,"Retrying in:");
		char buff[100];
		dtostrf(i, 2, 2, buff);
		u8g2.drawStr(0,50,buff);
		u8g2.sendBuffer();
		delay(1000);
	}
	ESP.reset();
}

void waitingWifiConfig(WiFiManager *myWiFiManager) {
	u8g2.clearBuffer();
	u8g2.drawStr(0,30,"Connect to SSID:");
	u8g2.drawStr(0,50,myWiFiManager->getConfigPortalSSID().c_str());
	u8g2.sendBuffer();
}

void loop() {
	readDHT();
	writeDataToOled();
	delay(10000);
}
void writeOled(String text, int x, int y){
	u8g2.clearBuffer();          // clear the internal memory
	u8g2.drawStr(x,y,text.c_str());  // write something to the internal memory
	u8g2.sendBuffer();
}


void writeOled(String text){
	u8g2.clearBuffer();          // clear the internal memory
	u8g2.drawStr(0,10,text.c_str());  // write something to the internal memory
	u8g2.sendBuffer();
}

void writeOled(float number){
	char buff[100];
	dtostrf(number, 2, 2, buff);
	u8g2.clearBuffer();          // clear the internal memory
	u8g2.drawStr(0,10,buff);  // write something to the internal memory
	u8g2.sendBuffer();
}
The main point of this code is in the setup function. Once you run this code for the first or every first time after you call for
myWifiManager.resetSettings();
a Access Point will be created with the name passed to
myWifiManager.begin("WEATHER_REC");
You will be able to select that network using any WIFI ready device and set the proper values for connection to your WIFI network. Once connected to that wifi, you can access the address 192.168.4.1 and a nice interface will open for you to setup your WIFI.
When you click "Configure Wifi". A page with the Networks around will open and a form to fill in the WIFI info and any additional parameter created when you called
myWifiManager.addParameter(IOT_URL_PARAM_NAME, "Iot Server URL", "https://api.thingspeak.com");
After you click Save, your network info will be stored in the Wifi memory and any additional parameter will be saved in the device SPIFFS.
Everything is managed by library FSEWifiManager. Which is an extension of Wifimanager by tzapu.
Step 4: Conclusion
If you follow this from the beginning to now and everything went well, you will have your OLED display showing the time in the upper right and also the Temp and Humidity from your DHT11 displayed in the screen.
As you could see in the code, the time is given by the NTP library. Which is a network time library that will retrieve the time from the internet.
I am now working in the part 2. For that part, I will add a transceiver device and also make changes to the code shared here.
Follow the github link for the receiver


