

Introduction: MacroPad - Macro Keyboard


The MacroPad is a Raspberry Pi PICO based Micropython macro keyboard. I features a SD card that can hold multiple macro sets for each program you load on the card. Each TXT file can map a caption, color, and series of key strokes to one key. It also contains the macro set name and global color for the keys. You can press the dedicated button to select the macro set held on the SD card and alter the key/screen brightness.
Supplies
- 3D model can be found and downloaded here: Printables Link
- 1 Adafruit NeoKey 5x6
- 1 Raspberry Pi RP2040
- 8 Clear Keycaps
- 8 Cherry MX key switches
- 1 SD Card Reader
- 1 SD Card
- 1 16mm momentary button
- 1 OLED display
- 4 Rubber feet
- 2 M3 x 8 (Display mount)
- 4 M2.5 x 8 (Display and Cover)
- 4 M3 x 12 (Bottom to Top connection)
- 2 M2.5 x 6 (SD Card Reader)
- 2 M3 x 4 (Key matrix mount)
- 4 M1.7 x 4 screws (RP Pico mount)
Step 1: Download and Print Enclosure

- Navigate your browser to https://www.printables.com/model/178414-macropad
- Download the AMF file
- Slice it with your favorite slicing program. (I used PrusaSlicer).
- All of the parts were designed to be face down but the AMF file imports them as blown out assembly, so make sure that the parts are face down on the build plate.
- On the bottom plate, add supports to the screw holes.
- Print.
Note: If you want them to appear as they do in the main picture you can play around with the filament switching at different layer heights to add some color to your print.
Step 2: Wire UP
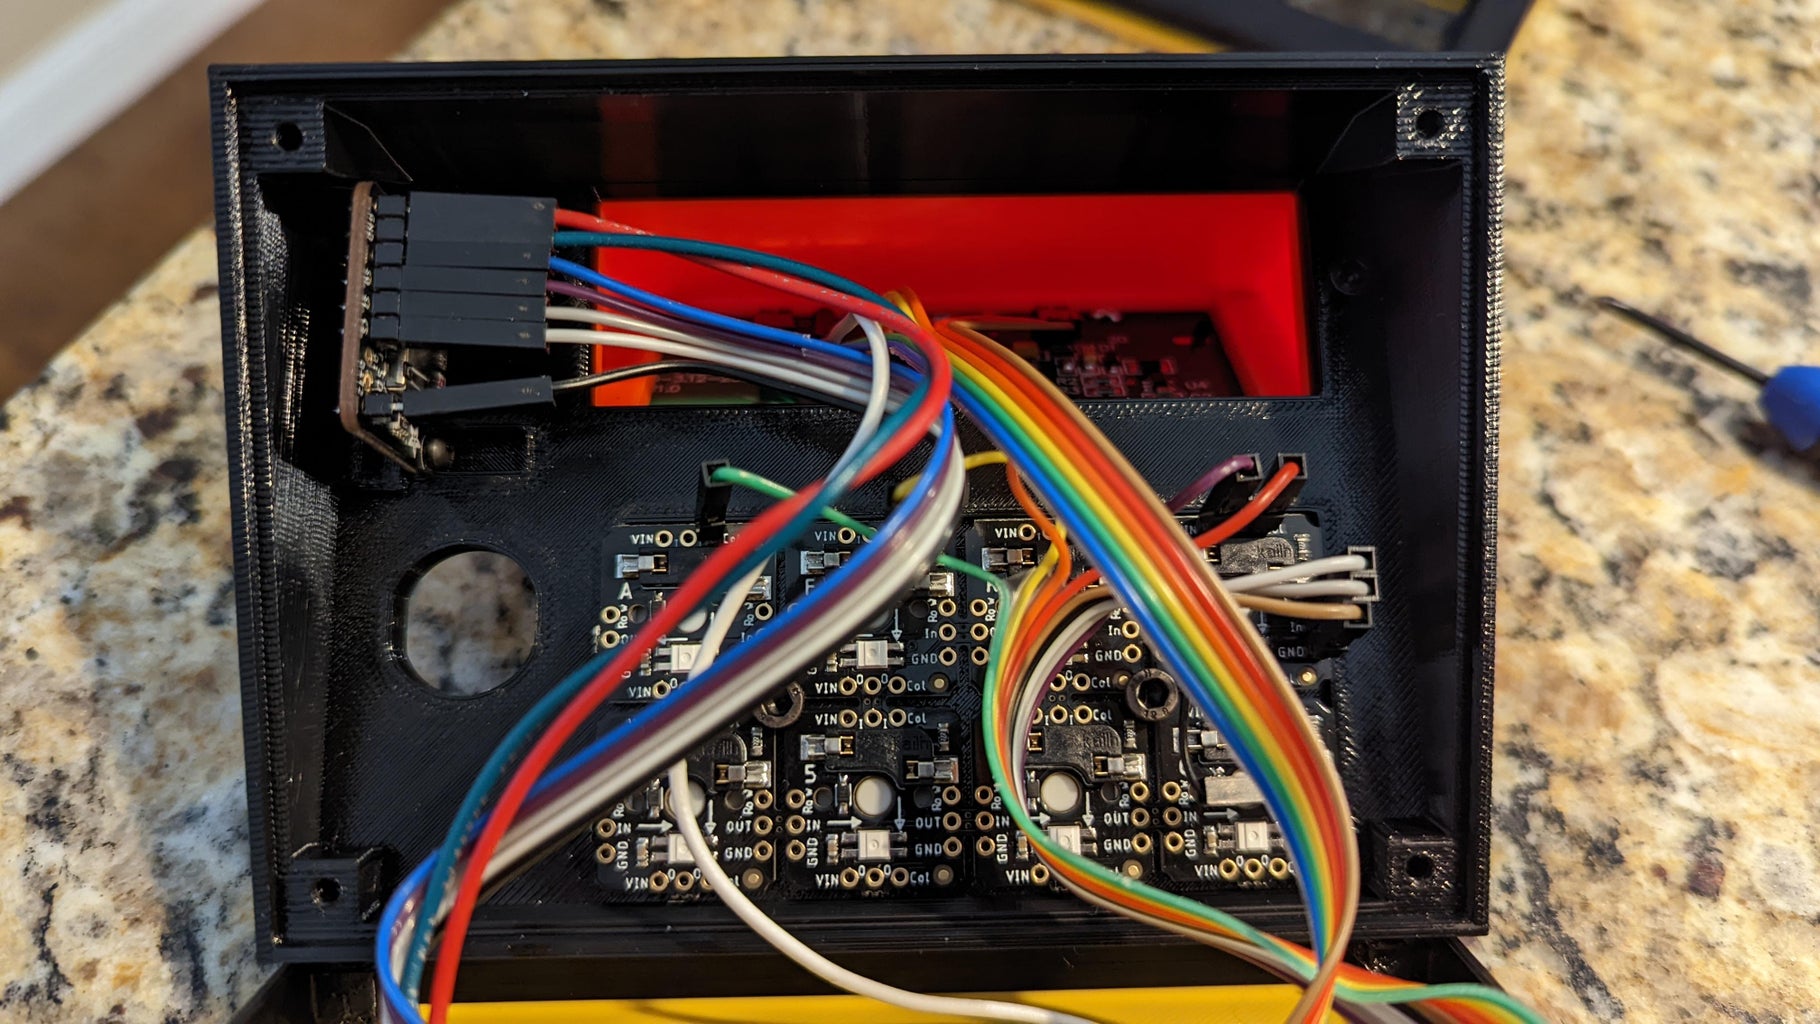


I used DuPont connectors but I know some people would prefer to solder direct. You should think really long about when to attach your components and when to solder your wires. I soldered all the headers on then connect them up after attaching them to the enclosure.
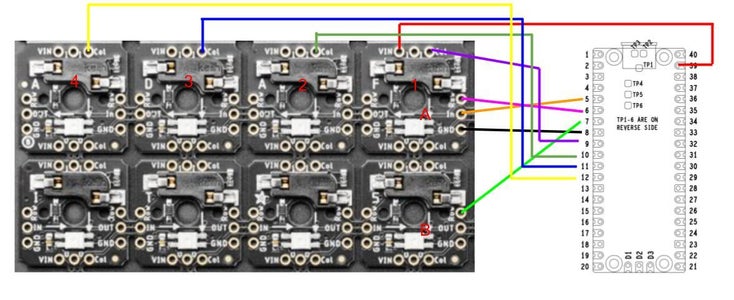
See wiring diagrams to hookup the OLED Display, SD Card reader, NeoKey board, and the Momentary Button.
All connections will be one to one to the RP Pico EXECPT the 3.3v connection. It is shared by the SD Card Reader and OLED Display. The NeoKey board is the only thing that uses the 5V connection on the RP Pico.
I also included a picture of my creative use of DuPont connectors and angled headers on the RP Pico. Notice that I used a male connector for power amongst female connectors so that I could jump or combine them.
Step 3: Load Custom Bootloader
The current build of Micropython doesn't support the usb-hid keyboard functions needed so we will need to use one developed by the community.
- Download the needed firmware file here: https://forums.raspberrypi.com/download/file.php?id=50270&sid=775770a709d548de86decbe0c430bff9
- While holding down the BOOT SEL button on the RP Pico a plug it into your computer.
- You will see a new storage device as RPI-RP2.
- Drop the firmware.uf2 file in the new drive.
- The drive will disappear while the RP Pico reboots.
Step 4: Programming the RP Pico

- Download and install Thonny.
- Open Thonny.
- Setup the interpreter by selecting the Run dropdown and clicking Select interpreter.
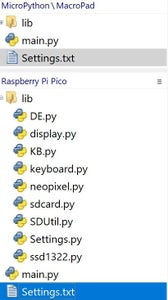
- Now copy over the files from your desktop to the Pico using Thonny making sure that the structure of the directory root contains( lib, main.py, Settings.txt). All other .py files are stored in the "lib" directory.

Step 5: Create Macro Sets on Your SD Card
- Add Template.txt to the root of your SD Card.
- Make multiple copies of the template on your SD Card.
- Macro sets are loaded alphabetically so it is recommended that you number the name your files. (See examples)
- Template is ignored during loading.
- Key Considerations:
- "+" - This symbol denotes key combos (i.e. [CTRL]+B) If you need the plus sign then use [PLUS]
- Special Keys:
- ENTER, ESC, BACKSPACE, TAB, SPACE, PLUS, F1-F12, PRINTSCREEN,
- SCROLLLOCK, PAUSE, INSERT, HOME, PAGEUP, DELETE, END,
- PAGEDOWN, RIGHTARROW, LEFTARROW, DOWNARROW, UPARROW,
- MUTE, VOLUMEUP, VOLUMEDOWN, CTRL, SHIFT, ALT, WINDOWS
- Colors: BLACK, RED, YELLOW, ORANGE, GREEN, CYAN, BLUE, PURPLE, WHITE
- Save your Macro sets and insert the SD Card into the Macro Pad.
Step 6: Final Thoughts
I hope you enjoy this build. I'm a tad rushed to get this out but I'll try to fill in some gaps as they develop. The code has only been tested by me so if you find something, let me know...I may live to regret that.

Participated in the
Electronics Contest


