

Introduction: Make a Custom Guitar With Custom Templates


If you are just getting into building musical instruments or a professional luthier you should know that a good template is always the starting point to building a great instrument. Just like most lutiers in the past I hand cut an shaped my templates. The process is demanding and labor intensive and very difficult to do with great precision. Those days are long gone for me now. When I discovered that i could produce my own templates just like the fancy ones I have seen in catalogs for relative little expense, and that I could design and custom build any instrument I wanted with theses custom templates, I knew it was going to change my entire perspective of building instruments. I now spend more time actually building and far less time preparing and hand shaping templates, a process that took longer than it did to actually build a solid body guitar. They where too good to keep a secret so I'm writing the Instructabale to share how I am able to build custom instruments in a rapid process that is satisfying and fun. I will demonstrate the use of these templates by building a Solid guitar body.
Check out the TwoCherriesInstruments.com website and send them your ideas to have a great set of templates made for your next build.
This Video is an intro to using templates...
This video building a guitar body with templates...
Step 1: Designing the Template


So maybe you have some images, a drawing or sketch, or maybe just an idea for a custom instrument. How do you get from there to templates? Back in the days you would have to draw up a plan for your custom instrument by hand, but today we do that kind of work on the computer. Maybe you already have some outlines of your ideas in scetchup or some other drawing program, how do you get them made into templates?
Well, its easy! whether you have everything ready to be sent to the CO2 laser cutter or your just trying to get an idea together the folks at
Twocherriesinstruments.com
have you covered. you can send in files, images, sketches, whatever you've got. just send them in and they will produce a perfect auto cad file that can be cut into the templates you need to get the work done. All the work of contracting with Laser cutting services and making your files function in there system is done for you. you just send in what you have, they convert it to template outlines that you approve or suggest changes to and when your satisfied they have the templates cut and shipped to your doorstep.
Step 2: Tools

your going to need some tools. this is what I use. but you could get by with much less. please leave comments about what you use or plan to use.
Router with a large flat base. a plunge router is better.
bits-
1/2" x1/2" template bit
1/2" x 1" template bit
1/2" x 1/2" template bit (this one has the bearing on the tip instead of the shank)
3/8" round over
band saw or hand jigsaw or even a bow saw.
drill press or hand drill
1" forstner bit
7/8" wood Spade-Blade bit
long 1/4" bit
bench plain
1" plain
small 10mm finger plain
wraps
razor cut file(stewmac.com)
.....
Step 3: Layout Lines


layout all the lines you are going to cut and shape with crisp pencil lines. for this solid body I can't layout the cuts on the back before the outline is shaped so I first layout all the lines for the top rough cut out the shape, route the outline. with the outline shaped I can layout all the cavities on the back.
Some builders like to cut the pickup cavities and the neck cavity before they shape the outline, for me this causes problems when I shape the outline an i don't have wood in the area of the neck pocket. With these templates you are able to aline all the cuts so accurately that it is not necessary to cut cavities prior to shaping the body.
Step 4: Hog It Out


using the drill press and the 1" forstner bit hog out the bulk of the cavities. be careful not to go to deep. I try to cut about 1/4" to 1/8" less than the final depths. Its good to have the parts (pickups, bridge, and the neck) you plan to put on the body around when doing this step so you can take accurate measurements and have better end results.
Step 5: Attaching Templates to the Workpiece


Your going to need to attach the template to the work piece some way. I use double sided tape for this. my preference is the double sided duct tape. cut and attach the tape to the template in a way that will hold it securely to the workpiece but don't go crazy, if you use to much it will be difficult to remove the template without breaking it.
Watch the video in step one to see how this is done.
Step 6: Routing


For the first pass set the depth so that the cutting edge is as close to the edge of the template as possible. I like to use one of the unused template pieces for this. you'll want to use the 1/2" bit to start. don't get to aggressive make small cuts.
take several passes to get to the final depth you may need to remove the template and change the the longer bit to get to the full depth for a control cavities. and for the instrument outline.
Step 7: Cavity Shelves


your going to need to route shelves for the control pocket covers. The least expensive templates are one eighth of an inch thick which makes it difficult to cut such a shallow shelf. To accomplish this I made a duplicate of the template out of 3/4" plywood in that way I could cut a shelf that was only one eighth of an inch deep with my 1/2" bit.
watch the video to see how this was done.
Step 8: Roundover


Now chuck up the 3/8" round over bit to round over the edges of the instrument be careful to start and to stop the cuts in places that you do not need to cut like around me neck pocket to leave space for the bolt on neck hardware . You will need to finish off the round overs by hand as well as the round over in the areas of the arm bevel and belly cutaway.
Step 9: Arm Bevel and Belly Cutaway


You're going to need to do a little bit of carving to get these parts shaped. It's not difficult but does take a little bit of time. I highly suggest acquiring a razor cut file from Stew Mac for this they cut very cleanly and are capable of aggressively taking out a lot of wood. Also a couple of planes and a template following sanding drum can make this task much easier (watch the video). Once they are cut out and shaped you have to continue the round over in the areas that you have cut to do this file off a 45 degree angle and then round of to match the round over on the rest of the body.
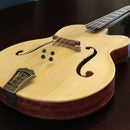
Step 10: Sand, Sand, Sand

all that is left is to surface prep your new instrument for finish. now that was not as hard as you though and before long you will be cranking them out at an amazing pace. but don't forget that the better the template the cleaner and nicer looking your final result will be. There is nothing wrong with hand shaping templates but if you want extremely neat and accurate templates there is no better or less expensive design and cutting service out there than TwoCherriesInstruments.com

Participated in the
Woodworking Contest


