

Introduction: Making Microcontroller Artificially Intelligent - Neural Networks


Artificial Intelligence, one of the most important research topics in computer science and robotics, and all implemented on a single chip that has memory of 8kbytes!? The main aim of this project is to describe possibility of implementing one of the leading algorithms in artificial intelligence that is Neural Networks on tiny microcontroller.
Neural Networks (or Neural Nets for short) is a mathematical object that mimics the behavior of brain through connecting smallest computing units: Neurons. One of the main properties of (artificially) intelligent object is to be adaptive i.e. learn and analyse environmental conditions, and be able to respond to new, previously unseen condition.
This instructable will show you how this can be done on cheap tiny commercially available microcontroller, which I've chosen to be ATTiny85. This microcontroller has 8kbytes of memory and is able to fully run Neural Network with total of 6 neurons which is enough to learn any non-linear correlation of two inputs to single output.
Step 1: Required Parts
The one of the main aspects of artificially intelligent object is to be adaptive to the environmental conditions and be able to learn the data supplied from any arbitrary sensor connected to one of its input ports.
In this project, to make system/circuit autonomous, i.e. independent of computer and simple, there are several components required other than a main microcontroller. General part list for this project has the following form:
- Main Microcontroller Chip, for e.g. ATTiny85 - The Brain of the circuit
- 2x Variable resistors (Potentiometers) of any range - Simulating a sensor input
- Any LED (It's better to use visible light LED :)) - Simulating an output
- 2x Buttons - One for adding entry in dataset or to the "experience of the brain", and One for training the dataset (more details will be supplied in the concluding steps)
- Several resistors - For LED, buttons and etc.
- <0.1uF Capacitors - To avoid bouncing effect of button
Note that this "list" is not universal, that is, it might vary from different applications of the trainable microcontroller, for e.g. one might substitute simple variable resistors with temperature or light sensors, thereby allowing possibility of measuring optimal light-temperature values.
Step 2: The Circuit


Generally, the program consists of two different modes of operation, which I'll from hereafter will refer to as: Training and Acting modes. Due to limited number I/O pins, some pins may represent input pins in one mode whereas in another mode, represent output pins.
The Pinout:
Pin 1: Reset/Clear dataset in both Training and Acting modes.
Pin 2: First analog input of Neural Net in both Training and Acting modes.
Pin 3: Second analog input of Neural Net in both Training and Acting modes.
Pin 4: Ground
Pin 5: Training Mode: Train and Switch mode, Acting Mode: Switch mode
Pin 6: Training Mode: Add current state to dataset, Acting Mode: Output of the Neural Network
Pin 7: Training Mode: Output condition to learn with given inputs, Acting Mode: Not Connected
Pin 8: +5 volts
I will describe the meaning of each pin in the Testing step.
Attachments

Step 3: The Program


The program serves as the main part of the project: It simulates a brain (with 6 neurons). It allowed the microcontroller to learn from its experience (that is data externally supplied or taught by its user).
You can upload the program using Arduino as a programmer, this can be done as follows:
- Open File->Examples->ArduinoISP.ino in the Arduino IDE
- Make sure you have correct port and board selected (Arduino which is to be used as a programmer)
- Upload the code to your Arduino and disconnect it from your Computer
- Connect Arduino to ATTiny85 as shown in the image above.
- Download ATTiny85 board files from: Here
- Click Shift and upload button as shown on the image
- Done!
Now you can move on to the next steps, where you'll explore the possibilities of the 6 neurons running on the microcontroller.
Attachments
Step 4: The Modes of Operation

As mentioned previously, there are two modes of operation: Training and Acting Modes:
Training Mode
When the power is supplied the the microcontroller, it will boot into the Training Mode by default. Here, the PinOut of the microcontroller is:
Pin 1: Reset
Pin 2: First analog input to Neural Network
Pin 3: Second analog input to Neural Network
Pin 4: Gnd
Pin 5: Train and Switch mode
Pin 6: Add to Dataset
Pin 7: Input of the value of the desired Neural network output with the current state of inputs(Pin2 and Pin3)
Pin 8: +5 volts
To better explain the idea behind each pin consider an example: suppose one wants to create a device that can predict whether or not current Light-Temperature values in the current environment are optimal (for e.g.: Not too Hot/Cold and Not too Dark/Illuminated) based on it's experience supplied by the user. To phrase the requirement more concretely: The Output should be at maximum if the environment if not both too Hot/Cold and too Dark/Illuminated, if at least one parameter deviates too much from optimum level, the output voltage should drop. Well to do this, you first teach microcontroller what do you mean under the optimum level, this is done by placing the microcontroller in Dark/Cold room and telling it that this environment is not good, i.e. it should have low voltage on the output pin in this environment. Similarly, in not too Hot/Cold and not too Dark/Illuminated room, the microcontroller is told that it should output the maximum voltage. This process is called training. In this case there are two sensors required: Optical and Thermal. Here temperature sensor might correspond to Pin 2 and the light level(optical) sensor might correspond to Pin 3. Output voltage is supplied to microcontroller through Pin 7 and the desired output voltage is "told" to microcontroller by clicking the button connected to Pin 6. When the learning procedure is done, you can click Train and Switch mode button connected to the Pin 5, which will "train the microcontroller" (I will describe this process in concluding sections) and will switch the current mode, that is Training mode to the Acting Mode.
More formally: In the Training modeone supplies the microcontroller with the input-output correlations through pins:
Input: Pin 2, Pin 3
(Desired) Output: Pin 7
by adjusting the voltages on Pin 2, Pin 3 and Pin 7 pins, and clicking Add to Dataset button (connected to Pin 6). If the dataset is fully supplied, the Train and Switch mode button (connected to Pin 5) is clicked, thereby switching the current mode, that is Training mode to the Acting Mode.
Acting Mode
After teaching your microcontroller, it must use its current knowledge in real physical situations! This mode makes this possible, specifically, with the current input values (i.e. states of potentiometers) it predicts what the output value (voltage on LED), should be, based on its experience/training data supplied by you.
To better illustrate this, consider previously mentioned example about teaching microcontroller the optimal level of Light-Temperature tradeoff: after clicking the Train and Switch mode button (that is connected to Pin 5), the training process will be initiated, which lasts approximately 20 seconds, after which the mode is switched to the Acting Mode. In this mode the pinout changes drastically:
Pin 1: Reset
Pin 2: First analog input to Neural Network
Pin 3: Second analog input to Neural Network
Pin 4: Ground
Pin 5: Switch Mode
Pin 6: Output/result of the Neural Network based on input pins (Pin 1 and Pin 2)
Pin 7: No function
Pin 8: +5 volts
Here similarly to the previous mode, Pin 2 and Pin 3 are the sensor (Optical and Thermal) input pins. These are like eyes for us, which sense and give data to us, using which we make a decision according to our experience, that is for example to stop walking when we see an obstacle, similarly, the pins: Pin 2 and Pin 3 are sensor inputs: in the aforementioned case optical intensity and temperature sensors, which supply data in form of voltage, then, the microcontroller using this values and its experience/knowledge decides how optimal current environment is by outputting corresponding voltage on the Output/Result pin (that is Pin 6).
Step 5: Testing the Neural Nets


After completing previous steps the circuit is now ready to be tested. When the microcontroller first powers up, it boots into Training Mode where it is waiting for the data to be supplied. The basic test dataset for learning algorithm is to simulate XOR gate which is a non-linear function of two variables. The output of XOR gate with respect to the values of the input variables is shown in the image above. So now question becomes: "How to train it?". Here're the steps for training microcontroller to simulate the XOR gate:
- Set the values of variable resistors connected to (Inputs) Pin 2,Pin 3 and (Output) Pin 7 to zero.
- Click Add to Dataset button (i.e. button connected to the Pin 6).
- Set the values of variable resistors connected to (Inputs) Pin 2 and Pin 3 to +5 volts and the value of variable resistor connected to (Output) Pin 7 to zero.
- Click Add to Dataset button.
- Set the value of variable resistor connected to (First Input) Pin 2 to zero and the value of variable resistors connected to (Second Input) Pin 3 and (Output) Pin 7 to +5 volts.
- Click Add to Dataset button.
- Set the value of variable resistor connected to (Second Input) Pin 3 to zero and the value of variable resistors connected to (First Input) Pin 2 and (Output) Pin 7 to +5 volts.
- Click Add to Dataset button.
- Click Train and Switch mode button (i.e. button connected to the Pin 5), this will trigger the output LED on.
- Wait approximately ~12 seconds for the training process to finish.
- After training process is done, the LED will start blinking for few seconds.
- Done!
After the training process is done try changing the state of each variable resistor attached to input pins (Pin 2 and Pin 3) and observe how the output LED changes its light intensity. The intensity of LED at the current moment depends on both: states of the input variable resistors and on its training dataset.
Above you can download Python script, which contains the same implementation of neural networks but provides graphs of change of error as the training progresses and graph of the output itself.
Attachments
Step 6: Working Principle of Neural Networks Algorithm
Mathematical flexibility of the algorithm is the main property allowing the microcontroller to learn, analyse and act to given/supplied condition. This is done simply by imitating working principles of brain: Neural Network. Now lets abstract this notion of "Brain": Mathematically one can define an object that takes a vector (set of multiple variables) as its input and outputs another vector, where the output vector not only depends in the input vector, but also on its "previous experience" which we have supplied manually.
More rigorously, this object is a multidimensional vector field which maps given vector with some variable coefficients to another, output vector.
But now the question becomes: How to adjust our object, so that its output is tweaked using its experience ? Here consider a simplified Neural Network, which consists of interconnected minimal computational units, commonly referred to as "Neurons".
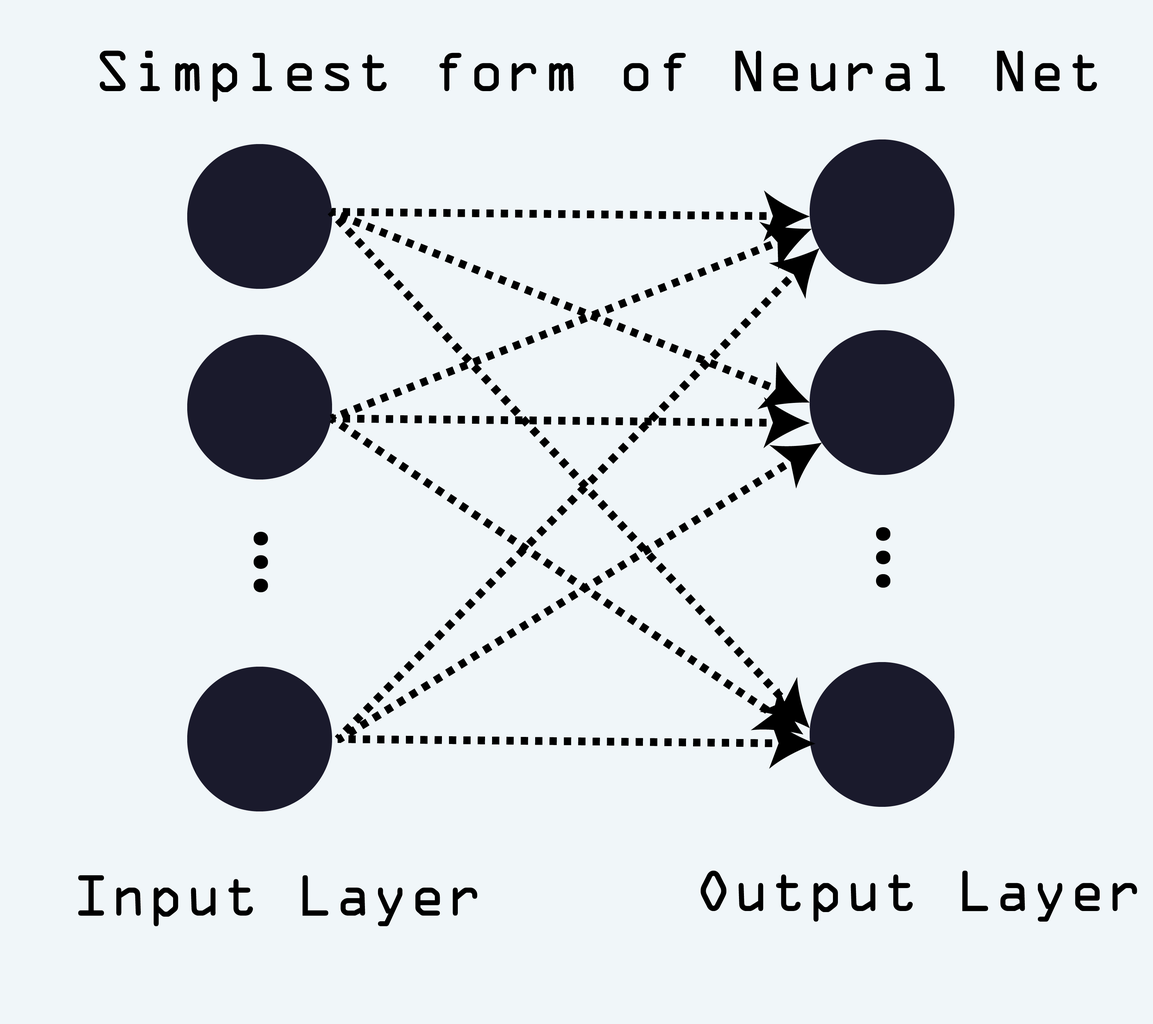
Using this idea of Neural Network, we can define our mathematical object to be a network of some simple computational units (namely "Neurons") connected with some coefficients, this allows us to define our input and output in terms of such computational units, specifically if an input is a vector of dimension n (i.e. consists of n variables), on the input we can put n neurons and similarly, if an output vector has dimension m, on the output we can put m neurons representing output vector. This gives us two layers: Input and Output layer. Connecting all neurons from input layer to output layer, with some coefficients gives us simplest form of a Neural network, which is shown in above image.
The coefficients (also called "weights") have very important role in defining what the output will look like for the given input. The process of adjusting coefficients in such way that they give correct output for given input is simply called "training", but how does one define what is "correct" output and what is "wrong" ? Initially we have a dataset, which consists of input output pairs, and we adjust coefficients in such way, that the deviation of the output of the neural network for the given input from dataset's input-output pair is as small as possible.
We can define this "deviation" as a function, for example the most simple definition would be the distance between current output and desired output for the given input. Using this definition our goal becomes to find minimum of this function, but how to do this?
Suppose some person won a trip to a mountain, but with one disadvantage: he is left at the top of the mountain and has all required food but no water. So he's standing on a mountain (of height h) admiring the view (and searching for water), when suddenly he saw a small lake, right at the bottom of the mountain, but in which direction would he go? In direction which minimizes his distance to the lake, so that he is as close to lake as possible, or more specifically: he moves in the direction where change of height is negative (i.e. derivative of height with respect to the coordinate of choice is negative).
Morphing this idea to our problem of "how to change our coefficients (where change translates to the direction in the mentioned example) so that the "deviation" function (which translates to height in above example) is as minimal as possible?" allows us to abstract the above example to a multidimensional (i.e. many coefficients) case:
- Change coefficients in proportion to how the negative of "deviation" function changes under small perturbation of coefficients (this is known as Gradient Descent method)
One can surely define "deviation function" as an Euclidean distance between the current output and the desired output for the current input, but using this approach, the training process will take a lot of time. Alternatively we can define a function of two variables (for e.g p and q), which has very large value if p and q are distinct, and has very small value if p = q and is defined for all p,q∈R. Here the deviation function is simply an exponential of a squared of a difference between p and q.
We can now apply previously mentioned idea of minimization to this "deviation" function for our "neural network". Computing its derivatives with respect to all coefficients, gives us an information of how these coefficients should change. After several steps of the algorithm, we can define satisfactory value of our "deviation" function, thereby terminate the process and output the resulting coefficients. This ends the training process (This method is commonly referred to as Back-Propagation Algorithm).

Participated in the
Beyond the Comfort Zone Contest


