

Introduction: Making an Engagement Ring With Investment Casting


There is quite a lot of information on investment casting jewellery on the internet, including some excellent Instructables. However, I would like to focus on some novel methods of making the wax mould and also discuss the process I used to make an 18-Karat gold engagement ring.
With recent advancements in 3D printing, many people are now using them for manufacturing the wax construct used for investment casting. This method certainly provides fantastic results but I think it loses that handmade feel and begins to encroach into the territory of fully automated production. On the other hand, carving the wax model without the aid of anything but hand tools proved challenging. I found small features, such as the prongs, to have a propensity to break during the process. I have seen some people overcome this with two methods:
1) Being very skilful. This is hard and time-consuming.
2) Forming the detail in the final gold casting. I think this is unnecessarily wasteful and by delaying the shaping work to later on in the process, potential mistakes will be more upsetting.
Having a background in machining, I felt there was a middle ground not yet exploited in the jewellery making field, where the wax mould could, for the most part, be hand machined.
Supplies
Materials:
Gold (Or any other castable metal)
A Diamond (Or any other stone)
Carving Wax
Sprue Wax
Investment Plaster
Polish
Equipment:
Furnace
Blow Torch
Vacuum Chamber and Pump
Lathe
Rotary Tool (e.g. Dremel)
Soldering Iron/Wax Pen
Reamers
Pliers
Crucible
Stone Setting Burrs
Files
Flask and Base
Step 1: Cut and Ream the Wax


Firstly, roughly cut the wax to shape. I bought a wax block with a hole already formed (figure 1) and all it required was cutting a slice off. I found a tenon saw used for woodwork worked excellently; although, if I were to make more than just a few rings, I would dedicate one saw with slightly more tooth set.
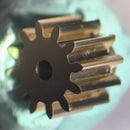
The hole in the wax was too small and not circular but I found that it can be accurately and easily adjusted with a reamer (figure 2). A reamer is typically used by machinists for forming accurate holes in metal. A tapered reamer can also be used to begin to form the convexity on the inside of the ring. From this point, the inside of the hole can be finished off with files or a knife, or just left for final finishing in the gold with minimal removal of metal required.
Step 2: Turn the Band

I roughed the band out with a fret saw. I wasn't a big fan of the spiral blades designed for wax carving. Whilst they cut quickly, it was difficult to control the direction of the cut because they will cut sideways if a sideways force is applied to the blade. I preferred a coarse skip-tooth fret saw blade, typically used by woodworkers.
However, the quality of the cut does not matter for this method anyway. A very roughly sawn wax ring band is pictured here and mounted on an aluminium arbour in the lathe, ready to be machined. The band was just lightly pressed onto the arbour since the machining forces are so small. Run the lathe fast (approx 1000-2000 RPM) and take light cuts. I used the slideways but I see no reason a hand tool rest (such as those used in woodworking lathes) could not be employed. The result will be a perfectly formed band.
Step 3: Shape the Collet


The collet to hold the stone can be shaped as a separate piece (figure 1). I cut a cuboid of wax and secured it in the 4-jaw chuck (figure 2). Simple machining operations can be used to roughly shape the collet, including drilling a blind hole for the stone (figure 3). The hole can then be shaped using a stone setting burr held in the tailstock chuck (figure 4). The top slide can be set over at 90 degrees minus the stone's pavilion angle to shape the taper on the bottom section of the collet (figure 5). I found judging this angle right with hand carving methods difficult. I was thankful for the angular divisions on my lathe.
I imagine the collet prongs could then be formed on a milling machine but I found this unnecessary and they could be hand-filed using needle files with relative ease (figure 6).
Step 4: Welding the Wax Model

The components can now be welded using a soldering iron or wax pen. I used sprue wax as a filler material and fed it into the joint to create a smooth contour and the effect that the two parts were always just one.
Step 5: Hand Carving Is Inevitable

The wax model could probably now be cast; however, I think it's worth spending time tidying up the wax model by hand, including adding any embellishments that were too difficult or small to machine. I rounded the outside of the band and further smoothed the joint where the band meets the collet.
Step 6: Sprue the Wax Model


Weld on a sprue and join it to the sprue base using a soldering iron.
Step 7: Invest


Mix the investment powder with water. I degassed the mixture for 5 minutes in the mixing container, then poured it around the wax mould before degassing for a further 5 minutes. After allowing it to dry for 90 minutes, I then put the flask into a furnace.
The two main stages of the burnout cycle involved melting the wax out at 230 degrees C for 3 hours and then burning the remaining wax out at 730 degrees C for 4 hours. Temperature changes were made gradually and the temperature was reduced to 600 degrees C at the end to bring the flask down to casting temperature an hour before casting. This reduces the chance of the gold reacting with the investment.
Step 8: Cast

Melt the gold with a melting furnace or a blow torch. I used a small oxygen-propane brazing torch.
Step 9: Quench

I waited for 15 minutes before quenching the flask in a bucket of water to ensure the gold had fully solidified. The investment will disintegrate when quenched and the gold casting can be retrieved.
Step 10: Remove That Sprue


The sprue can now be removed from the casting with a fret saw and the stub filed down.
Step 11: Clean Up


The ring can now be cleaned with files, emery paper and a rotary tool (I used a Dremel). I found a wire brush fitted in the Dremel worked well for cleaning off debris from casting. I also used a bearing scraper (again, another machinist's tool) to help clean out the inside of the ring. The reamer cannot be used at this stage because the surrounding gold is too thin to withstand the forces from reaming. A morse taper 2 arbour can be used to hold the ring while working on the outside of the band or collet (figure 2). After filing and sanding, the ring can be given an initial polish (figure 4).
Step 12: Set the Stone

Setting the stone was a relatively straightforward process. Firstly, the collet is cleaned out with a stone setting burr. At this stage, the material removal should be tiny. The stone is then placed into the collet. The collet prongs are then progressively bent over with pliers, gripping the stone in the collet. The overlength prongs are then cut down and the ends are shaped. The ring is given a final polish and clean. I used acetone and a toothbrush to remove excess polish.
Step 13: Make the Box and Present


After all the effort to make the ring, it would be remiss of me to stick it in any old box for the big reveal.
The box was a relatively straightforward woodworking task, although special care has to be provided when hand-cutting such small dovetails. I opted to use a combination of woods including cherry, sapele, and walnut. I used a Gravograph engraver to include a little plaque on the inside of the lid for that extra flair. The velvet lining is simply placed over a block of foam and pressed into the bottom of the box (figure 3).
And, of course, to conclude: she said yes!
Thanks for reading, and if you have any questions or comments, please feel free to contact me.

Second Prize in the
Metal Contest


