

Introduction: Making an LED Blink


Hey guys! Want to get started with Arduino by creating a simple program? Well here you've got the perfect tutorial on how to do so! In this instructable, I will guide you through the simple steps needed to make an led glow.
Step 1: Downloading the Arduino IDE

Download and Install the Arduino IDE (Interactive Development Environment) using the link below:
https://www.arduino.cc/en/Main/Software
Choose and save the version that best suits your operating system and configuration.
Step 2: Hardware Materials


1) 1 Arduino board
2) 1 breadboard
3) 2 male-male jumper wires
4) 1 LED
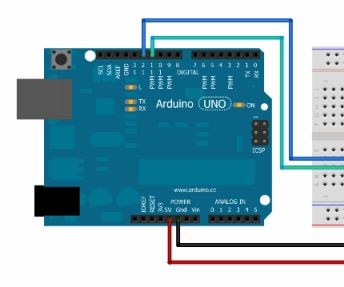
Step 3: Building the Hardware


1) Connect one pin of the LED to port 5-e and the other at 6-e on the breadboard.
2) Connect one end of the jump wire at port 13 on the arduino board and the other end at port 5-a on the breadboard.
3) Connect one end of the second jump wire at port GND (ground) on the arduino board and the other end at port 6-a on the breadboard.
4) Above picture shows how output should look like.
Step 4: Downloading and Running the Program
Download the attached arduino program to your laptop. Connect the arduino to your laptop, and run the program. You should have a blinking LED.
Attachments

Step 5: Understanding the Program
pinMode() takes two parameters. This method sets the digital pin as the output in this case. The first parameter is the pin number and the second is a specific mode such as INPUT, OUTPUT, or INPUT_PULLUP.
digitalWrite() takes two parameters. This method sets the led on and off. The first parameter is the pin number and the second is a value, either HIGH or LOW.
delay() takes one parameter. This method waits for a certain time. It takes a parameter of the number of milliseconds to wait for.


