

Introduction: Mason Jar Hand Sanitizer


Corona Virus (COVID-19) is wreaking havoc in the world. Almost every country is suffering from the Corona Virus. WHO has already announced it a Pandemic disease and many cities are under lockdown situations and changed our lifestyle. In this current scenario of the global outbreak, it is advised by WHO (world health organization) to maintain HealthyHand Wash and Sanitation Habits, but the main problem is the way we do it, that is by physical touch. Touching alcohol containers or hand sanitizers with infected hands can spread the virus to the next person. In this tutorial, we will build an automatic hand sanitizer dispenser that uses IR sensors to detect the presence of a hand and activates a pump to pour the liquid on the hand.
You can find several Arduino automated liquid dispensers circulating the web. But my intention is to keep it simple and cheap so that anyone can replicate it. Possibly the easiest solution for this purpose is to use a simple transistor or MOSFET with an IR proximity sensor, which would also drastically reduce the costs. Obviously, the absence of a microcontroller removes control of over spilling, but using a smaller nozzle would physically limit the flow of liquid. Before proceeding further you can watch the demo video:
Supplies
- IR Proximity Sensor
- Mini Submersible DC Water Pump With Plastic PVC Pipe
- 14500 Li-ion Battery
- TP4056 Li-ion charging module
- Mini SPDT Switch
- Blank Mason Jar.
- A flexible stainless steel tube collected it from a USB microphone stand.
- Aquarium tube or Saline PipeThis is only required if you buy the dc pump without any pipe.
Hand tools and fabrication machines
- Soldering iron (generic)
- Hot glue gun (generic)
- 3D Printer (generic)
- Wire Stripper & Cutter,
- 18-10 AWG / 0.75-4mm² Capacity Wires
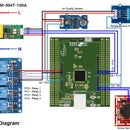
Step 1: Schematic & Connection


The design of the electronics is very simple. It does not require any microcontroller and programming. The schematic is also very simple and easy. The IR proximity sensor detects the presence of a hand and makes the OUT pin LOW. Normally OUT pin keeps HIGH. When it goes low it turns on the PNP transistor and the pump becomes on. I used the BD136 power transistor for the circuit. A 1K resistor is connected between sensor OUT and the base of the transistor. It protects the transistor from burning out.
The detection range can be adjusted by turning the potentiometer of the sensor from the lowest sensitivity level, and slightly increasing it to achieve your desired detection range. Do NOT make it too sensitive because the pump might act spontaneously without any trigger! For powering the circuit and the motor a 14500 Li-ion cell is used and it is connected with a USB charging circuit.
Step 2: 3D Designing & Printing


For the sanitizer container, you can select any size mason jar. My selected one is a glass mason jar from an old Horlicks container. An encloser for the circuit is designed according to the capsize and the file is attached.
The encloser will work as a house of the electronics as well as the cap of the jar. Actually, the original jar cap will also be used with the 3D printed housing. After placing all the electronics and the battery I will place the jar cap. So, I designed the 3D encloser according to the size of the cap of the container for placing the circuit inside it with the cap.
Tinkercad was used to design the 3D file. Tinkercad is a free, online 3D modeling program that runs in a web browser, known for its simplicity and ease of use. Since it became available in 2011 it has become a popular platform for creating models for 3D printing as well as an entry-level introduction to constructive solid geometry in schools.
Tinkercad is an online collection of software tools from Autodesk that enable complete beginners to create 3D models. This CAD software is based on constructive solid geometry (CSG), which allows users to create complex models by combining simpler objects together. As a result, this 3D modeling software is user-friendly and currently enjoyed by many, particularly teachers, kids, hobbyists and designers. Additionally, it is free!
Tinkercad is a good alternative to other 3D modeling software such as SketchUp or Fusion360 – another solution from Autodesk – if you do not need the more advanced options of these solutions. Actually, the leading software company acquired Tinkercad in 2013, two years after it was launched by former Google engineer Kai Backman and his cofounder Mikko Mononen. Its main advantage over that two software is that it is free, and yet offers more modeling freedom than first meets.
Attachments

Step 3: Connecting Sensor & Power Circuit


As I said earlier, the circuit and connections are very simple. The sanitizer will be spread by a pump and the pump will be drive from a 3.7V li-ion battery. The pump will be turned on by a single power transistor and the transistor will be triggered from the output of the sensor. For charging the battery a li-ion charging module was used.
I soldered the battery with the Li-ion charging module directly using jumper wires. The output of the sensor was connected with the base of BD136 PNP transistor using a jumper wire. A 1K resistor was used in the base of the transistor to protect it from burning. The collector of the transistor is connected to the power supply pin of the pump. A switch was also added between the pump and the battery.
I made a hole in the middle of the container cap and bring out the wire of the motor through the hole and soldered according to the circuit diagram. Then I tested everything is working by connecting the charger. After confirming the operation I added hot glue in every solder joint.
Step 4: Assembling All the Stuff


To pump bring out the sanitizer from the container I used a bendable stainless steel tube. Inside the container, I used an aquarium tube and connected the pump and the steel tube using the aquarium tube.
After connecting I placed all the electronics in the right place and that place the plastic cap. All the things are place and fixed with hot glue. The dispenser is ready. You can now fill your dispenser with whatever liquid you want. It even works with viscous liquids such as liquid soap and dishwashing liquids! I made this project specifically for hand wash alcohol and hand rub since I use it often.
Participated in the
Mason Jar Speed Challenge


