

Introduction: Race Track Magnets


Using a 3D printer and some simple conversion of image files, I was able to create 3D printed layouts of race car tracks. As a fan of the Indy Racing League, I choose to make one for all the tracks on the 2015 circuit. Each track is made approximately the same size, and when the magnets are staggered it creates an abstract checkered flag pattern as well.
Step 1: Saving the Image to Your Computer


1. Go to the website http://www.indycar.com/Schedule or any website with race track images.
2. Copy the image of the track layout and saved it to your computer.
3. Open the image in paint.net
4. Resize the image 400%(This step is important. If you do not enlarge the image some features of the track will be lost in the conversion from png files to svg.
5. Fill the track with the color black.
6. Save the new image has a png file to your computer.
Step 2: Converting the Image From Png to Svg

You will need to convert the image to an svg so that you can have a 3D design on the image.
There are many online converters, I used this site http://image.online-convert.com/convert-to-svg
1. Select convert to svg
2. Upload the png
3. Convert and save the new file to your computer.
The new file will be in svg and you should be able to upload it to any 3D design program.
Step 3: Exporting to STL


Once you have the file as a svg you will need to make any adjustments and export the file as an stl for printing.
I use AutoDesk 123D Design as my 3D software. In the program I import a svg as a solid.
Delete the negative space.
I pushed the z height down to the size I wanted(took off 7 cm) and exported the file as an stl.
Step 4: Printing the 3D


Using the software that comes with my 3D printer(Makerbot)
I upload the stl. I used the auto adjust button to have the item fit on my build plate.
I decided to scale them down so I could get 3 tracks on one build plate.
Finally I set up the 3D printer and let the printer take it from there.
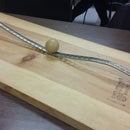
A track that is about 4in by 6 in and about 1/2 in high, it takes about an hour per track.
Step 5: Mounting and Displaying

The pieces can be used to create an abstract checkered pattern which arranged in a staggered pattern. The pieces are very light so they can be displayed a variety of ways.
Small hanging nails will support these(very light weight) or you can hot glue small magnetic strips on the back and make them into magnets.

Participated in the
3D Design Contest

Participated in the
Homemade Gifts Contest


