

Introduction: Saturn V Lamp


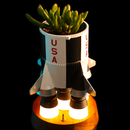
The Saturn V rocket is the most popular of all rockets, it was made famous by the historic flight of July 1969 which brought two astronauts on the lunar soil, this event took place 50 years ago !
I made this lamp imitating a flight of this amazing rocket,
It's been a long time I wanted to make it, and I was inspired by a similar creation on internet.
Step 1: Materials
For this project you will need:
- wood (plank and cylinder)
- warm white SMD led's (or led strip)
- acrylic paint (white, black, silver)
- transparent varnish
- cotton
- printable adhesive paper
- buck converter
- switch
- DC jack
- wires
Tools:
- hot glue gun
- soldering iron
- access to a 3D printer
- ink printer
- sandpaper
Step 2: The Saturn V Model


I wondered how to make the rocket:
- from wood?... but the details are too complicated
- from a purchased plastic model? ... but the scale was too big
... So I turned to 3D printing.
The member "major__tom" is a friend of mine, who printed it from thingiverse with his CR-10.
>>> model here <<<
The print was cleaned with a cutter and sanded using sandpaper 220.
In the lower part of the first stage, I glued a wooden cylinder and drilled a hole between two engines (as shown on the photos) that will position the rocket on the lamp later.
For the paint job, I used diluted white acrylic in order to avoid brush strokes. It took me 8 thin white layers to reach the desired finish. With an aerograph, the result can be cleaner and faster.
I masked the rocket with masking tape, and painted the black areas with acrylic according to the scheme of the Apollo XI's launcher.
The details, such as the control module and the fins are painted in silver.
I printed the inscriptions (USA, United States, and flags) on adhesive paper and then, cut and glued them on the rocket.
I finally applied a layer of non-gloss varnish on the entire saturn V to protect the paint.
Step 3: The Exhaust Flames


The rocket exhaust flames are one of the light sources of the lamp. They were made from a pencil tube of the same diameter as the nozzle, which was cut into 5 tubes about 25mm long. These tubes were sanded outside using sandpaper (120). For each exhaust light : Two smd led were soldered together in parallel. They were placed at one end of the tube (as pictured), facing down. The tube containing the led's wires was filled with hot glue.
Step 4: The Lamp Body


The body of the lamp is a wooden cylinder of 300mm long and roughly 40mm diameter,
A metal rod was placed at the top of the cylinder so that the rocket can stand straight.
The exhaust flames and the model nozzles should fit together in the end, so they should be glued while facing each other.
About 20 led wires were soldered, then harmoniously sticked around the cylinder. Keep in mind to place more led at the top than the bottom for realism ! All the "+" should be soldered together as well as the "-". Each pole should be soldered to a long wire which will be connected to the base later.
You can also use led strips, just make sure it's "warm white" to make it realistic!
Step 5: The Base


The base is made from 3 squares of 20mm thick wood planks. The top plank has been drilled near the middle to allow led wires to go through. The middle plank has been emptied to make room for electronics.
The upper and middle planks are glued together. The bottom one will be screwed with 4 screws (1 in each corner)
With a screw, the lamp body is fixed to the base.
Step 6: Electronics


I first thougth about making a PWM module as on The Earth Clock. But this time, the rocket needs more led, and the module wasn't powerfull enough. I decided to only have an ON/OFF switch and nothing else.
To do so, I used a buck converter (preset on 3.1V) directly connected to led.
Step 7: The Cotton


The smoke is made using white cotton, a very simple process : you only have to glue gradually the cotton to the wood cylinder.
If you notice that lower led are too bright, you can glue a little cotton ball right on the led: that way, the light will be spread and softened.
Step 8: End


This project is now done! Here is a cut drawing showing all the steps.
If you build it, keep in mind that you can modify everything as you want (bigger, smaller, or different spaceship like the space shuttle or the falcon heavy ...) the possibilities are limitless!
If you want more pictures or if you have any request, post a comment.
I hope you liked this project!

Participated in the
Make it Glow Contest 2018


