

Introduction: Steampunked Eye-catcher


Hi everybody
When I presented my last instructables project
Someone told me that this, was a real “eyecatcher“!
Now, this word was spinning around in my head all the time and next I woke up in the middle of the night, going down into my workshop and started creating this first STEAMPUNKED EYECATCHER.
After the idea came clear to my mind only some steps were necessary to build it up
All parts I needed for were already in use before so this is a 100% upcycling project.
I want to present you this project once again in my special steampunk style as a Steampunk Creators diary an hope you enjoy it.
Before we start, let`s have a look at a short video impression
Oh, you may have seen in the movie that I printed the german name „Hingucker“ on the label instead of „eycatcher“ But I asure you both words mean the same ;-))
And now:
OPEN THE LATEST STEAMPUNK CREATORS DIARY
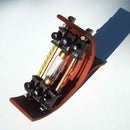
Step 1: How It Works


All parts have been screwed together with brass screws and nuts so you can move every part and fix it in any position you want Just let the eyecatcher „looking“ to left or right side, above or down. With the brass made gears (like eyebrows) you can try to create emotional expressions too. In a second project this labelholder gets LED behind the glass eyes so they can attract the attention in the night by a glowing look. Another steampunk creator and friend of mine already thinks upon an automatically moving with the help of sensors, arduino control unit and servos so that the eyes will follow the visitors walking along....
Step 2: Creating This Label Holder


The label holder itself is made of two old metal frames just screwed together. Because of its profile the new label holder contains a small plate of plywood so the paperstraps can easily kept in. In this way now several holders carry their labels in my exhibitions. At the backside two locking plates made of brass and slightly bended are fixed with screws to keep the label in the right position you have chosen. At this page of the diary I took a photo of new locking plates, but believe me that I took used ones taken out from an old sideboard from a scrap yard and that´s also why they had been already bended ;-)) Glass eye samples from the apprentice work of ocularists had already been in my storage ; even the other parts like Edison screw sockets or some old fuse blocks too. First: I took the brass made lamp sockets and put out carefully the base made of glass. Before doing it please wear an eye protection and working gloves to avoid injuries. Hovering the broken glass parts is best!! Then I chose a pair of nearly similar looking glass eyes and placed them into the sockets open base. Adjust and fix them with bondic UV-reactive resin. At Least fill the socket bottom up with resin. Second: Unscrew the threaded ring from a fuse block and srcrew the Edison socket in. Third: Choose a brass made gear wheel with the right size and drill a hole of 3 mm for M3 screws. Fourth: Screw the gear to one side of the threaded ring and the label holder on the other side and that´s it!! So just one hour later my work was done and the first STEAMPUNKED EYE CATCHER ready to be presented Hope you enjoyed this short instructables project and maybe you will try your own „looking“ label holders???? Thanks for reading Yours Aeon Junophor

Participated in the
Halloween Props Contest 2016


