

Introduction: Tinfoil Art


This is a fun art project to do in your free time. It takes little to no time, and it makes for great wall decor.
Supplies
-Paper
-Glue
-Yarn
-Tinfoil
-Markers
-Scissors
Step 1: Step 1: Cut and Rearrange Yarn

First, you need to cut your yarn into the desired length you want. Then choose the different line designs you want to make on the paper.
Step 2: Step 2: Glue Your Design

After rearranging the yarn and finding the design that you like best, glue down the finished design.
Step 3: Step 3: Place the Tinfoil Down on the Paper

When the glue dries, cut the tinfoil to the size of the paper and press it down to see the outlines of the yarn. Then, tape or glue the back sides of the tinfoil.
Step 4: Step 4: Color in Your Designs

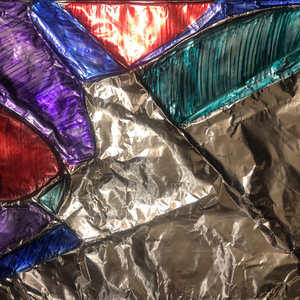
Finally, you can color in the shapes with the colors you choose. Since most of the designs are shapes, I made sure to color within the shapes and not pass over the yarn without switching to a new color. These make for some cool designs.
I hope you enjoyed this fun art project and will try it out! Stay safe!
Participated in the
Tinfoil Speed Challenge


