

Introduction: Women Safety Device With GPS Tracking and Alerts Using Arduino


With all the technology available to us in recent times, it's not hard to build a safety device for women which will not only generate an emergency alarm but also send a message to your friends, family, or concerned person. Here we will build a band that can be worn by women, using which they can inform police or anyone, using SOS emergency SMS along with the current location. Using this information, the police will be able to save the victim from the location. For this, here we are using an Arduino which can be interfaced with GSM and GPS module for sending SMS alerts and getting the location coordinates. We have also used an RF Transmitter and receiver module for wireless communication between the Band and Receiving device with GPS/GSM.
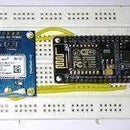
Step 1: Materials Used
- Arduino Nano
- SIM900 Modem
- NEO6M GPS module
- 433 MHZ RF Transmitter and Receiver
- Button
- Battery
- Breadboard
- Jumper
Step 2: GPS Module

Here we are using the NEO6M GPS module. The NEO-6M GPS module is a popular GPS receiver with a built-in ceramic antenna, which provides a strong satellite search capability. This receiver has the ability to sense locations and track up to 22 satellites and identifies locations anywhere in the world. With the on-board signal indicator, we can monitor the network status of the module. It has a data backup battery so that the module can save the data when the main power is shut down accidentally.
The core heart inside the GPS receiver module is the NEO-6M GPS chip from u-blox. It can track up to 22 satellites on 50 channels and have a very impressive sensitivity level which is -161 dBm. This 50-channel u-blox 6 positioning engine boasts a Time-To-First-Fix (TTFF) of under 1 second. This module supports the baud rate from 4800-230400 bps and has the default baud of 9600.
Features:
- Operating voltage: (2.7-3.6)V DC
- Operating Current: 67 mA
- Baud rate: 4800-230400 bps (9600 Default)
- Communication Protocol: NEMA
- Interface: UART
- External antenna and built-in EEPROM.
Step 3: GSM Module

This is a GSM/GPRS-compatible Quad-band cell phone, which works on a frequency of 850/900/1800/1900MHz and which can be used for various applications such as access the Internet, make a voice call, send and receive SMS, etc. The frequency bands of the GSM modem can be set by AT Commands. The baud rate is configurable from 1200-115200 through AT command. The GSM/GPRS Modem is having an internal TCP/IP stack which enables us to connect with the internet via GPRS. This is an SMT type module and designed with a very powerful single-chip processor integrating AMR926EJ-S core, which is very popular in various industrial products.
Technical Specifications:
- Supply voltage: 3.4V – 4.5V
- Power saving mode: Sleep Mode power consumption=.5mA
- Frequency bands: SIM900A
- Dual-band: EGSM900, DCS1800.
- Operating Temperature: -30ºC to +80ºC
- Supports MIC and Audio InputSpeaker InputUART interface supportFirmware upgrade by debug portCommunication: AT Commands
Step 4: Connection Diagram


Women Safety system with GPS Tracking & Alerts can be subdivided into two sections such as Transmitter and Receiver section. The circuit diagrams for each section is described as follows:
Transmitter Section: In the RF Transmitter part, there will be an SOS button along with a 433 MHz RF transmitter, which will transmit the data to the receiver part wirelessly. The purpose of making two individual parts here is, to minimize the size of the transmitting module so that it can be worn as a wrist band. The circuit diagram for the transmitter part is shown above.
Receiver Section:
In the RF Receiver section, the data transmitted from the wrist band (Transmitter part) is received by the device having a 433 MHz RF receiver. The RF receiver sends this information to Arduino through the digital pin. Arduino Nano then receives the signal and processes it using the program which is flashed into it. When the victim presses the SOS button in the transmitter part, a HIGH signal is generated and passes to the Arduino side, and then Arduino sends a signal to SIM900 modem, to send an SMS to Registered user along with the GPS coordinate which has already been stored in the Microcontroller by the help of NEO6M GPS module. The circuit diagram of the Receiver side is shown as above.
Step 5: Programming for Arduino

After successful completion of the Hardware connections, now it’s time for programming the Arduino Nano. The stepwise explanation of the code is given below.
Start the code by including all the required library files in the code like TinyGPS++.h for NEO6M GPS board, SoftwareSerial.h for defining the Software serial pins. Here TinyGPS++.h library is used to get the GPS coordinates using the GPS receiver module. This library can be downloaded here. Now, declare the connection pins of the GPS module and its default baud rate, which is 9600 in our case. Also, define the software serial pins using which GPS will communicate with Arduino. static const int RXPin = 2, TXPin = 3; static const uint32_t gps_baudrate = 9600;Then declare the objects for the TinyGPSPlus class. Also, define the object for SoftwareSerial class with the pins as arguments declared earlier. TinyGPSPlus gps; SoftwareSerial soft(RXPin, TXPin);Inside setup (), declare all the input pins and output pins. Then, initialize the hardware serial and Software serial functionality, providing the default baud rate which is 9600 in our case. Women Safety Device with GPS Tracking & Alerts Using Arduino When the SOS button is pressed, the Buzzer starts beeping and an SMS will come to the authorized number containing the latitude and longitude of the location of the victim. The screenshot of the output is shown below:
Step 6: Code Is Given Below(please Download the File)
Attachments


Participated in the
Maps Challenge


