

Introduction: Woodshop From Fully Reclaimed Components


I will start this 'ible with some brief history. I work as an industrial automation engineer on distribution site in Dublin, Ireland. I have been part of the team through the construction of the site and as such was permitted to access and resue waste materials from the site.
I also run a side hussle as a woodworker and my current shop is positioned in a former horse stable on my farm. This shop is quite small at 2.4mx4m (8x13ft approx.)
As the site construction came to an end there was a surplus of parcel chutes. Typically these would be sent off to another project but there is only one site in Ireland and due to the massive weight involved, the shipping costs were prohibitive.
Initially we were going to seek a local scrap metal processor to take them but I quickly realised that they could make very strong and rapid wall infills for a new wood shop. Here goes the planning and bulk of the implementation of that plan.
Shortly after the site launched there was a faulty sprinkler head that activated and wet several hundred floor panels in our towers and these panels were removed and replaced for safety reasons. Again, I was allowed to pick through and take panels away as this cut down on waste and gave the panels a second life. These panels are 40mm thick chipboard with a non-slip melimine coating on one side and a metalised white coating on the other (this will come in useful later on)
Unfortunelty at the point of writing, I am dealing with a pretty severe shoulder injury which has slowed me down as this has pretty much been a one man build which followed a 1 man build of a 15x30ft log cabin so I have myself to blame!
Supplies
Supplies used so far:
34 * tall chutes, these were 199cm long
23 * short chutes, these were 110cm long
38 * 7x2" 16' treated boards
40 * 62 16' treated boards
10 * 9x9 18' treated joists
28 * 40mm chipboard panels (various sizes due to removal from installation)
54 4" solid concrete blocks
9 * 1x5.4m Corrugated roof panels (sourced from architectural salvage)
25m 300x300mm edge flashing
Various reclaimed shiplap
Leftover rockwool insulation
Tools:
22deg Framing nailer
Circular Saw
Mitre Saw
Speed Square
Home made circular saw track guide
Step 1: Design for Max Space


The satelite image above shows a portion of my farm. The area in red is where the shop is located. There were a number of reasons for this location which aren't important here but the space was otherwise dead so it suited.
Originally I wanted to only use the metal panels but soon realised that more structure would be required. I modelled one of the panels in Sketchup and thenplotted out a design. Given the available quantity of panels and some 6x2 lumber I had left from another project, I determined that the shop would be stick framed with the 6x2's and then infilled with the panels from the inside as they have a tophat profile.
The design was going to be fully square, inititally with just the long panels but these were only 199cm long, given that I'm 193 tall and want to work with 2.4m (8ft) sheet materials this was going to be arkward. I didn't have enough short panels to go around the whole shop and the fact that I live on top of a hill with sometimes strong but prevailing winds, I decided that a single sided pitched roof was best.
With all drawn out I calculated a 5x9.4m interior with a small deck was the final design. The reason for the deck will become apparent.
Step 2: Ground Frame


As with all constructions, a good foundation is essential. However, I had a few issues:
- The ground had a considerable slope
- Poured foundations require planning permission here as it makes the building permenent
- Levelling the ground is prohibitively expensive due to the high rock content
The good news is that the ground having such a high stone content is very stable and many neighbours have build large shed and barns straight on the ground with no issues. Fun fact: the old name for the area where I live is "Rockfield" I found out why the hard way!
I laied out a grid of 4" solid concrete blocks on a 900mm centre. These blocks came from an old wall I demolished and manged to save the materials. I did this a few years back and glad I did as the costs have risen so dramatically.
On top of the blocks I put a layer of damp proof course and then raised legs made from 7x2 treated construction lumber. Most of the lumber exept the roof joists came from temporary building a friend had up for around 18 months. A ground frame was then levelled off of these legs with every second joist connected to legs and intermediate joists installed at 450mm centres. The frame was built in 2 halves for handling as I was working on this alone. Levelling was aided using 4 hydraulic trolley jacks.
All framing was initally built with 90mm framing nails from a pneumatic framing nailer. Following this I came back and bolted all of the legs to the joists with 12mm roofing bolts to add strenght and previent the separation of the nailed joints with wind load, working vibrations from inside the shop or loading from construction on the slope.
The deck also allows a landing area for equipment and materials to come in off my trailer bed directly and helps me avoid coming across the sloped and muddy ground outside
Step 3: Framing


As per the deisgn above, I had a quantity of 6x2 material on hand. This was used to create a frame on the ground using the metal panels as spacers. Once the frames were complete, I fitted a nailer strip to the ground frame and using a chain block to a nearby fence post hauled them up.
On the low side of the shed, the 199cm panel was just a little small so I added a 6x2 base riser, this got me to around 2.1m (7ft) right in at the wall.
The joists were one of the few matierals I bought new for this project. They were 9x2 18' treated boards and man were they heavy. Before raising them, I cut a birdmouth at each end for the wall plate, the roof pitch was about 10deg.
To get the up, I lifted one end to the top if the low wall and pushed it out to clear the higher back wall. I then used a chain block from the high wall top plate to get the joist most of the way there. Using a ladder for support I removed the chain block and lifted the beam to the top of the high wall and pulled in the outer walls with a strap until both birdsmoths were engaged.
Step 4: Roofing
Before raising the roof panels, I added a series of 4x2 battons along the joists, these acted as ties between the joists adding strength and giving options for anchoring the roof. This was also faster than adding noggins between each joist.
This did come back to bite me later.
The roof panels were 1m wide box profile with anti drip, this was important as I don't want condensation dripping on the cast iron beds of my machines.
The roof panels came from architectural salvage and requied a little clean up, they were also immensely heavy so a local farmer lifted the bale to the roof for me with a front loader.
The panels were fixed down with 100mm metal to wood tek screws and sealed along all the joints with tek7.
I then hit a problem with having used the extra battons as the flashing I had on hand was now 2" too short to cover the gap at the end of the joists so I did have to source and but 300x300mm flashing new.
I'm sorry there are no photos for this bit but it was dangerous work and I did much of it in the rain so photography was far from my mind.
Step 5: Flooring & Dooring


This section of the build was simultaneously the easyist and hardest part. The floor panels were large and though there was some vairance in size as these came from a removed installation, there were several that were close enough to keep a flow.
The flooring is 40mm chip with tounge and groove so it fit together well. Some had a little water damage so were I could, I cut it out but there are parts of the floor with a little warping. It's still far better than the rough stable floor I have in my current shop.
The really hard parts were moving the sheets, they weigh between 100-130kg (220-290lb) and have a fairly slick coating on both sides. I think this is where I did the damage to my shoulder. Also the metal backing on the sheets made it hard on the circular saw blade. The floorboards didn't really need fixing due to their interlock and weight but I am an engineer and paranoid so I secured them with 6x100mm twin thread screws.
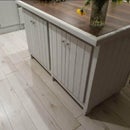
The doors may not be the final ones and really only went up to close the structure. They were made up with 3.2s and shiplap left from my cabin construction project earlier this year.
Step 6: Where We Are At
Like I said, I am sitting at a bit of a go slow. My body is out of action for a bit but I'm eager to get the shop moved and running.
I have some of the flooring left over and I have fitted one panel to the wall with the white metalised side out. This is both glossy and works as a dry erase board so 1 whole 9m wal of my shop isa white board for plans/measurements etc and it's also magentic so I can hold up printed plans.
I placed the top hat metal sides with the open area inside. I have a huge amount of 100mm rockwool insulation left from my cabin build so I will have my first ever insulated shop. I have to wire all of the lights and outlets but due to the fact that I went insane in the old shop and installed a double outlet ever 1m the full perimeter of the shop means that I have ample electrical on hand. Hopefully, I can get my back functional again soon and get this finished.
I am a huge believer in waste reduction and where possible giving materials a second life. Very little of what I did here will win a beauty contest but it has saved me €1000's in materail costs and kept several tonnes of waste out of landfill and or material recycling centres.

Participated in the
Reuse Challenge


