

Introduction: 1990 Shredder Costume


Halloweens come and gone and here are some pictures of the shredder costume that I made this year.
This was my First time making a costume that used pepakura, resins and Bondo Auto filler.
Materals:
Pepakura file - Shredder Helmet
Pepakura file - shredder blade
X Acto knife / Craft Blade
Hot glue gun / glue sticks
Card stock
Disposable brushes
Aluminum pie pans for mixing resin and auto filler
Fiberglass resin
Fiberglass cloth
Bondo Auto Filler
Rubber filler spreader
Non slick cupboard liners
Small plastic grid
Cardboard
Card Stock
Dense poster board
Red glittery Fabric (jumpsuit/tunic)
Packing foam
Elastic
Tabi boots
black fabric (sash/cape)
spray paints, (primer, black, silver)
Step 1: Shredder Helmet


1)First thing you are going to need is a pepakura file viewer, if you search online it can be found easily and is free
2)Next you will need to search online for a shredder helmet pepakura file, It took me awhile, but I ended up finding one at www.theprf.com
3) load the file onto the file view program and print the file out onto Card stock.
4) Once you have all the pages printed use an X acto knife to cut out all the pieces.
Step 2: Helmet and Mask Assembly


Now you should have all the pieces cut out and ready for assembly.
all of the shape that you cut out tabs on them, those tabs will be folded and glued with a hot glue gun and attached to a corresponding piece.
Step 3: Resin and Fiber Glassing


(1) Apply resin with a disposable brush to outside of the pieces and let dry, once dry repeat. You will want to get a few good coats on the outside
(2) Spray adhesive to inside of all the pieces and apply fiberglass cloth.
(3) Apply resin with disposable brush over fiberglass cloth.
(4) Once this all dries sand all sharp areas and corners so they are smooth
Step 4: Bondo & Sandpaper


(1)Mix and Apply layers of bondo filler using rubber spatula to the outside of the pieces and let dry.
(2) Sand with 80 grit sand paper and use dremel around edges and corners.
(3) re apply small amounts of filler into gaps and sand.
Step 5: Helmet: Matting, Resin, Prime and Paint


(1) Hot glue non slick matting onto helmet, trimming it accordingly
(2) mix and Apply a few coats of resin over the green matting
(3) spray Primer over the matting after the final coat of resin has dried.
(4) spray whole helmet black, filling in all gaps between mesh
(5) brush on silver paint, not filling gaps
Step 6: Making Armor


Arm/Leg/shoulder guards
(1)Hand drew patternonto cardboard
2) Bent cardboard accordingly to contour with arms and legs
(3)Applied coat of resin to outside. Waited and let harden
(4)applied adhesive spray to inside and covered with fiberglass cloth down fiberglass cloth and resin
(5)got glues blades on, applies mesh, and resin.
(6)Primed, black and brushed on silver.
(7) hot glue on elastic straps to wrap around arms and legs
Step 7: Jumpsuit


(1) Cut and sew jumpsuit pattern that I found at fabric store
(2) Attache shoulder pads and armor to tunic
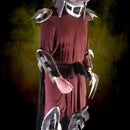
Step 8: Finished


Now just throw on your costume and tabi boots, wrap a black sash around your waist and throw on your cape and your ready to hit the streets. recruit your foot soldiers and Rise!

Finalist in the
Halloween Epic Costumes Contest


