

Introduction: 2x4 Guitar


There are lots of instructables on guitars built with basic tools and cheap materials, but most of them look and play pretty rough (They're still fun though!). I aimed to make a really good guitar which both plays well and looks good using cheap materials and fairly basic tools.
Admittedly, you will need more tools to build this than a cigar box guitar, but if you do any woodworking at all you'll likely have access to most of what's needed, with the exception of a couple of guitar-specific tools. I'll probably miss some minor things on this list, but it's a good starting point.
To be clear, full books have been written on building a guitar, so obviously I will be simplifying immensely. This should be seen more as a rough guide that can give you some ideas. I built this guitar in my apartment, so I've used some different (sometimes inefficient) methods to avoid using any large shop tools (other than the drill press)
Materials:
- Wood: A few cheap construction grade 2x4 I grabbed the heaviest, most symetrically and tightest grained I could find (especially for the neck). I used 3. Also, probably a piece of hardwood for the fretboard.
- Glue: Ordinary yellow PVA wood glue. Most guitar builders recommend Titebond, which is definitely a good choice, but really any standard wood glue will work fine.
- Finishing supplies: I just went with clear water based varathane, but you can use almost anything you want.
Guitar specific parts:
- Tuners
- pickups
- bridge
- string ferrules (if you're stringing through the body)
- electronics (switches, pots, etc.)
- Fret wire
- Truss rod (I used a stewmac hot-rod)
- Pickguard (if you want to use an off-the-shelf one like I did
- Strap buttons
- Knobs
Ordinary tools:
- Measuring tools (tape measure, ruler, calipers, etc.)
- Router
- Drill press
- Forstner bits and sanding drums
- Saw (I used a cheap hand saw)
- Rasps
- Small files (cheap mini-files are fine)
- Clamps
- Sand paper, various grits.
- Clamps
- Hand plane
- Spoke shave
- Clamps
Guitar specific tools:
- Fret file
- Fret saw
Step 1: Sourcing Your Parts and Materials.


For the guitar specific parts there's a few good sources. I've bought from lmii.com and stewmac.com for general guitar building stuff. I recommend just looking at every category on their sites and asking yourself "Do I need one of those" I'm in Canada, so getting stuff shipped from the states is $$$. It really sucks when you miss something.
I got the pickups, tuners, control plate, knobs all from guitarfetish.com this time around. It seems to be reasonable quality stuff for pretty cheap. Their pickups, especially, seem very nice for the cost.
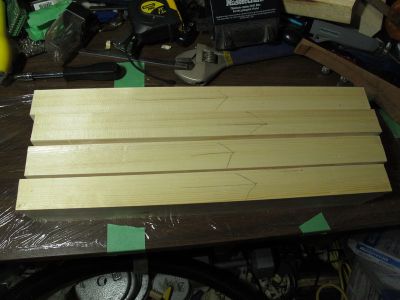
For wood, I used 3 2x4s from the local lumberyard. Total was about $10. If you want to save some work, you could probably use one, and a couple pieces of 2x6 or something instead of laminating the whole body, but I wanted edge grain all the way across.
I dug through the whole wood pile to fine the best boards (stacking them neatly when I finished, of course) I picked a heavy piece with dense symetrical grain and few knots The outer edges were very banged up, but I knew I would be cutting them away anyhow.
I used a piece of padauk "project wood" from Lee Valley for a fretboard. They have a neat assortment of woods, already pretty close to fretboard dimensions. It was around $11 You can use almost anything, but ideally something that cuts smoothly, and doesn't splinter (you'll be hammering frets in later)
Step 2: Making the Neck Pt.1


This is a neck-through guitar, so it runs all the way from head to tail.
I took my specially selected 2x4 (the one with the best grain and no knots), and cut it in half.
I then planed 2 of the surfaces and glued it together into a 4x4. It's important to maintain the grain orientation. Before you cut it, put an arrow on each half pointing to the same end. When you glue it, make sure they're the same way. (I marked the ends with an F (for front?) in the direction that they planed nicely.
If you get them backwards, you'll have problems with the plane later, since one side or the other will always be cutting against-the-grain.
Glue them together. Contrary to what most people suggest for the "right" amount of glue, I want to avoid any voids at all cost, so I use way too much glue, rubbing the boards together to get an even coat, and then most of it gets squeezed out by the clamps. I put down a layer of plastic wrap for it to drip on and keep my bench clean.
Use a ton of clamps, really. You don't want big wide glue lines. I think I used about a dozen. You could get away with less if you have some nice solid cauls, but I recommend waiting until you see clamps on sale for cheap and buy a bunch. You can't have too many.
Next, plane your 4x4 square and start on the layout. I'm going to gloss over a lot of important things I'm sure, but you should do some reading elsewhere, and have a pretty good understanding of how a guitar works and what dimensions matter before you start.
At this point, we need to decide where our bridge is mounting, and where the fretboard and headstock will start and end. You can use another guitar you like for reference so you don't end up with a weird balance. Everything starts from your bridge position, so if you place it closer to the head or tail, you'll have to position the neck accordingly.
Choose a position for the bridge. I based mine on a telecaster, but there's nothing magical involved here. You just don't want it so far to the tail that you end up with a stubby awkward guitar, or with a crazy long neck. mark the line where the saddles will line up when they're in a normal, but mostly-extended position (you'll be moving the saddles back slighly to fix intonation)
Decide on a scale length. I used 630mm, which is a bit shorter than what is on most Fender guitars, and actually pretty close to what's on a gibson. Longer scale lengths will give you higher tension and a bit more twang. Shorter will make it a bit softer to play, and a slightly smoother less bright sound. The difference is pretty subtle sound-wise, so probably best to just pick what you're used to playing, you can always change the feel by changing strings.
Step 3: Making the Neck Pt.2


Draw a line across the neck at that distance from your saddle-line. This is where the nut will be. Draw your headstock on paper (or in cad software, etc) making sure that you have room for your tuners, and that as much as possible, the strings will feed off the end of their tuner in a straight line to their positions on the nut.
Put your headstock template on above the nut so you have a rough idea of length, and then cut off most of the excess (leaving a bit of room for shaping later.)
Route down the centre line to make a slot for your trussrod. (following the dimensions recommended by the rod manufacturer). and making sure it doesn't stick out past the fretboard at the body end, and that it will stick out at the headstock end. In my case the angled headstock will open up the end, so I just routed way longer than I needed to at that end. I also made some additional slots and epoxied in some steel bars (1/8"x3/8" IIRC) for reinforcement. This is serious overkill though, and you could skip it if you want.
I then drew the side profile. I hate string trees and whatnot, so I angled the neck back at around 14 degrees.
I don't have a bandsaw, so I chopped down reasonably close to my lines with a chisel, and then planed the top surface of the headstock right to the line. My headstock design was a tiny bit wider than the neck blank so I glued on a small chunk of wood to make up than non-structural edge.
Next I very roughly hacked out the back side of the neck using chisels, rasps, knives, etc. It's still way off finished dimensions at this point, and really I could have (and probably should have) left this until later.
Step 4: Now the Body


I took the other 2x4s and chopped them up into shorter sections, and glued them into slabs. I cut the slabs down from the 3.5" that they started at, down to a bit over 2" close to the final thickness of the body. I did it this way just for aesthetics. You could save some time by just using a 2x8 or something, and making your body slightly thinner to match.
I don't have a thickness planer, so I cut the first slab down with a scrub plane that I made by grinding the iron and sole of a low quality smoothing plane, but even with the agressive cuts it was a huge waste of time. The second block just removed most of the waste wood with a 1" forstner bit in the drill press, and then planed off the remaining dimples (from the pointy tip of the bit)
I then glued the body slabs onto the neck one at a time, leaving them slightly proud so they can be planed perfectly smooth later (without screwing up our perfectly flat neck) I only have a few very long clamps, but they work fine, since the slabs can't flex.
Next I printed out a template of the shape I wanted, and glued it to some 3/8" MDF. I then stuck it down with some 2 sided masking tape, and a couple of screws (aligned with the pickup cavities I'd be cutting out later)
If you have access to a bandsaw, now's the time to use it. I didn't have one available at the time, so I knocked out some bulk with the drillpress again. In this case I'm not going all the way through, just cutting away enough that the router will only have to cut on one side when I follow the template. Incidentally, I think on future guitars I'm going to cut the pickup cavities at this stage. It's easier to balance the router on a nice big plank than on the edge of the guitar body.
Step 5: Body Pt.2


route around the template using a router bit with a top bearing. A really good alternative I came up with (after the bearing's set screw flew away at 20kRPM) is to just use a bit with the same shank size and cutter (I used 1/4" cutter 1/4" shank, but 1/2" cut 1/2" shank should work even better) I rubbed the edges of the template with a chunk of candle wax to reduce the friction, and just ran the shank against the template. Obviously this would be a bad idea if you buy fancy plastic templates, but it works great with the mdf.
Note that if your template ends at the neck like mine does that you won't be able to follow it to the very end or you'll cut into the neck. I just freehanded this part, leaving some space to clean up later.
Next I tossed the bridge on, and lines up my pickguard just to see how everything would look, and to sanity check my measurements.
Then I used the same MDF template process to cut the pickup cavities. I didn't take pics of the process, but it's pretty self explanatory.
Step 6: Back to the Neck, and Headstock.


Once again, I don't have an appropriate tool for the job, so I use the drill press.
I need to make the headstock a nice uniform thickness, so I rigged up a piece of scap aluminum angle to the table on my press such that pivoting the table moves it gradually toward the sanding drum. This way I can just adjust the table position a fraction of a mm at a time, and sand down in very light passes.
Next I draw out and drill the headstock. Drilling through a jig made from a chunk of scrap metal will keep the bits from wandering if you're using standard twist drills like I am.
Then I went at the back of the neck, mostly with a spokeshave, and a bit with the rasp to blend the neck into the body. I wanted an asymetric neck profile, so I just cut it freehand to feel. It's not as scary as you might think. I just set the spokeshave very light as I approached the finished dimensions, cut for a few seconds, feel it to see if it's right, repeat.
Once it's almost perfect I switched to sandpaper to get it perfect. (though leaving a very tiny bit of extra width so it can be sanded flush with the fretboard later.
I've found that with both the sandpaper and spokeshave, sliding it quite quickly seems to help get a smooth finish. I think the high speed causes it to cut deeper on high-spots instead of climbing over them.
Step 7: Fretboard


First I planed the board perfectly flat, smooth, and with a straight edge (to place my square against)
I then marked the fret lines with a hobby knife (very precise), and then cut them using a fret saw (.023" kerf, if you want to find an alternative saw). I will cut them to finished depth later.
Next I did some carbon fibre inlays on the frets. I may do another instructable with some more detail on that specific process later if there's interest but I'm going to skip it here. (I don't recommend it on your first guitar anyway)
I marked the freboard edges and cut it to shape. I used my handplane turned on its side, and slid the board along it.
Next, I drilled some holes in the edge of the fretboard for position markers (these are the ones you look at when you play) I glued in some thin aluminum rod and then cut them off and then smoothed them with a file and sandpaper.
I then did a coat of varathane on the fretboard, which is a terrible idea at this stage. It plugged up the fret slots with a rubbery mess, and then I gouged the board when I was trying to clean it out. I ended up having to go through the slots with the saw again to clean them out, and then sanding it back off until my slipped tool mark was gone.
Next I tapped in the frets with a plastic hammer. Any that seemed like they weren't solidly seated I held down with a small clamp, and tacked down with a bit of water-thin superglue. I then trimmed and filed the fret ends flush with the edge of the board.
Next I drilled some tiny (and shallow) holes, and put a tiny piece of sharp steel wire in on a few places on the bottom of the fretboard. and then put the trussrod in (don't forget it) and then glue the fretboard onto the neck. The little spikes will bite into the neck wood and keep it from sliding while the glue dries.
After that, I just sand off the excess glue, and the tiny bit of extra wood we left on the neck so everything is perfectly flush.
Step 8: Almost Done


Next I drilled a hole for the ouput jack with a large bit, and drilled some holes for string ferrules (since my bridge strings through the body). If you want the string ferrules to be flush with the back, buy ones that are intended to. The ones I bought stick out (just like on a fender telecaster) and are kind of annoying IMO. I ended up cutting an extra step so I could seat them flush, but it's a lot of extra work I could have avoided by buying the right ones to begin with.
I also trimmed the pickguard slightly since my fretboard is slightly longer than the telecaster that pickguard is made to fit.
I then knocked off all the hard edges on the body. On most guitars this is done with a roundover bit in a router, but on this style of guitar it's such a slight rounding that it's just as easy to do with some sandpaper. I followed that up with some general sanding wherever it was necessary. As I was using handplanes, the body was actually already smoother than sandpaper will make it in most places, so there was not much needed on the main faces, just on the edges of the body and headstock mostly.
Then I masked everything off and rounded off the end of the frets so they're smooth to the touch. (you really don't want to mess up the fretboard at this point.
Next everything gets a coat of finish. I used water based varathane because I wanted the colour to stay exactly as it is, and not yellow like oil based polyurethanes, etc. And because I'm applying it at home, this has way less stink. If you don't mind the very slight amber tint, wipe-on polyurethane wins hands down. It will give a much smoother finish and is very easy to apply. (though it takes more coats, and is time consuming.)
Keep in mind that most finishes aren't super dry or hard for a couple
weeks. Assuming you keep it clean, and treat it gently, you should be fine to play it, but I would be extra careful until it's had some time to harden up.
Step 9: Almost Done (Really... It Felt Like I Was Almost Done Back There)


Next is fret leveling. If you did a really good job getting everything flat, and installed your frets properly it may already play as well as a cheap guitar from the music store, but a fret leveling will make it much better. I don't have a pic of the initial part, but I masked off all of the wood, leaving only the frets exposed, and coloured all the tops of them with a permanent marker. I then put some sand paper on the bottom of my jack plane (with the blade removed, and carefully slid it back and forth until I had just barely removed some ink from the top of every fret (the lowest frets will clear last)
If you really want to skip that step, it's definitely possible if you got everything perfect. I built two bass guitars which play quite well, before I bought a crowning file.
Then I re-colour them, and file them with a fret crowning file until there's only a very thin line of ink at the top (removing most of the flat-spot we made in the last step)
Next I install the bridge and tuners, and put some strings on so I can make the nut.
On this guitar I'm using a zero fret, which sets the string height perfectly. All the nut does is keeps them horizontally aligned, so it's much less critical. I cut it out of a piece of scrap aluminum and just filed the slots deep enough with a square corner of a small file that the strings solidly touch the fret. Maybe some day I'll get around to making something better, but this works perfectly, so I'll probably never bother.
Install some new strings, put in the pickups, controls and strap buttons and it's all done. (There's lots of resources for guitar wiring elsewhere and there's a million ways to do it. You probably got a diagram with your pickups)
Step 10: Set It Up and Play.


Like any guitar, you'll need to go with the standard setup procedure. Adjust the trussrod for neck relief, set your string height and intonation adjustment and you should be good to go.
Have fun with it.
Edit: Some people have been asking about the cost. I don't want to clutter up the first page with a bunch of notes, so I'll put it here.
I've built a couple guitars before, so I already had some parts and supplies, so this is not an exact tally of what it cost me, but around what it would cost someone who has most of the tools and general shop supplies available to them, and just needs the guitar parts, and wood. I'll note some alternatives where you could save some $ as well.
Pickups $55
I bought the GFS active pickups. A minimal/cheaper solution would be to build with a single bridge humbucker, which goes for $20-$30
Bridge $26
A basic bridge with with a humbucker mount is around $17
Tuners $30
Pickguard $15
Pots $12
Jack $11
I went with a nice switchcraft locking jack. You can get a standard jack that mounts on your control plate for around $3,
Knobs $11
This is for a set of standard knobs. I spent $13 for some abalone topped ones, Broke the shell out, and replaced it with some carbon fibre, and topped it with an epoxy dome.
Caps $2
Switch $7
I bought a nice 3 way switch from digikey, because like them more than the standard guitar switches, but the price is similar.
Ferrules $8
you can skip these if you get a bridge with string holes on the end.
Control plate $14
This is kind of pricy for a chunk of metal. I was just feeling lazy when I ordered. Make one out of scrap if you want to save a few bucks.
Fretwire $10
4 feet should easily be enough to do any reasonable guitar or bass. It's probably enough for a couple standard guitars, but it's good to have some extra in case you screw some up.
Fret Saw $30
Common fret wire fits a .023" slot, Very slightly wider will work too, if you're going to glue your frets in.
Crowning file $40
Honestly, these ones kind of suck if you're doing a flat radius fretboard, and I want to get some of the expensive diamond ones in the future, but they get the job done. you can also get away without one if you do a really good job of building your fretboard and neck and/or don't mind a slightly higher action.
Truss rod $17
Go with a double action adjustable rod (like the stewmac hot-rod, etc). Avoid compression rods, and non-adjustable rods. The only reason anyone uses them anymore is "tradition"
Strap buttons $5
I really like the Dunlop Straploks, which are around $20, but ordinary ones work too.
Wood $10+12
The wood cost is pretty negligible if you're building with softwood lumber Like I did. It's plenty stiff, and sounds great so don't believe anyone who says it's going to be muffled, or lacking sustain. If you need some proof, look for some pine teles on youtube. There's many different varieties of wood used in 2x4s. The ones at the heavier end of the spectrum have stiffness comparable to maple, and hardness only slightly worse than mahogany. (the two most common woods for necks) Basically, it'll be slightly more easily dented if you bang it into things, but otherwise it's fine. Make sure to get kiln dried lumber though. If you get green, it'll warp like a pretzel. I've been told that even KD can still warp, but I built this guitar just before xmas 2013, and it's still dead straight (Maybe luck, maybe my construction technique?)
Total: $315
I didn't count shipping, but depending how many places you order from, you can probably estimate how much that'll cost you.

Participated in the
DIY Audio and Music Contest


