

Introduction: 3D Printed Honeycomb Grid for the Light Source


Hello.
After I posted a Fancy Lamp Instructable, decided to play a bit with Fusion 360 and check ho to work with arrays. As result of the experimenting I've received a Honey Comb grid for the lamp, to use in photo shooting. There is not much to say about it, it just give a nice spot of the light, see below.
I decided to design and print it after checked the price of such products. Printing it costs ≈2,5 USD which is acceptable and it could be perfectly attached to the most common table lamp size.
Supplies
• 3D Printer
• Black filament
Step 1: Models to Print
Here is 2 models of the honeycomb grid, with 20 and 30 mm deep, and cleaning tool. Cleaning tool will help to remove stringing after printing, if any appears and reduce the amount of cutting work with hobby knife.
All parts are printed with 0.2 resolution and no supports.


Step 2: Checking the Result


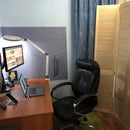
Here is 2 images that show result of using the printed Honeycomb Grid. Image with nice light spot and dark area is with grid attached to the light source, second one without it.

Participated in the
Indoor Lighting Contest


