

Introduction: 4D Gaming With the Arduino (aka 4D Gaming Engine)


The Arduino 4D Gaming Engine is a Maker approach to game development that will add a 4th dimension to your 3D gaming experience - real world effects!
In this guide, the Arduino MKR1000 will receive commands from a custom developed 3D game (Unity Game Engine) to trigger real world effects.
Here are some examples of effects aimed at the survival horror genre:
- Smart Lights turn on, off, or cycle.
- A knocking sound suddenly comes from another room.
- Small vibrators clipped at strategic locations on your clothes to your shirt suddenly give you jump.
- Water is misted out to your face.
- A radio turns on to static or playing spooky sounds in another room.
- A fan turns on and blows air at you.
Once you get your game to blink the Arduino LED - its all up to your imagination.
For this Instructable, we developed a game in Unity that makes use of the device. We'll see the underlying Unity C# code as well as the Arduino Code to build the device. The game is Son.Light.Sleepwalker (pronounced "sunlight sleepwalker") that has a hidden Maker feature in the pause screen and it is full of jump scares and eerie ambiance. By pausing (escape) and then pressing the letter 'm', you enable the maker mode to talk to your device. If you see the LED blink 5 times, you are connected. Get ready to get scared!
Step 1: Start Your a 4D Game in Unity

For Son.Light.Sleepwalker owners who were directed here by Steam, you can skip to Step 4...unless you want to see how we pulled it off.
First, download Unity from Unity3D.com. It is an incredible, free 3D Game Engine. Sign up for a personal edition. Even though its the Personal Edition, they still let you sell your game if you haven't already made $100,000 in a year using Unity.
We will not get into the details of 3D programming in this guide. Rather, we'll dive into the minimum requirements needed to get your game talking to your microcontroller. If you have any questions, though, feel free to post a comment.
When you first open Unity, you will have a default game "scene". A scene is basically the stage at which the camera is first set where the first action occurs. The only objects (called game assets) in the scene are the main camera and a light source.
In the Unity Editor Hierarchy pane, click on the Directional Light. The Inspector Pane on the right will update to show you properties of the light.
Scroll to the bottom and click the "Add Component" button. Scroll to the bottom of the options presenting and select "New script". I named my script "SeanSerialTesterScript". You can name yours differently, but you will need to alter the code in Step 3 accordingly. Last, click "Create and Add".
Before we proceed, we need to set up your Unity Player to access the Serial Ports.
Step 2: Adjust the Unity Player for Serial Port Access

To adjust the Unity Player for Serial Port Access, we have to tell it to use the full .Net references, not just a subset as with the default.
On the menu bar at the top of the Unity Editor, click Edit-->Project Settings-->Player. The Inspector Pane on the right will now show the "Player Settings" properties. Scroll to the section called "Other Settings". If it is not already expanded, click on it. Now scroll to the Configuration sub-section.
Refer to the image above to for the settings you need. You may have newer .Net implementations you desire (ie, 4.x versus 3.5). The big thing is to not use the "subset" version for the API Compatibility Level as it does not include Serial Port access.
Go ahead and click save and give your project a name. You are now ready to paste the code.
Step 3: Editing the Unity Code
Click back on your Directional Light and scroll to the script component you added. Doubleclick on the name of the script and the code editor will open.
Paste the following code into the editor:
using UnityEngine;
using System.IO.Ports;
public class SeanSerialTesterScript : MonoBehaviour {
    SerialPort sp;
    float next_time; int ii = 0;
    // Use this for initialization
    void Start () {
        string the_com="";
        next_time = Time.time;

        foreach (string mysps in SerialPort.GetPortNames())
        {
            print(mysps);
            if (mysps != "COM1") { the_com = mysps; break; }
        }
        sp = new SerialPort("\\\\.\\" + the_com, 9600);
        if (!sp.IsOpen)
        {
            print("Opening " + the_com + ", baud 9600");
            sp.Open();
            sp.ReadTimeout = 100;
            sp.Handshake = Handshake.None;
            if (sp.IsOpen) { print("Open"); }
        }
    }
    // Update is called once per frame
    void Update() {
        if (Time.time > next_time) {
            if (!sp.IsOpen)
            {
                sp.Open();
                print("opened sp");
            }
            if (sp.IsOpen)
            {
                print("Writing " + ii);
                sp.Write((ii.ToString()));
            }
            next_time = Time.time + 5;
            if (++ii > 9) ii = 0;
        }
    }
}
Note: You may need to rename the main class if you chose a different name in Step 1.
This code will send a number from 0 to 9 every five seconds to the microcontroller. Once it passes 9, it starts back at 9 until you stop the program.
There are some "print" statements that are there just for debugging purposes. You can see them in the Unity Editor Console as the code executes.
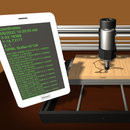
Step 4: Editing the Arduino Code

Any microcontroller that can connect to a PC Serial Port via USB will work. In this example, we are using the Arduino MKR1000. It has WiFi capability allow for further real world effects.
Assuming you have an Arduino and the Arduino IDE installed, paste the following code into a new Arduino Sketch:
<p>int inByte;<br>void setup() {
  // start serial port at 9600 bps:
  Serial.begin(9600);
  pinMode(LED_BUILTIN, OUTPUT);
  digitalWrite(LED_BUILTIN, LOW);
}
void loop() {
  // if we get a valid byte, read analog ins:
  if (Serial.available() > 0) {
    // get incoming byte:
    inByte = Serial.read();
    if ((57-inByte)==0)
    { //after pressing m in pause screen and connected
      blink_it (10);
    }

    if ((57-inByte)==1)
    {
      //Saw kid
      blink_it(1);
    }
    if ((57-inByte)==2)
    {
      //Lightening/Thunder
      blink_it(2);
    }
    if ((57-inByte)==3)
    {
      //Spooky Noises
      blink_it(3);
    }
    if ((57-inByte)==4)
    {
      //Sudden sound like the door being beat on
      blink_it(4);
    }
    if ((57-inByte)==5)
    {
      //Chilling Ambient Sound
      blink_it(5);
    }
    if ((57-inByte)==6)
    {
      //door creak
       blink_it(6);
    }
    if ((57-inByte)==7)
    {
      //voices talking
       blink_it(7);
    }
    if ((57-inByte)==8)
    {
      //drone woke kid
       blink_it(8);
    }
    if ((57-inByte)==9)
    {
      //next chapter
       blink_it(9);
    }
  }
  delay(500);
}

</p><p>void blink_it(int the_count){<br>  for (int ii=0;ii<the_count;ii++){</p><p>     digitalWrite(LED_BUILTIN, HIGH);
     delay(150);
     digitalWrite(LED_BUILTIN, LOW);
     delay(150);
  }
}</p>
Deploy the code by clicking the icon at the top left of the Arduino IDE.
The code polls for available Serial commands from the PC. Once it receives one, it then compares the value with If statements to determine which routine to run. To keep it simple for this guide, we just have it blink the onboard LED to let you know what command was sent. If a 5 was sent, it will blink 5 times, etc.
Leave the Arduino connected to the PC and go back to Unity, or run Son.Light.Sleepwalker to test it. In Unity, Click the Play button. You should see output similar to what is pictured.
If you are a Maker, you know that once you blink an LED on a microcontroller, the sky is the limit as to what you can do.
Please post any questions in the comments below.
Happy Making!
Sean
All our projects: raisingawesome.pagekite.me

Participated in the
Game Life Contest


