

Introduction: 5 Simple Button and Led Projects With Arduino


- What you for Need these 5 Projects.
- An Arduino uno or Clone.
- 3mm 5mm or 10mm Leds any will work and 1 RGB led.
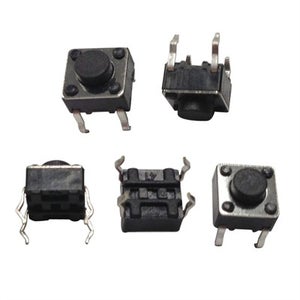
- Some Push Buttons.
- A breadboard.
- Male to Male Jumper Wires.
- Some 10k and 220 Resistors.
- 10 led bar graph or leds will work
Step 1: Push Button and the Serial Monitor.
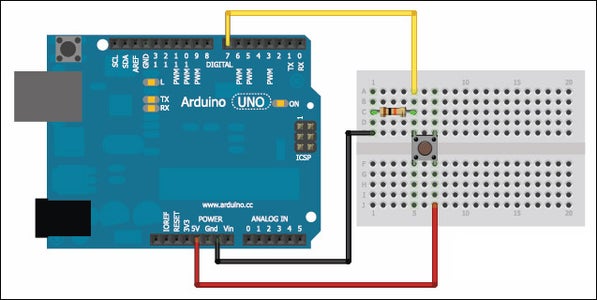
If you put this code into your Arduino , when you open the serial monitor and push the button it will come up as 1.
int BUTTON1 = 7;
void setup(){
Serial.begin(9600);
pinMode(BUTTON1,INPUT);
}
void loop(){
Serial.println( );
if(digitalRead(BUTTON1) == HIGH)
{ Serial.println("Button1 1");
}else{
Serial.println("Button1 0");
} delay(200);
}
Step 2: 1 Button 1 Led.

int LED = 13;
int BUTTON = 2;
void setup(){
pinMode(LED,OUTPUT);
pinMode(BUTTON,INPUT);
}
void loop(){
if(digitalRead(BUTTON) == HIGH){
digitalWrite(LED,1);
}else{
digitalWrite(LED,0);
}
}
this code will make it so when you push the button the led will light up.
Step 3: 3 Buttons and RGB LED.

this code should make it so when you push one button one color should light up if you push all three buttons it will make a whitish color.
int BUTTON1 = 9;
int BUTTON2 = 10;
int BUTTON3=11;
int BLUE=3;
int GREEN=5;
int RED=6;</p><p>void setup(){</p><p>pinMode(BUTTON1,INPUT);
pinMode(BUTTON2,INPUT);
pinMode(BUTTON3,INPUT);
pinMode(BLUE,OUTPUT);
pinMode(RED,OUTPUT);
pinMode(GREEN,OUTPUT);
}</p><p>void loop(){
if(digitalRead(BUTTON1) == HIGH){
digitalWrite(BLUE,1);
}else{
digitalWrite(BLUE,0);
}
if(digitalRead(BUTTON2) == HIGH){
digitalWrite(RED,1);
}else{
digitalWrite(RED,0);
}
if(digitalRead(BUTTON3) == HIGH){
digitalWrite(GREEN,1);
}else{
digitalWrite(GREEN,0);
}</p>
Step 4: Led Pin 13 and Serial Monitor.

int outPin = 13;
void setup(){pinMode(outPin,OUTPUT); Serial.begin(9600); Serial.println("Enter 1 or 0"); } void loop(){ if(Serial.available()>0) { char ch = Serial.read(); if (ch == '1') { digitalWrite(outPin,1); } else if (ch == '0') { digitalWrite(outPin,LOW); }
}
this code will make it so when you go into the serial monitor and type 1 the led on pin 13 will light up then when
you type 0 the led will be off.
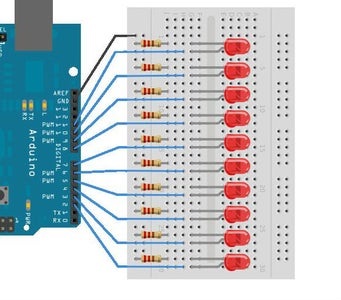
Step 5: Random Number Generator With Led Bar Graph.

int LED0 = 2;
int LED1 = 3;
int LED2 = 4;
int LED3 = 5;
int LED4 = 6;
int LED5 = 7;
int LED6 = 8;
int LED7 = 9;
int LED8 = 10;
int LED9 = 11;

long randomNumber;

void setup() {
Serial.begin(9600);
Serial.println("Randon Numbernesssssss");
pinMode(LED0, OUTPUT);
pinMode(LED1, OUTPUT);
pinMode(LED2, OUTPUT);
pinMode(LED3, OUTPUT);
pinMode(LED4, OUTPUT);
pinMode(LED5, OUTPUT);
pinMode(LED6, OUTPUT);
pinMode(LED7, OUTPUT);
pinMode(LED8, OUTPUT);
pinMode(LED9, OUTPUT);
randomSeed( analogRead(A0) );
}

void loop() {
randomNumber = random(2,12);
Serial.println(randomNumber);
digitalWrite(randomNumber,HIGH);
delay(40);
digitalWrite(randomNumber,LOW);
}

//This code will make it so when you connect the led or the bar graph to the Arduino it will make random numbers, and the number it makes is the pin number on the Arduino.


