

Introduction: 6WD PiZero W Robot With Darkwater 640 Motor Controller


I wanted to create a genuine 6 wheel drive robot where I had a motor controller that could power 6 motors whilst keeping the size down to the size of the raspberry pi zero. I found in the magpie magazine a feature on the darkwater.io product range and so ordered a 640 motor board a few months ago, I finally put it together and this is my blog about how I made the chassis and build using this board as well as feedback on what I found worked well and what needs improving in my design.
I had 6 x micro metal gear motors which I found in testing would have been better if they were perhaps in the 100-200:1 ratio range as the vehicle drove much faster than I wanted. so when choosing a motor gearbox setup I would recommend ones not with a 1:50 ratio setup or lower.
If you want a lot of torque 298:1 is really good but slow so it wont be racing around, however this does make it highly controllable, and great for climbing slopes or small obstacles.
Step 1: Equipment Required


- 6 x wheels for Micro metal motors
- 6 x Micro metal motors
- strips of angled plastic to use for motor holders
- 1 x Darkwater 640 6 x motor controller board for Raspberry PI https://darkwater.io/
- 1 x Raspberry PI Zero
- Plastic sheet or project box that can be used for chassis building
- Jumper wires
- Batters to regulated USB power supply board.
- Rechargeable Batteries for power
Step 2: Building the Chassis First Stage Axles and Motors


I decided to start with working out how to mount and secure my 6 motors. I had purchased in the past blue plastic rigid strips that had a 90 degree angle, I cut some of these to a length that seemed right my my plans.
Its a good idea to solder wires onto the motors before this step. I then got more of the blue plastic strips and boxed in the motors and used hot glue to secure them in place, creating a boxed motor and wheel assembly for each axle.
I then added a piece of 1mm thick plastic sheet to cover the axles, secured in place with more hot glue.
Step 3: Building the Chassis Up


Then turning over the work so far we can add another layer of sheet plastic to cover the tops of the axles.
Ensuring after some drilling the motor wires can get through the chassis so they can be connected to the motor controller.
Step 4: Adding the PI Zero and the Motor Controller


I added the PI Zero with the darkwater motor controller mounting on plastic spacers.
I then wired in the 12 wires going from the motors to the motor controller. If you are using a PI Zero W then you wont need to use a wifi dongle. I played around with using a small hub as well for extra add ons.
Step 5: More Body Building


I used more of the black plastic 1mm sheet to construct a sloping front to help it slide up and climb small obstacles.
I next added a hinge to the front so I could lift it up to get at the wiring and electronics when needed. For a lid I used a plastic project box.
Step 6: Adding Power


I next added a switch to turn on and off the main battery power. I decided to add the switch on the left hand side. I connected this to the power using a pack using 6 x AA rechargeable batteries. These from the power switch routed to two places, one an external power to the darkwater motor control board. Secondly power to the battery to USB regulated 5v power which allows the raspberry pi to be powered from normal batteries.
Step 7: Conclusion
Overall this vehicle worked well and I found it good to experiment with 6 wheel drive control. The darkwater 640 motor driver worked perfectly, and they provide a good library for its use. One other thing thats nice about their motor drivers is you can add a 9DOF accelerometer / gyroscope combination. Go to https://darkwater.io/ to see what is on offer.
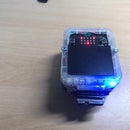
The fact this can all fit in the footprint of a PI Zero is great for space saving. I added an 8 x 8 Led matrix to the vehicle as well using it to display info or shapes I wanted.

Participated in the
Box Contest 2017


