

Introduction: A Florida Wedding Guest Book

This project got it's start as a request from my son and his fiancee for a unique guest sign-in wedding book. The sister of the fiancee saw something similar at another event (a plaque of another state). The idea was to have all the guest write notes and best wishes on the back with a Sharpie permanent marker.
The overall size of the project is 36X44X2 and is made out of Red Cedar. It took me approximately 2.5 weeks (Ok 3 weeks) to deliver the project. The construction is 2X8X8 and 2X4X8 red cedar. Held together with biscuits. It is coated with a clear semi-gloss spar urethane.
Tools I used in the construction are listed below:
Radial Arm Saw, Saber saw, Router, Plate joiner, Orbital/Belt sander, Bar clamps, Spot light and Camera tripod, Scissors, Box cutter,Paint brushes and a Big vacuum.
Materials:
2 each 2X8X8 red cedar, 1 2X4X8 red cedar, 10 #20 biscuits, Titebond III glue and Minwax Helmsman Spar Urethane (clear semi-gloss), Atlas (used to copy Florida), cardboard for mounting paper template, 3 each 2X2X1/4" plywood panels, Spray adhesive, 3' length of metal strapping
Pic #1: The completed project
Step 1: Make a Template


The template was made using paper copies of Florida from a United States road atlas taped together. Using a standard printer and the enlargement setting to 104% (for my map) each section was printed out. There is some trial and error with this step so be patient. For instance, after printing out the north and south sections I went to print the panhandle area an discovered that the scale was off. This was apparent when I tried to tape the map sections together. After two more copies I discovered the printer had gone to it's default settings.
Here are the steps I used after printing out the map sections;
1. Align map sections with it's mate
2. Secure sections with scotch tape
3. Trim excess paper away to the outline of Florida. I did not trim away all water areas because some will give support to the wood later on.
4. Secure paper template to some stiff cardboard (I used some 1/8" insulation panel I had available) with spray adhesive.
5. Using a sharp (new) box cutter blade to cut around the paper template. You need crisp edges. So change to a new blade if necessary.
6. Next is to enlarge the paper/cardboard template onto the 2X2X1/4" plywood. Now there is more than likely a better way to enlarge the template, but this technique worked for me. Mount the cardboard template on some stilts approximately 18" above the surface of the plywood panel.
7. Mount a spot light on to a camera tripod. Now adjust the height so you get a good shadow (turning out the lights helps). Trace the outline of the shadow with chalk on the plywood panels. Adjust the light around the template maintaining the same height till the outline is complete.
8. Using a saber saw cut out the enlarged template.
Pic #2: Completed paper template
Pic #3: Cutting the support material
Pic #4: The shadow enlargement
Pic #5 #6: The paper and plywood template
Step 2: Cut and Glue-up Stock


During this step the red cedar was prepared. The board edges were squared up and cut to length. Before you start your glue-up make sure you have cut the correct number of boards. Lay out your boards in the pattern you expect to use when they are glued together. Use the plywood template to check this. Biscuits were added to the board edges for strength. Apply glue to biscuits and the board edges and place in clamps for 24 hours. Clamps were used top and bottom. Several 2X4's were used to help keep the boards flat. After the boards are released from the clamps mark the side you wish to be front and center.
Note: Use chalk for all your marks, it sands out better
Tools used during this step.
Radial Arm saw: Cut the boards to length and square up edges
Plate Jointer: Used to cut slots for biscuits along the length of the board.
Pic #7: Board going through the Radial Arm during edge squaring process
Pic #8: Template on boards prior to glue-up
Pic #9#10 #11: Clamps used during glue up. Laying on the bench(#9) is the plywood template.
Step 3: Using the Template

During this step the glued up boards meet the plywood template.
This step is very straight forward. Place the boards on your bench, position the template and trace around it. I used pencil to do the tracing. This helps give a finer line and sanding is not a issue because it will be removed by the saw. Make sure to hold the template securely during the tracing process by using spring clamps. If any changes to the template are necessary make them now. I found one on my template during this step. I forgot to include the little bump out Florida has in the Jupiter area. I'm glad I paid attention during that Jupiter lighthouse tour.
Pic #12: Showing the positioned template on the glued boards
Step 4: Follow the Pencil Lead


This is another step that you need patience in. Make sure your surface is at good height and you have good sight of your line. The saber saw can wander if you go to fast. Use a new blade that has a fine cut. If you do it right you won't have to do much edge sanding.
Pic #13 #14: Cutting out the pattern. Boundary edges a surveyor could love.
Pic #15: The initial template and the negative
Step 5: Surface Preparation


This step is as tedious as getting the template prepared. There is a lot of sanding proceeding through several grits of sand paper (80-400). Don't skip this, it will show up later when the finish is applied. Also during this step you need to use the router and apply any details. My Florida has Lake Okeechobee and Florida bay visible. I also drilled the holes for the metal support at the top of the piece
After all the sanding is complete vacuum and wipe the piece throughly.
Pic #15: Show the completed pattern with the metal support band and the spar urethane
Pic #16 #17 #18: Different views of Florida bay and Lake Okeechobee
Step 6: Apply the Finish


Some prior testing of the wood you use is in order. In pic # 20 the wood looks bleached. In pic #21 you see how the same wood took on two different hues after just one coat of urethane.
Some people think I used a stain prior to the urethane but that is not the case it was all the urethanes fault. So test your type of wood and follow the instructions on the can. One other thing, when applying the urethane keep air movement to a minimum. Those pesky dust particles can play havoc on the final product.
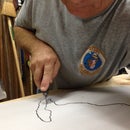
Four coats were applied sanding between coats. Only one coat was applied to the back because testing showed that the sharpie pens ink could rub off when more than one coat was used (Pic #20 upper left corner). A final coat of urethane was applied to the side with the writing to prevent any smudging several weeks later by my son.
Pic #22: The "Piece de Resistance"
Final note; Be creative and Be Safe. Use power tools properly, wear PPE when sanding. Thank You for reading my instructable. I try to answer any questions that may arise.

Participated in the
Homemade Gifts Contest

Participated in the
Wood Contest


