

Introduction: A Hand Woven and Hand Sewn Rag Rug


I recently decided try my hand at making a rag rug. I knit a couple of small rugs for my kitchen and decided that I needed one for my bedroom - but this time I wanted to try something different. My maternal Grandmother had a braided rug under the dining room table which I believe was made of wool. Although the colors were not my favorite, I remember being intrigued by the item. I even made my own version with braided yarn as a small child, though they were more coaster sized than rug size.
I rooted around in fabric bureaus, boxes, and bins to find quilting cotton remnants that I thought would work together to create a cohesive color scheme. In the end, I loved my first pink and green version so much, I decided I had to make another in purple!
Step 1: Preparing the Strips


The first thing I knew that I wanted to avoid was raw edges. I used a few scraps of muslin to test the best way to go about creating finished edge strips. What I ended up with were three inch torn strips that I folded and ironed to hide those dreaded raw bits. To start ripping, I would clip the edge of the fabric with a pair of scissors to start the process, and then tear along the entire length of fabric. This also ensures that the strips are on grain.
Once three of these folded strips of cotton were ready to go, I stitched the ends together, and started braiding.
When I came to the end of a strip, I would add another by stitching a torn strip to the short end, right sides together. That strip would then be taken to the ironing board to fold into a finished strip of cotton, ready for braiding.
I just had to remember to add my next strip of fabric while it was still long enough to reach from the sewing table to the ironing board.
Step 2: Braiding


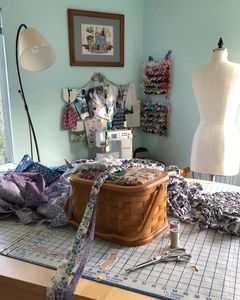
My trusty sewing basket was used as a sturdy anchor point, which made it much easier to braid the pieces together. As the braid got longer, I would simply re-pin the braid to the padded top of the box closer to the end of the braid.
Because I wanted a bit of consistency running through the entire rug, I purchased three yards of pink polka dotted cotton. I was expecting that I would have leftovers, but I ended up using the entire three yards for this rug.
Which means that I used up six yards of cotton scraps for the second and third strands of the braid.
It also made me reevaluate some of the tiny scraps of fabric that I have been hoarding - there is a limit to how useful micro remnants can be, and if I save every bit of cotton I will not be able to maneuver around the sewing room at all. And then I discovered the joys of paper piecing a hexi quilt and found a new use for tiny bits of cotton, but that is a story for another day . . .
Step 3: Lots of Hand Sewing


After a whole lot of braiding, the rope of fabric was ready to be stitched together.
The next, and most time consuming step, was hand stitching the braided cotton into a rug. I know there are a lot of online versions of rag rugs that use a machine zig zag stitch to attach the coiled braid, but where is the fun in that?! And to be honest, I am not a huge fan of how that ends up looking.
Starting with the end of the braid, I coiled the fabric around on itself and began stitching with cotton hand quilting thread (which is slightly sturdier than the polyester thread used for machine sewing). I contemplated using a button and carpet thread, but thought it would be overkill with the mid-weight quilting cotton.
I started out with fairly large whipstitches to join the braid together, but decided that smaller stitches would be stronger for a rug.
Step 4: Keep Everything Nice and Flat!


One of the most important things to remember is to keep the rug flat as you are stitching the braided coils together, or the finished piece is no going to lay flat!
The rug lived on my sewing table while it was being put together.
I would switch between tearing strips, ironing them, braiding, and stitching the rug together to keep things interesting.
Step 5: Shape Matters


For the pink and green rug, I was expecting to make a circular shape.
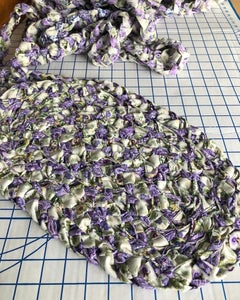
For the purple and green version, I wanted a more oblong shape. However, if you want an extreme oblong rug, you have to start with a very large loop of braid. What begins looking almost rectangular will soon round out and become almost circular. For the purple rug, I believe I only folded over 6 or 7 inches. I love the way it turned out, but in my mind I was expecting it to turn out a little less rounded.
Step 6: The Braiding Is Complete!


And that is what a completely hand stitched rag rug looks like!
Step 7: Felt Backing


But the project isn't quite finished just yet!
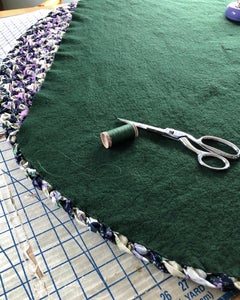
The final step was to back the rug with felt. This particular felt contains some rayon and is a little bit lighter weight than I would have liked, but I already had it on hand, so it was another stash buster! And if the backing deteriorates at some point, I can always replace it - the backing probably took an hour to cut and apply by hand. The rug, however, took a lot longer than that!
I also backed the purple version with felt. I needed a bit more width than I could find to cover the entire rug, so I pieced the outer edges.
Quilting thread was used to tack the felt in place. I figure if the felt gets gross or wears out over time, it will be easy to replace. Meanwhile, the felt is protecting all my hard work with the cotton!
Step 8: All Done!


For the pink version, my finished rug is approximately 36 inches in diameter. I estimate that I used about 42 yards worth of braided cotton (which took approx. 9 yards total of 45" quilting cotton) to end up with a fairly small rug, so yes, this is a fabric hog. But in the end, I cleared out a small portion of my stash and did not add yet another garment to my very full closet(s).
I am by no means finished with garment sewing, but this was a very enjoyable sewing experience that took me a little bit out of my comfort zone, and I am thrilled with the results!
Participated in the
Weaving Challenge


