

Introduction: A Much Safer Table Saw Taper Jig


My neighbour who knows I do a bit of woodworking asked me to cut some angles in some wood, he is making a dovecote. To do it properly I made an angle jig... or at least I thought I had made it properly, I posted a picture of it on a woodworking Reddit sub.
A lot of the comments ranged from 'looks a little dangerous' to 'oh my, I fear for your life'...
I decided to make a better, safer version. I'm really pleased how it came out, it is also more functional.
Supplies
A piece of 18 mm ply (sized to your table saw).
1 or 2 pieces of wood for mounting the clamps to.
2 x 8 mm coach bolts.
2 x 8 mm nuts.
2 x Bessey Horizontal Hold-Down Self-Adjusting Toggle Clamp
Some screws and glue to hold it together
Table saw
Angle grinder with metal cutting disc
Router mounted in table, 12 and 8 mm router bits
Step 1: Base T-slot and Bolts


Not having any t-bolts to hand I need to make my own, I took a couple of 8 mm coach bolts, trimming off the sides with an angle grinder gave me perfect t-bolts.
The reason for squaring off the bolt head is so that it doesn't turn in the slot when you tighten it down (during use).
Next was to cut a receiving slot into the baseplate.
With the 12 mm router bit I cut a slot, this slot needs to be just over the depth of the head of the bolt.
When cutting the slot you need to stop it short of both sides, to do this I pencilled two mark on the router table fence, this allowed me to plunge the wood about 30 mm from the first side and stop before the other.
Now, without moving the router table fence, swap out the bit for the smaller 8 mm bit. Not moving the fence ensures the next slot is perfectly centred on the previous one. This second slot also needs to stop before the ends and is for the bolt to pass through the baseplate.
Don't change the router bit... You'll need it in a moment.
Step 2: Making and Mounting the Runner


One of my ways to make the jig safer was to attach it to a runner, eliminating the chance of the jig moving away or worse nearer to the blade.
I needed to make a runner that was tight but not too tight that it couldn't slide.
Using a piece of hardwood (sorry don't know the type) I cut a strip to the correct width.
I used a zero clearance insert in my saw as the next cut was going to be narrower than the gap in the normal insert. If you don't have a zero clearance insert, they are pretty easy to make, mine is just 12 mm MDF.
The second cut was to trim the runner down to just below the depth of the t-slot, you want to do this so the baseplate will sit squarely on the saw table.
To attach the baseplate to the runner, space the runner slightly off the bottom of the t-slot, I used a couple of thin strips of wood but in the past I've used washers. So long as you can raise the runner above the level of the table that will work.
Add a couple of drops of superglue (CA glue) to the top of the runner, both ends and in the middle. Coat the rest of the runner with wood glue.
Now raise the blade as high as it will go, you'll use this to align the baseplate. Holding the baseplate against the blade lower it to the runner, press it down to allow the superglue to grab.
Carefully lift the baseplate and flip over, you now want to drill a few countersunk holes in the runner, finally secure the runner with some screws.
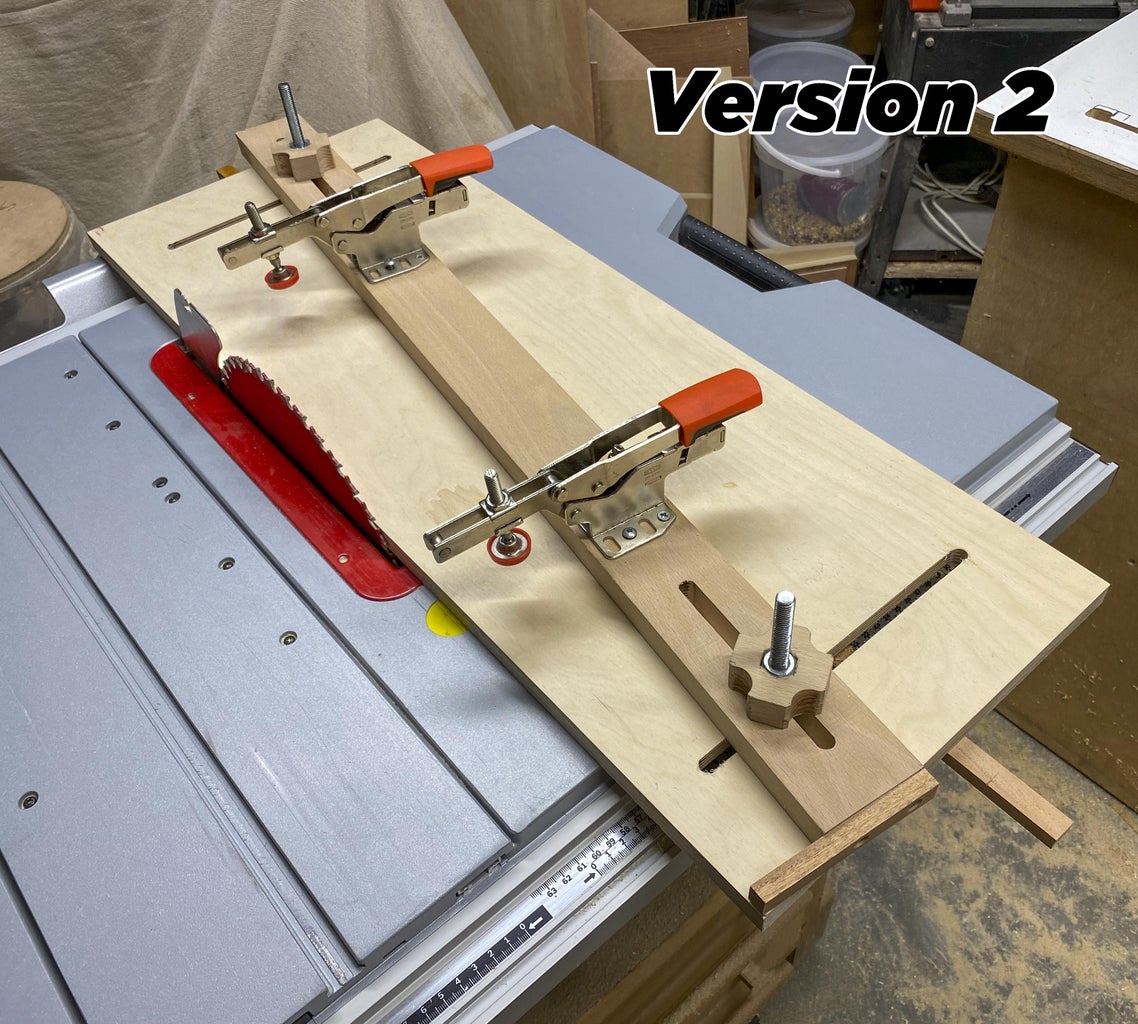
Step 3: Hold Down Bar


The clamp hold down bar is next, I made two of these. The first one will have the clamps screwed into and this was made of hardwood (maple) and the second was just a riser, this was made of a piece of pine.
Both pieces were 845 mm x 65 mm x 18 mm.
These pieces need slots cut in them to allow for the bolts.
Start by centring up the bar with the router bit, then cut I used the same stop marks on the fence to allow me to plunge the wood onto the router. To make the slot all the way through I made 3 or 4 passes.
Step 4: DIY Hand Wheels


I had originally planned to use a spanner to tighten down the bar but I tried this a couple of times and it was dreadful.
With this in mind I determined to make some handwheels.
I took some maple hardwood and cut a couple of 50 mm squares.
Onto these squares I marked out the outline of the 8 mm nuts. I then carefully chiselled the outline, clearing out the middle, a couple more goes around the outline took it to the depth of the nut. You'll need to drill out a hole though the dead centre of the cutout, this is a clearance hole for the bolt.
To make the handwheel more comfortable I took off the corners with a 19 mm forstner bit.
As you can see in the video the wheel spins very easily.
I will be making my own handwheels in the future, so easy, cheap and completely configurable to your needs.
Step 5: Clamp Bar


With the clamp bars cut and slotted next was to add the clamps and sacrificial end stop.
The end stop is easy, just take a small piece of scrap and screw it to the end of clamp bar. This stop will allow you to make repeatable length cuts it also enhances the safety helping to stop kickbacks.
I had to make a guess as to where to place the clamps but as these are only screwed down they could be moved in the future if not in the correct location.
As you can see in the 8th picture when the blade is at its highest point it just clears the underside of the clamp. I would love to say this was as designed but it was a happy fluke
In the last picture you can see the riser bar, this is necessary if you have a taller piece that needs cutting. Just remove the clamp bar, put the riser underneath and reattach the clamp bar.
These Bessey clamps are amazing, within reason they can automatically adjust for the height of the clamping. With a 60 mm clamping distance and 40 mm height adjustment, along with the riser bar there is a huge range of sizes this jig will accommodate.
Step 6: Taper Cuts


The main usage for this jig will be for putting the classic double tapers onto table and cabinet legs.
The first cut is made and then the piece is rotated 90º, by ensuring the edge is against the clamp bar and the end is against the end stop a perfect double taper can be achieved.
In the last image you can see the maximum cutting angle, this is about 18º.
Step 7: Vampire Spikes

Hitting all four sides with a tight taper gets you an incredibly sharp spike... Good luck out there Van Helsing.
Step 8: Straight Edge


Another use for the jig is to cut a straight edge on to a piece of wood that can't be run against the fence.
The clamps hold the piece so it can be run through the saw without the need for a straight edge on the other side. Perfect if you don't have a jointer.
Hopefully you have found this Instructable useful, if so please give it a vote in the 'Build a tool' contest.

Second Prize in the
Build a Tool Contest


